
Installation manual


Page 22
3 Installation Procedures For eco6 Guard Fan
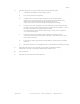
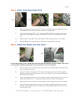
Step 1, Install Mounting Assembly
For Wall-Mounted Applications
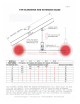
Fig 14
A)
B)
C)
D)
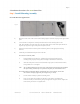
Mark a level line on the wall at the desired mounting height to locate the top edge of the upper mount
plate.
Use the mount as a template to carefully mark the locations of the mounting holes on the
wall. There should be six holes total: four in the upper plate and two in the lower plate. Be sure to
align the top edge of the upper mount plate with your level line.
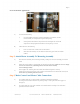
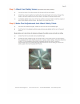
Remove the mount from the wall and pre-drill mounting holes for the appropriate mounting
fasteners.
Attach the pre-assembled mount/pivot unit to the wall.
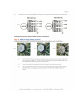
For concrete or masonry walls:
i)
ii)
Note:
Insert Red Head or equivalent 1/2" self-anchoring studs (not included) into the
mounting holes, properly securing them according to manufacturer's instructions.
Slide the mount plates over the studs and attach using nylon lock nuts and flat washers,
being careful not to over-tighten.
We recommend that nylon lock nuts not be removed and reused because this will defeat
the nylon locking; instead, buy new nylon lock nuts from your local hardware store.
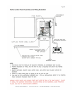
For wood surfaces (wood studs): Before mounting the fan to a wood surface, ensure that
the structure will safely support the fan's weight (see spec. sheet).
i) Line the mount assembly up with the mounting holes.
ii) Insert 1/2" lag bolts (not included) into the holes, using washers to maximize the
hold. Be sure that you use bolts long enough to support the weight of the fan. Tighten the
bolts securely, but do not over-tighten them.
MacroAir, Inc. www.macroairfans.com Toll Free: 866-668-3247 Build: March 2012