
Installation manual


Page 19
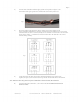
B) Install extended blade safety links . This step is REQUIRED — omitting it will void
manufacturer's warranty!
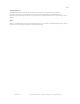
Fig 12
i)
ii)
iii)
iv)
v)
vi)
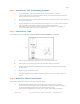
On top of one blade, place a safety link, so the long leg lines up with the holes in the blade.
Put a bolt through the outer blade hole just to hold the link in place — don't put a nut on it at
this point, though.
On top of the next blade, place a second safety link so that the short end is on top of the
previous safety link. (See Figure 2 above).
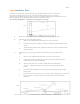
Line up the inner hole of the blade with the holes in both safety links. Put a bolt through
each of the holes on this blade.
Securely tighten an included nylon lock nut onto each of the bolts, using an
included flat washer between the nut and the blade. The safety link will bend
when the nut closest to the hub is tightened due to the angle of the blade struts.
Repeat for the rest of the blades.
Once the starting point is reached, slide the final safety link between the short
end of the first safety link and the blade. Follow steps iii and iv to attach like the rest.
C) Check that all bolts are tightened firmly —- blade bolts require 23 ft-lbs of torque. Blades
should not rattle when the fan is running.
Step 10, Check Clearances And Guy Wire Tension For Safety
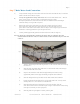
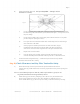
A) Rotate the fan slowly one time by hand to find the position and blade with the least
clearance from any possible obstructions. If necessary, reposition the fan to prevent any dangerous
conditions.
Note: At rest, the blade tips droop lower than they will be in operation due to gravity. For our
largest fans, this deflection can be approximately one foot.
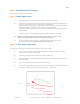
B) Double check guy wire tension by attempting to move the fan in any horizontal direction
and by trying to pull down on the guy wires. They should be very difficult to move. If
there is visible slack in any guy wire or if any moves easily, re-tension them before proceeding.
MacroAir, Inc. www.macroairfans.com Toll Free: 866-668-3247 Build: March 2012