
Installation manual


Page 18
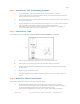
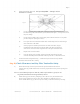
1) Attach the tool to a 3/8 inch drive ratchet.
2) Loop the tool through the free end of the guy wire between the
clamps and turn clockwise as far as possible.
3) Tighten the inner clamp to hold the tension.
4) Repeat until all excess slack is out of the wire.
vi)
vii)
viii)
i x)
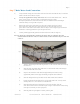
Loosen the outer cable clamps, pull the slack out of the free end of the wire, and position the
clamp about 18 inches from the inner one.
Re-tighten the outer clamp and double-check that the inner clamp is tight. Be sure the u-
bolt is over the free end of the wire to prevent slipping.
Repeat for all guy wires.
Re-check all clamps for tightness.
Step 9, Install Fan Blades and Blade Safety Links
A) Install the fan blades.
i)
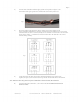
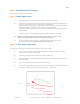
Blades should curve toward the floor (thin edge down) when correctly installed.
Whisperfoil XL blades (our standard blades) use a black extruded-aluminum
blade strut that will only allow the blade to be attached in one direction. This blade strut
has an index line in the center of one side, which should face the direction of airflow
(usually down).
Whisperfoil and Wickerbill blades use a flat steel blade strut that does not restrict
the direction the blade can be installed. Extra attention to blade direction is required
when installing these types of blades.
Fig 11
(If you are installing an inverted-blade fan (rare), the blades should curve away
from the floor. ONLY install the blades in this direction if you want the fan to blow
air up. Unless ordered from the factory as an inverted-blade fan, the blade
holders will need to be reversed for this; consult the factory before doing so.)
ii)
iii)
iv)
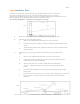
Slide one blade over any blade holder. For Whisperfoil XL blades, be sure the index line
of the blade holder faces down (up for inverted applications). For Whisperfoil or
Wickerbill blades, be sure the blade curves downward.
Line up the bolt holes in the blade with the holes in the blade holder.
Repeat for each blade.
MacroAir, Inc. www.macroairfans.com Toll Free: 866-668-3247 Build: March 2012