
Installation manual


Page 17
Step 8, Install Guy Wires
If an extension is installed, be sure to use the longer guy wires packaged with it. Be sure to use four guy
wires, with two clamps per end (four per guy wire). Keep the angle formed by the guy wire and the
ceiling less than 45 degrees. If longer guy wire is required, it is available inexpensively at most hardware stores. Eye
bolts (not supplied) are recommended to attach the wires to the building structure.
Note: This step is REQUIRED — omitting it may void manufacturer's warranty!
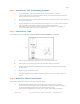
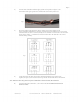
Fig 9
A) Be sure to avoid any sharp corners to avoid fatiguing and fraying of the guy cables.
B) Attach the guy wires to the building structure.
i)
ii)
iii)
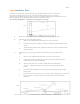
Slide two of the supplied small cable clamps over one end of the wire.
Feed that end of the wire through the eye bolt (not supplied) and back through the cable
clamps.
Tighten the cable clamps securely, keeping the u-bolt side over the free end of the cable —
see figure10 below.
C) Attach the guy wires to the loops on the lower section of the fan, one wire per individual
loop.
i)
ii)
iii)
iv)
v)
Slide two of the supplied small cable clamps over the near end of the wire.
Feed that end of the wire through the guy wire loop on the fan and back through the
clamps, taking all the slack out of the cable.
Slide one clamp as close to 18 inches as possible from the fan and tighten it
securely — it needs to hold the free end of the wire in place during the tensioning
process.
Position the other clamp about two inches from the fan and tighten it just far enough to
hold it in place.
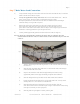
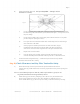
Remove the rest of the slack, one guy wire at a time, using the included guy wire wrench (see
Figure 10 below). It is advisable to put a level on the hub to be sure the fan remains
horizontal.
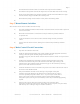
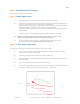
Fig 10
MacroAir, Inc. www.macroairfans.com Toll Free: 866-668-3247 Build: March 2012