
Installation manual


Page 15
Step 7, Make Motor Lead Connections
A)
B)
C)
D)
Verify controller voltage; this can be found on the lower left corner of the MCP's door, as well as the
sticker on the side of the VFD (see "input").
Use only the supplied motor cable for motor leads, and be sure to attach all four wires — three for
power, one for ground. The 25 foot cable is recommended to prevent voltage
and frequency fluctuations, which could cause the motor to malfunction and/or be damaged.
Consult the factory if a longer cable is required.
Route motor cable away from all other power and control cables. Keep motor cable at
least 6 inches away from input power and control wiring. If the motor cable must cross
power cables or other motor control cables, make sure they do so at 90 degree angles to minimize
interference. Avoid long parallel runs to prevent signal crossover.
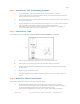
Correctly install supplied cable glands at both ends of the motor cable (see Figure 6).
Note: For all fans, one cable gland will be attached to the motor cable. For 1 HP fans, the second
will be threaded into the motor J-box; for all other models, it will be attached to the power unit with
a cable tie.
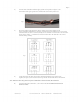
Fig 6
i)
ii)
iii)
iv)
v)
vi)
vii)
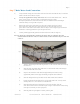
Take the cable gland apart and slide the gland nut over the end of the cable, threads facing
the cable end.
Slide the plastic and rubber cable gland insert over the end of the cable, with the larger
end toward the middle of the cable.
Strip the outer insulation of the cable back approximately three inches, leaving
approximately half an inch of copper foil sticking out past the outer insulation.
Slide the cable gland insert up the cable until it is flush with the outer insulation.
Peel the foil shield back and fold it down over the cable gland insert. You may need to
carefully make 2 or 3 cuts in the foil so it will fold back.
Slide the threaded part of the cable gland over the end of the cable, long side
down. Work it down over the insert until only the "fingers" of the insert are visible, turning
either piece as necessary to ensure a proper fit.
Slide the gland nut up and tighten it securely onto the gland.
MacroAir, Inc. www.macroairfans.com Toll Free: 866-668-3247 Build: March 2012