
Installation manual


Page 13
Step 2, Attach Power Unit To Mounting Hardware
A)
B)
C)
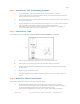
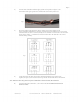
We recommend using a scissor lift to install our fans. The best method is to place the
power unit hub-down on the lift and raise the lift until the power unit frame touches the bottom of
the universal mount or extension (if used).
Once the motor frame is in contact with the mount/extension, maneuver the power unit as necessary to
line up the mounting holes.
Securely attach the power unit to the mount/extension using the ½" x 1½" bolts, washers, and nylon
lock nuts included in the mounting hardware kit. Be sure to thoroughly tighten
all four bolts and nylon lock nuts to prevent vibration-related loosening. Correct tightening is
extremely important. Again, do not re-use nylon lock nuts.
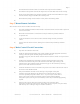
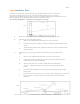
Step 3, Attach Safety Cable
Refer to figure 5 as necessary. This step is required, omitting it will void manufacturer's warranty!
Fig 5
A)
B)
C)
D)
E)
Slide two of the supplied large cable clamps over each end of the safety cable.
Make a loop in one end of the cable, sliding the end back through the cable clamps.
Feed the other end of the safety cable through the loop, making sure that the cable goes through
the motor frame.
Repeat step B for this end of the cable.
Tighten the clamps securely, making sure that the u-bolts are over the free end of the cable, see
Figure 5.
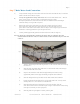
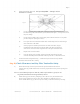
Step 4, Mount The Motor Control Panel
Select a location for the MCP (Motor Control Panel) and mount securely.
A)
The MCP should be mounted so that no more than 25 feet of motor cable is required to
connect it to the fan motor. Mount it in the upright position, vertically, with the door opening to
the left. Do not mount so that the door opens downward. The mounting
surface must be non-flammable, away from sources of heat, dust, moisture, and vibration.
MacroAir, Inc. www.macroairfans.com Toll Free: 866-668-3247 Build: March 2012