
Instruction manual


55
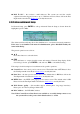
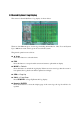
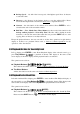
8.1 Search By Time
The screen for Search By Time is shown on the right
side.
The Status field will show the ‘Recorded from’ time
based on the selected Video/Audio before searching -
alarm partition if any of Alarm, Motion or Video Loss,
is checked and normal partition if Normal is checked.
The general operations are as below:
▲▼
Press these buttons to select the items.
ESC
Press this button to escape from this screen and return to split-window display.
SEARCH / MODE
Press this button to start searching the recorded video/audio with the selected search time
and video/audio type for playback. The search result will be shown on the bottom of this
dialog if it failed. If there’s no camera in playback mode, up to 4 cameras in the
current split window will be set to playback mode.
Play Button ( )
Press this button to start playing the recorded video/audio with the selected search time
and video/audio type. If there’s no camera in playback mode, up to 4 cameras in the
current split window will be set to playback mode.
Copy Button ( )
Press this button to backup (copy) the selected type of recorded video/audio starting from
the Search Time (described below) in the HDD to the connected backup device without
playback. The Backup display (described in Section 8.4) will be shown. Please note that
this kind of backup is performed in the background and the user can still do almost
all the operations.
Following is a brief description for each item and its specific operations:
Search Time – (Year, Month, Date, Hour, Minute) for the recorded video/audio. The
playback (or backup) will start from the time entered here when the user press the
playback buttons (or Copy button) later. Press +/- buttons to modify each item.
Video/Audio – (Alarm, Motion, Video Loss, Normal). Check the types of the recorded
video/audio you want to search for playback. Press ENTER to check/uncheck each item.