R2-3500 Digital Media Player/Recorder User Manual May 26, 2009 - v1.0 Firmware: 20090512 The diagrams and images contained in this document may not fully represent the actual product and are there for illustration purposes only.
R2-3500 Media Player/Recorder Table of Contents Table of Contents 1 Getting Started ........................................................................................................................ 1 1.1 1.2 1.3 2 Basic Operation....................................................................................................................... 9 2.1 2.2 2.3 2.4 2.5 2.6 2.7 3 Video In ............................................................................................................
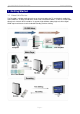
R2-3500 Media Player/Recorder Getting Started 1 Getting Started 1.1 About this Device The R2-3500 is a digital media player that can be connected to the TV and playback media files from USB drives, its internal hard drive, media cards and network folders, as well as record videos directly to its internal SATA hard drive. It supports high definition video playback, offers digital HDMI output and features both scheduled recording and time shifting.
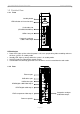
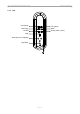
R2-3500 Media Player/Recorder Getting Started 1.2 Detailed View 1.2.1 Front Standby button LED indication & infrared receiver Card reader slot (SD/SDHC/MS/MSPro) USB#1 host port Composite analogue audio & video input LED Indication Power LED; lights up blue when the power is ON, turns purple during video recording and turns off when system is in standby mode. Standby LED; lights up orange when the system is in standby mode. LAN LED; lights up yellow during network activity.
R2-3500 Media Player/Recorder 1.2.
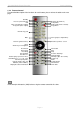
R2-3500 Media Player/Recorder Getting Started 1.2.4 Remote Control For a detailed description of the functions for each button, please refer to the table on the next page.
R2-3500 Media Player/Recorder Button Power Source Rec List Browser Setup TV System Timer Audio Copy Mute Go To Zoom In Zoom Out Return Delete Rec Pause/Step Play Stop FR/FF Prev/Next Slow Ins Replay CM Skip 1/All A-B Music Volume Display Subtitle Guide Time Shift Getting Started Function Turns system ON or puts it into stand-by mode. N/A (only one source available, Video1 = Composite audio/video) Opens context menu to rename or delete the selected folder/file in the browser menu.
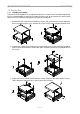
R2-3500 Media Player/Recorder Getting Started 1.3 Before Use 1.3.1 Hard Drive Assembly The internal SATA hard drive is not required for the basic functions of the R2-3500 media player but it is recommended to install a drive in order to make use of all the functions this device offers and also have a convenient storage place to store your media files. 1. Remove the two screws from the bottom, push the side cover from the front to slide it off the back and lift it off the case.
R2-3500 Media Player/Recorder Getting Started 1.3.2 Formatting the Hard Drive Formatting the internal drive is necessary in order for the R2-3500 media player to access the drive and record videos or stores files on it. Note Formatting the hard drive will erase all data on it! If you have some files on it already, make sure to back them up to a different drive first, before you start the formatting process. 1.
R2-3500 Media Player/Recorder Getting Started 3. Confirm the next dialog and start formatting by pressing Format. During the process, do not turn off the power or interrupt the device in any other way. 4. Once the formatting has completed, a new Congratulation dialog will appear. Press OK to close it and exit the disk utility. The device will restart automatically. Note The R2-3500 media player will be able to write to the first FAT32 partition only.
R2-3500 Media Player/Recorder Basic Operation 2 Basic Operation 2.1 Turning on the Power Connect the power supply to your R2-3500 media player and plug it into the wall socket. The device will start up automatically. During the start up, a splash screen will be shown and as soon as it’s ready, the main screen with further options will appear.
R2-3500 Media Player/Recorder Basic Operation 2.4 Transferring Files (File Copy) To enter the file copy menu, select File Copy from the main screen or press the Copy button on your remote control. This function allows you to copy files back and forth between different devices, such as attached USB drives, media cards, the internal SATA drive and shared network folders. To copy files, select a source from where to copy and a destination where the files are to be copied.
R2-3500 Media Player/Recorder Basic Operation 2.6 Setup Menu (Setup) To configure the settings of the R2-3500 media player and for more details, refer to chapter 4. 2.7 Scheduled Recording (Timer REC) To open the recording schedule, select Timer REC from the main screen. This function allows you to create, edit and delete recording schedules as well as view the current status and history of the recordings.
R2-3500 Media Player/Recorder Examples 3 Examples 3.1 Video In The R2-3500 media player can record from a VCR, set top box, DVD player or camcorder as an example but it will only record whatever the current input on its AV in connectors is. For the recordings to work, make sure that the device connected to the AV in port is turned on and playing or the correct channel on your TV is selected. If there is no input, the recording will fail.
R2-3500 Media Player/Recorder Examples 3.1.2 Time Shift 1. Select Video In from the main screen. 2. Press the Time Shift button on your remote control to start the time shift function. The time shift function will be initialized and the recording starts. 3. Once the recording message disappears, you can use the Play, Pause and FF/FR buttons for playback control just like when watching recorded videos. 4. Press the Display button to hide and show the navigation screen.
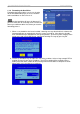
R2-3500 Media Player/Recorder Examples 3.2 File Copy 3.2.1 Transferring files from USB to HDD 1. Select File Copy from the main screen or press the Copy button on the remote control. 2. Use the Up and Down buttons to select the source and press Enter to confirm it. Use the Up and Down buttons to select the destination and press Enter to confirm it. 3. Use the Up/Down and Enter buttons to locate and highlight the file. Press the Play button to place a tick behind the selected file.
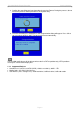
R2-3500 Media Player/Recorder 4. Examples Press the Right button and select the destination. 5. To create a new directory, select NEW-DIRECTORY and press Enter. Use the virtual keyboard to name the new directory and select OK to create the new folder. 6. Once the destination has been defined, press the Right button to continue. Confirm the dialog by selecting OK and pressing Enter. 7. The file(s) will be copied to the destination.
R2-3500 Media Player/Recorder Examples 3.3 Browser 3.3.1 Playback Media Files 1. Select Browser from the main screen or press the Browser button on the remote control. 2. Use the Right and Left buttons to filter the content by media types (Music/Photo/Movies) or select All to display all types. 3. Use the Up/Down and Enter buttons to locate the media file(s). 4. For images and videos, a small preview is shown.
R2-3500 Media Player/Recorder Examples 3.3.2 Browse the Local Network 1. Go to the Network category in the Setup menu and make sure the device is configured correctly and has successfully acquired an IP address. 2. Select Browser from the main screen or press the Browser button on the remote control. 3. Select NET and press Enter. 4.
R2-3500 Media Player/Recorder Examples 5. Select a shared folder, in this example the Taurus LAN NAS and press Enter to access it. 6. Select one of the available shares and press Enter to access it. 7. If required, enter an ID and password to login. Select the ID and press Enter to open the virtual keyboard in order to enter your user ID. Confirm it by selecting OK. Repeat the same steps for the password.
R2-3500 Media Player/Recorder Examples 3.3.3 My Shortcuts If the shared folder can not be found by browsing the local network or just to add a shortcut manually, in order to quickly find and access a certain folder, use My Shortcuts. 1. Select Browser from the main screen or press the Browser button on the remote control. 2. Select NET and press Enter. Select My_Shortcuts and press Enter again. 3. Press the Rec List button on the remote control to open the context menu. Select Add and press Enter.
R2-3500 Media Player/Recorder Examples 4. Select the user ID, press Enter and use the virtual keyboard to enter the correct login. Do the same for the password and then use the number keys to enter the IP address. Press OK and confirm the next dialog by selecting OK and pressing Enter to save the settings. 5. For the advanced user, before saving the settings, click on Detail to show more options. It will now also be possible to modify the label of the shortcut, add a domain and add a host name. 6.
R2-3500 Media Player/Recorder Examples 3.3.4 Editing Files 1. Select Browser from the main screen or press the Browser button the remote control. 2. Locate the file or folder that you would like to modify. Only files on a drive formatted using the FAT32 file system can be modified. 3. Highlight the file or folder and press the Rec List button on the remote control to open the context menu. 4. Select Rename and press the Enter button to open the virtual keyboard and rename the file. 5.
R2-3500 Media Player/Recorder Examples 3.4 Timer REC 3.4.1 Creating Schedules 1. Select the Timer REC from the main screen or press the Timer button on the remote control. In the Edit category, select Add a new schedule and press the Enter button. 2. Modify the settings according to your preferences. The Source is set to Video 1, which is the AV in connection on the front of your media player. The start time and recording length can be set with the Up and Down buttons.
R2-3500 Media Player/Recorder Examples 4. Before the scheduled recording starts, a reminder will announce that recording will start shortly, so make sure that the device connected to the AV in is turned on and playing or the correct channel on your TV is selected. During the recording, the status will change to Lock. 5. Once the recording is finished and if the repeat mode was set to once only, the schedule will be removed from the list.
R2-3500 Media Player/Recorder Examples 3.4.2 Editing Schedules 1. To edit an existing schedule, use the Left/Right buttons and go to the Edit menu. 2. Select one of the schedules from the list and press Enter to modify it. 3.4.3 Deleting Schedules 1. To delete an existing schedule, use the Left/Right buttons and go to the Delete menu. 2. Select one of the schedules from the list and press Enter. 3.
R2-3500 Media Player/Recorder Setup Menu 4 Setup Menu To enter the menu, select Setup from the main screen (press the Guide button to return to the main screen if you are somewhere else) or press the Setup button on the remote control. Use the arrow keys on your remote control to navigate the setup menu, use the Enter key to open and confirm settings, and use the Return key to cancel out of a menu. 4.1 Audio 4.1.
R2-3500 Media Player/Recorder Setup Menu 4.2.4 Aspect Ratio Set the TV aspect ratio, depending on your display and preferences. Pan Scan: For standard 4:3 displays (full screen but cuts off the sides for widescreen films). Letter Box: For standard 4:3 displays (adds black bars on top and bottom for widescreen films). 16:9: For 16:9 widescreen displays (full screen). 16:9 Wide Screen 4:3 Letter Box 4:3 Pan Scan 4.3 REC 4.3.1 Permanent Time Shift Option to enable or disable the time shift function.
R2-3500 Media Player/Recorder Setup Menu 4.4 Network 4.4.1 Wired LAN Setup Cancel: Returns to Network menu without making any changes to the network setup. DHCP IP (Auto): Automatically acquires IP address and network information from DHCP server. Fix IP (Manual): Allows the administrator to set a fixed IP address, subnet mask and gateway. 4.4.2 Wireless Setup Connection Mode: Depending on your wireless setup, select either Infrastructure (AP) or Peer to Peed (Ad Hoc).
R2-3500 Media Player/Recorder Setup Menu 4.5 System 4.5.1 Menu Language Select your preferred menu language from the list of available languages. English Traditional Chinese Japanese Spanish French German Italian Korean Dutch Simplified Chinese 4.5.2 Text Encoding Text encoding for external subtitles (SRT). Unicode (UTF8): Standard encoding suitable for most languages. Simplified Chinese (GBK): Select this when your subtitles are in Simplified Chinese. 4.5.
R2-3500 Media Player/Recorder Setup Menu 4.6 Photo 4.6.1 Slideshow Timing Select an interval time for the slideshow from the list of presets, ranging from 2 seconds to 2 minutes or disable the automatic slideshow by selecting Off. 4.6.2 Transition Effect Select Off to turn the transition effects off, select All Effect Shuffle to use a random effect or select one of the presets from the list. Cross Fade: Fades in and out. Left to Right: Loads new image from left to right.
R2-3500 Media Player/Recorder Appendix 5 Appendix 5.
R2-3500 Media Player/Recorder Appendix 5.2 Precautions Before using your R2-3500 media player, please carefully read the following paragraphs relating to the safety issues of your device. 5.2.1 Power on/off precautions The R2-3500 remote control provides the power ON/OFF button that controls the power status of your device when connected to the TV. It is highly recommended to switch the unit off when not in use.
R2-3500 Media Player/Recorder Appendix 5.3 Trademarks MS-DOS, Microsoft, Windows 2000/XP/Vista are trademarks of Microsoft Corporation. Apple Macintosh and Mac are trademarks of Apple Computer. Dolby® and Dolby® Digital are registered trademarks of Dolby Laboratories, Inc. “Memory Stick” and “Memory Stick PRO” are trademarks of Sony Corporation. All other third party brands and names are the property of their respective owners. 5.4 Important Notices 5.4.
R2-3500 Media Player/Recorder Appendix Q: I can not see anything on my TV screen but the media player is connected and turned on! A: If the device is connected correctly and turned on but there is no output, we recommend first removing the power supply and reconnecting it. If after 2 minutes there is still no signal, press the TV System button on the remote control to change the video output until you see the main screen.