
User manual


Hydra S2 User Guide
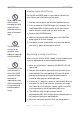
To enter the RAID
tton
k
n
setup menu, press
and hold the
CONFIRM bu
for 3 seconds until
the three RAID
mode LEDs blin
two times. Use the
MODE button to
select the new
RAID mode and
then press the
CONFIRM butto
within 10 seconds
to confirm the new
setting.
Changing the RAID
e
setup will require
you to re-format th
drives. Make sure
you backup all data
before doing so.
When only two hard
drives (A &B) are
nored.
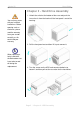
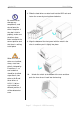
Front View
LED indication and buttons as seen beneath the front panel of
the Hydra S2.
installed, the
blinking LEDs for C
& D can be ig
ailed View Det
LED or
Status or Function
Button
POWER
• OFF = Power off
• Blue = Power on
BIG
• Yellow = BIG mode active
(JBOD spanning)
FAST
• Amber = FAST mode active
(RAID 0 striping + striping)
SAFE
• Green = SAFE mode active
(RAID 1 mirroring)
SAFE &
FAST
• Green & Amber = SAFE II mode active
(RAID 10 mirroring + striping)
ERROR/
REBUILD
• Red = Error
• Green = Rebuilding data in SAFE mode
ACCESS
• Blue = Ready for data access
• Blinking = Accessing data
CONFIRM
• To change and confirm the RAID mode
(press 3 seconds to enter setup menu)
MODE
• RAID mode selector button
HDD
A, B, C, D
• Green = HDD status OK
• Blinking red & green = Error or no HDD
• Blinking red & solid green = Data access
• Blinking green & solid red = Rebuilding
Page 2 / Chapter 1 - Introduction