D7-DMA Digital Media Adapter User Manual & Installation Guide October 15, 2007 v1.
D7 User Guide Table of Contents CHAPTER 1 - INTRODUCTION 1 [SECONDARY DNS] 7 [DEFAULT GATEWAY] 7 [AOL] 7 WIFI SETUP 8 [PREFERRED] 8 THE D7-DMA 1 [AVAILABLE NETWORK] 8 PACKAGE CONTENTS 1 [SSID] 8 SYSTEM REQUIREMENTS 1 [CONNECTION] 8 PC REQUIREMENTS 1 [SECURITY] 8 TV REQUIREMENTS 1 [KEY] 8 INTERFACE INFORMATION 2 TIME SETUP 9 REMOTE CONTROL 3 UPDATE ROM 9 [TV MODE] 3 [SETUP] 3 [VOLUME] 3 [RETURN] 3 [INFO] 4 [SUBTITLE] CHAPTER 3 – USB HOST 10 CHAPTER 4 – N
D7 User Guide Chapter 1 - Introduction The D7-DMA The 'D7' Digital Media Adapter is the perfect gateway for your living room, linking up your PC, TV, stereo, digital camera and much more. Great design coupled with playback support for all kinds of standard media formats and simple installation makes it the perfect all-in-one multimedia solution. Product Dimensions: 16.5cm x 16.5 cm x 3.2 cm 6.50” x 6.50” x 1.
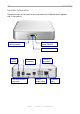
D7 User Guide Interface Information Following images are for reference only and show the D7-DMA without the optional 802.11 b/g antenna.
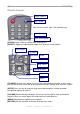
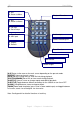
D7 User Guide Remote Control Power ON/OFF No Function Input for time, search, login, URL and other text. Input Selector Clear (Backspace) [CLEAR] Delete a letter or number when entering text. [SELECT] Toggle text input between upper case, lower case and numbers. No Function TV Mode Setup Volume Adjustment Mute Sound Navigation Keys Menu Return [TV MODE] Each time this button is pressed, the video output will change.
D7 User Guide A: N/A B: Return to Menu Playback Functions A: N/A B: Return to Home A: File Info B: Go to Setup A: Time Search B: URL input Audio output Subtitle encoding/OFF A: Repeat B: Refresh Zoom Function No function No function Rotate Images [A-B] Return to the menu or the main screen depending on the present mode. [REPEAT] Return to the main screen. [INFO] Go to the setup menu or show file info during playback. [EDIT/PROGRAMM] Go to URL or time search during playback.
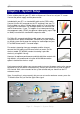
D7 User Guide Chapter 2 - System Setup Find a suitable place for your D7, within a distance of 1.2m or less of your TV screen. Connect the power supply and the power outlet. Included with your D7 is a standard AV cable and a YPbPr cable. Connect it to the A/V connector on the D7 and plug it into your TV. For the video, use either S-Video (better quality) or if not available, the yellow RCA connector. For analogue audio, use the white and red RCA connectors.
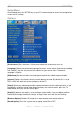
D7 User Guide Setup Menu Once booted, press the SETUP key on your D7 remote control to access the configuration screen and its settings. Options [Screensaver] Set a time from 1-60 minutes before the screensaver turns on. [Language] Select your preferred language for the on-screen menu, file browser encoding and subtitles. You can also turn off the subtitles for your movies here. The default language is English. [Slideshow] Set the transition time and repeat mode for the slideshow presentation.
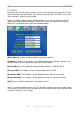
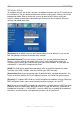
D7 User Guide IP Config By default, you can leave these settings and the D7 will automatically request the IP and other information over the network. If the internet connection does not work or you would like to change it, switch to manual mode. Input an IP address from your local network which is not in use yet. Enter an IP for the subnet mask and the default gateway. For the DNS server, we recommend using two different IP’s, preferable from a local and reliable provider.
D7 User Guide Wireless Setup To configure and use the wireless function, the optional antenna and mini PCI card have to be installed first. Set your preferred network to wireless and save the settings. You will be prompted to reboot. After restarting the system, go back to WIFI Setup, select your wireless network and configure connection type and security key if required. Save the settings and reboot once more. [Preferred] Set to Wired if you use the Ethernet cable or set to Wireless if you use the 802.
D7 User Guide Time Setup Setup for clock time with time zone and NTP server. If the NTP server is set and an internet connection exists, the D7 can synchronise the time automatically. The default value for the NTP server should work fine, so you only have to choose your time zone, turn on daylight saving if required and save the settings. Update ROM Displays current firmware version and can be used to check for new releases and upgrades for the D7.
D7 User Guide Chapter 3 – USB Host The D7 has two USB connectors for external USB devices. You can connect up to two USB mass storage devices with digital media content to display on your TV. For D7 to recognise the external USB device it has to be mass storage class, and the file format must be FAT12, FAT16 or FAT32. As an example, you may use a USB disk, an USB card reader or a USB memory stick.
D7 User Guide Chapter 4 – Network Mode There are 3 different kinds of network modes: • UPnP devices on local network • Media server on PC • Online premium content with direct internet access UPnP devices To access a Universal Plug and Play (UPnP) device, all you need to do is connect it to the same local network as your D7. Turn on the UPnP enabled NAS or Windows Media Connect as an example, then turn on the D7. On boot up, it will automatically connect to the network and list any compatible devices.
D7 User Guide Online Premium Content In this mode, you can access content on the internet directly from your D7, without the need to turn on any computer. To use this function, make sure your gateway and DNS server are setup properly and that you have access to the internet. [VTuner] Access to online radio broadcast and web radio with advanced search features. Bookmark your favourite channels and listen to music from all over the world right from your living room. [AOL] Access to AOL subscriber services.
D7 User Guide Chapter 5 - Appendix For RMA and other questions, please contact your vendor or check out their online support area! Specifications Internal Memory Playback Formats N/A (data is accessed via USB or Ethernet) Video: • MPEG-1 up to 1.
D7 Supported USB devices UPnP Version Output Interfaces User Guide Mass Storage class devices using FAT12, FAT16 or FAT32, including USB hard drives, card readers and USB memory sticks. v1.0 Video NTSC/PAL: • Composite Video • S-Video • Analogue Component Video up to 720p or 1080i • SCART RGB (optional cable) • VGA up to 1024x768 (optional cable) Audio: • Dual Stereo Analogue Audio • SPDIF optical output Power Supply External Power Adapter universal auto-switching (UL, cUL) Input: AC 100-240V, 1.
D7 User Guide Remote Control Key Functions Item Button 1 Power 2 1 3 2 4 3 5 4 6 5 7 6 8 7 9 8 10 9 11 0 12 CLEAR 13 SELECT 14 TV MODE 15 SETUP 16 MUTE 17 VOLUME 18 UP 19 DOWN 20 LEFT 21 RIGHT 22 ENTER 23 RETURN 24 MENU 25 A-B 26 PREV 27 PLAY 28 NEXT 29 REPEAT 30 REV 31 STOP 32 FWD 33 INFO 34 SLOW REV 35 PAUSE/STEP 36 SLOW FWD 37 EDIT/PROGRAM 38 TITLE 39 SUBTITLE 40 AUDIO 41 SHUFFLE 42 ANGLE/ROTATE 43 SEARCH 44 ZOOM Browser Mode Power OFF 1 - .
D7 User Guide About this Manual This manual covers both D7-DMA (wired version) and D7-WDMA (wireless version). Images and descriptions may therefore slightly vary between this manual and the actual product you have. © Copyright 2007 by Macpower & Tytech Technology Co., Ltd. all Rights Reserved The information contained in this manual is believed to be accurate and reliable.