Model G2 Instruction Manual Congratulations on purchasing your Trio Personal Media Player! To get the most out of your purchase, please take the time to carefully read through this manual. Foreword If any problems occur during while using your Trio, please feel free to contact Mach Speed technical support at 580-272-0035, or sending an email to mssupport@machspeed.com.
circumstances. To prevent loss of your data, please backup your data regularly. Information in the manual is subject to change without notice and is subject to copyright protection. Copying or otherwise reproducing this material without prior written consent is prohibited. Due to Firmware changes, some of the pictures and functions described in this manual may not be the same as are included with your player.
Caution • • • • • • • Do not use the player in exceptionally cold or hot, dusty, damp or dry environments. Do not drop, strike, or throw your player. Physical damage to your player will void ALL warranties.
Appearance Key Function Mode: press this button one briefly to return to the last screen, or press and hold to return to the main menu. Previous: in a menu, use this button to navigate to the previous item in the menu. In music or video mode, briefly press this button to skip to the previous file, or press and hold this button to rewind the current file. Next: in a menu, use this button to navigate to the next item in the menu.
Power On/Off To power the player on, set the power switch to the ON position, and press and hold the PLAY button for 5 seconds, or until you see the loading and Trio screens. To power the player off, press and hold the PLAY button for 5 seconds, or until the device powers off, then set the power switch to the OFF position. Charging To charge your player, set the power switch to the ON position, and connect the player to a powered USB port on your computer, or to a USB wall adapter.
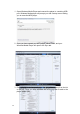
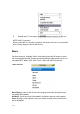
1. Open Windows Media Player and connect the player to a working USB port. Windows Media player will prompt you with a setup screen asking you to name the MP3 player. 2. Once you have named your MP3 player, select Finish, and your Windows Media Player will open to the Sync tab. 3. Drag your music to the sync list (on the right of the screen) from the list on the left. Once you have selected the music you wish to add to the player, press Sync.
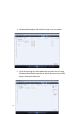
4. Windows Media player will load the songs on to your player. 5. Once all the songs you have added are synced to the unit, and Windows Media Player says that is safe to disconnect your MP3 player, disconnect the device.
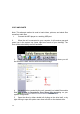
COPY AND PASTE Note- This alternate method is used to load videos, pictures, and ebook files as well as audio files 1. Connect the MP3 player to a working USB port. 2. When the unit is connected to your computer, it will create a gray and green icon in the system tray (lower right hand corner of your desktop). The icon will be called safely remove hardware. 3. Go to the “My Computer” section of your computer. In there you will find a section called “devices with removable storage” 4.
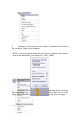
6. Locate the music stored on your computer. Generally this is stored in the “My Music” folder of your computer. NOTE: if you are unable to locate the music on your computer, click on start, search, files and folders, then search for “*.MP3, *.WMA”. 7. Once you have located the song files, you can right click on the song itself, and select “copy”. Open the removable disk drive, right click on in the empty space, and select Paste. This will transfer the song on to your player.
8. Repeat step 7 for as many songs as you want to copy on to the unit. NOTE: MAC Computers When connected to your MAC computer, the device will act as a removable drive. Simply drag your files to the device. Music On the main menu, highlight “Music” and briefly press the OK button to enter the music playback mode. Please note that this player plays audio files in non encrypted MP3, WMA, OGG, APE, FLAC, WAV and AAC formats only.
Album: Displays a list of albums loaded on the player; once an album is selected a list of music from that album is displayed. Genre: Displays a list of genres loaded on the player; once a genre is selected, a list of music files will be displayed My Music List: Displays your 5 playlists. Files are added to a playlist in the music submenu. Dir List: List all music files in the Music folder. Files are displayed in a standard folder structure. Record List: displays a list of recorded files.
Music Submenu AB Repeat When you select “AB Repeat”, you will be returned to your file, and “A-” will be displayed on the playback screen. Briefly press PLAY to set the “A point” and “-B” will be displayed, briefly press PLAY again to set the B point, and begin playing you’re a-B selection. The icon will change to “A-B”. If you press PLAY again, you will cancel A-B Repeat. Repeat To adjust your repeat mode, select “repeat”. You can select Sequential, repeat one, repeat all, shuffle, or shuffle and repeat.
resolution of 220x176. Video menu Now Playing: return to the file you were playing previously (this option may not always be available Dir List: Lists all the video files saved in the Video folder of the device. Files are displayed in a standard folder structure. -> Video Playback Interface While a video is playing, briefly press any button to bring up the progress bar and file information. This bar will disappear if no buttons are pressed for 3 seconds 1.
On the main menu, highlight “Pictures” and briefly press the OK button to enter the picture mode. Please note that this player displays images in JPEG, BMP, GIF, TIF and PNG formats. ->Main Interface Now Playing: return to the file you were playing previously (this option may not always be available Dir List: Lists all the picture files saved in the Picture folder of the device. Files are displayed in a standard folder structure. Play Mode: set your selection display to either a list or thumbnail setting.
Video camera On the main menu, highlight “video Camera” and briefly press the OK button to enter the video recording mode. 1. Briefly press the OK button to start recording and press it again to pause. Briefly press the M button to exit, the system will automatically save the file before exiting. 2. Press and hold the OK button to enter the Video Camera submenu. Resolution: 320*240. This is the only setting at this time. Record quality: high, medium, low, automatic; the default is high.
2) eBook Select eBook on the extra menu to enter the recording interface. eBook selection menu Now Playing: return to the file you were playing previously (this option may not always be available Dir List: Lists all the picture files saved in the Picture folder of the device. Files are displayed in a standard folder structure. Tag List: List all the text files with tags, or bookmarks. This player will support up to 32 tags.
year/month/day/time, etc, and use the Next or Previous buttons to adjust the value. 4) Stopwatch When in stopwatch mode, briefly press the OK button to start or pause a timer. Briefly press the Next button to stop the current timer, and begin timing on a second timer. Press and hold the OK button to clear all timers. 5) Calculator Use the Next and Previous buttons to navigate the calculator, and briefly press the OK button to select. 6) Settings 1) Date & Time 1.
Power Saving 1. Idle time Select how long the player is idle before powering off to conserve battery life. Choose Off, 10S, 30S, 1M, 1M, 5M or 10M. 2. Sleep Mode Set a timer to power off the device after a certain amount of time elapses, even if the player is playing a video or music. Choose Off, 10M, 30M, 1Hr, 2Hr, 3Hr, 4Hr or 5Hr. Language Choose from Simplified Chinese, Italian, English, Traditional Chinese, French, German, Dutch, Spanish, Czech, Danish, Polish, Romanian etc.