
User`s guide


Configuring JTAG Tools for Debugging
i.MX53 System Development User’s Guide, Rev. 1
9-4 Freescale Semiconductor
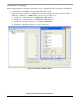
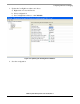
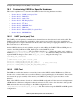
After following the recommended steps, the RVDS JTAG scan chain should look like Figure 9-3. Note this
screenshot shows the resulting scan chain when using ARM RVDS v3.1 tools.
Figure 9-3. i.MX/Cortex-A8 RVDS JTAG Scan Chain
After setting up the JTAG scan chain, RVI can connect to the i.MX53’s core. This is the only required step;
no initialization scripts are necessary.
Once connected, test code can be loaded immediately into the internal RAM space, which starts at
0xF800_0000 (for more details refer to the i.MX53 memory map in the i.MX53 reference manual).
Additionally, ARM provides “.bcd” files for some i.MX products, which can be used with RVDS to
provide enumerated views of registers and/or peripherals on the target hardware along with the entire
memory map of the target processor. Available “.bcd” configuration files are located at
http://infocenter.arm.com/help/index.jsp?topic=/com.arm.doc.dui0182l/Bjefhigi.html
9.2 Accessing Debug with a JTAG Scan Chain (other JTAG tools)
The JTAG scan chain described in Section 9.1, “Accessing Debug with a JTAG Scan Chain (ARM tools),”
is not specific to ARM tools. It can be used with any JTAG tool to connect to the i.MX53 processor. The
IR lengths of each component in the JTAG scan chain are provided so that the steps can be repeated when
using a different tool.