A1.
Compliant
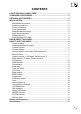
CONTENTS FUNCTIONS AND CHARACTERS.................................................................... 1 STANDARD ACCESSORIES............................................................................. 2 OPTIONAL ACCESSORIES.............................................................................. 2 INSTALLATION.................................................................................................. 2 Microphone connection.........................................................................
FUNCTIONS AND CHARACTERS Full Aluminum body offer best heat radiation Remote control microphone with Wide angle Dot matrix LCD Multiple norms: EU, EUH, CE, UK, PL, E1, I2, DE, DEH 3 color display: Blue, Purple, Orange Dual watch Full channel scan EMG Channel CH9/19 SQ and ASQ Control 4 Memory channels for each Norm SQ, VOL, voltage level display Field strength display Automatic Power on/Manual Power on Time Out Timer Keypad lock Channel and Frequency mode Optional earphone for Microphone Optional remote PTT
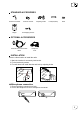
STANDARD ACCESSORIES Screws for bracket Pads for bracket Adjusting knobs Hanger Self-tapping Screws Fuse(2A,250V) Pads OPTIONAL ACCESSORIES Remote PTT Control Cable EK01 Earphone HS03 INSTALLATION Choose a idea location to install the radio. 1. Mark the location for screws by intall racket. 2. Fix the bracket by screws. 3. Fix radio base into install bracket and lock by adjusting knobs. Microphone connection 1. Plug microphone connector into jack. 2.
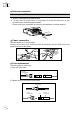
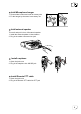
Antenna connection Note: Never press PTT before install the antenna, it might burn the transistor. 1. Screw on the antenna into antenna jack. 2. To make full use of this radio, it is necessary to locate the antenna in a well grounded place, and well adjust the SWR. * Please enquiry the local dealer for choosing and intallation of suitable antenna. Power connection This radio adopt 13.2V power supply.
Intall Microphone hanger 1. Choose idea location and mark for screw point. 2. Fix the hanger by the srews in accessory list. Intall external speaker This radio adopt 4-8 ohm, 4W external speaker. 1. Install the external speaker in idea location. 2. Plug in the seaker connector into jack. Install earphone 1. Open the jack cover 2. Plug in the earphone into MIC/SP jack Install Remote PTT cable 1. Open the jack cover 2.
KNOW ABOUT THIS RADIO PTT 9 10 1 2 3 4 5 6 7 8 9 10 11 12 13 14 15 16 17 18 19 FUNC/FRQ Function menu / frequency mode EMG/M1 EMG CH9 and CH19, or program with second function DW/M2 Dual watch, or program with second function SC/M3 Channel scan, or program with second function AF/M4 AM/FM selection, or program with second function VOL-, Squelch level - Decrease volume or Squelch level VOL+, Squelch level + Increase volume or Squelch level MT/SET Mute, Menu, Lock key PTT Transmitting SQ
HOW TO USE THIS RADIO Power on radio 1. Press key to turn on the radio. Note:When the radio on, hold key, the radio will power off. key until nothing appears on LCD and release 2. Adjust squelch level until you can hear background noise, refer to Page 7 about Squelch level setup. 3. Adjust volume level to wanted level, refer to Page 7 about Volume level setup. Automatic Power on 1. Short Press key, F Icon appear and flashes. 2. Short Press key to enter Menu. 3. Repeatedly short press POR: XXX 4.
Volume control ( 1-56 levels, Default level 54 ) 1. Press SQ/VOL key repeatedly, until LCD display VOL: XX XX stands for volume level. 2. Short Press or key to choose wanted volume level. 3. Hold Hold can fast increase volume level, can fast decrease volume level. Mute Function 1. Short press will fastly mute the speaker, and LCD displays VOL:MT again, the volume will resume to 2. Press previous volume level setting. Squelch control ( 1-28 Levels, Default Level 3) 1.
LCD display Dot matrix LCD display for channel number, frequency and operations. Dual watch ASQ 1W/4W: Power level M1-M4: Storage location CH9/19 Current Voltage Func Working norm FM/AM Mode Scan Current channel Keypad lock icon ASQ, SQ,VOL level RX signal strength, PWR: TX signal strength. 2 Digits for display of channel number and Norms 5 Digits for display of frequency and Norms AM/FM mode 1. Short press mode. key to switch between AM/FM 2. Corresponding mode will displayed in the LCD.
Time Out Timer 1. Short Press key, F Icon appear and flashes. 2. Short Press key to enter Menu. 3. Repeatly short press el key until LCD displays TOT: XXXX 4. Press or to adjust the TOT time. 5. Short press any other key to confirm and exit. LCD color 1. Short Press key, F Icon appear and flashes. 2. Short Press key to enter Menu. 3. Repeatly short press COL: X 4. Press or key until LCD displays to choose the color. 5. Short press any other key to confirm and exit. Beep Prompt 1.
Keypad lock 1. To avoid wrong operation of keys, you can hold key to lock the keypad. . 2. The LCD displays 3. Repeat the above function to unlock the keypad. Frequency mode 1. Hold for over 5 seconds, the display will change to frequency mode. for over 5 seconds, the display 2. Repeat hold will change to channel mode. Scan 1. Set SQ or $64 ¿UVWOy. 2. Short press SC/M3 key to start scanning the LCD displays SC. 3. Press any key to stop scan, SC disappear.
DW channels 2 channels need be pre-stored for dual watch function. 1. Short Press key ) ,FRQ DSSHDU DQG ÀDVKHV 2. Short Press key to enter Menu. key until LCD displays 3. Repeatly short press DW0: XX or 4. Press to choose first DW channel 5. Repeatly short press key until LCD displays DW1: XX or 6. Press to choose second DW channel. 6KRUW SUHVV DQ\ RWKHU NH\ WR FRQ¿UP DQG H[LW Using DW function 1.
Norms and Frequency Band ID EU Country Europe AM=1W Power FM=4W CH-01 26.965 CH-02 26.975 CH-03 26.985 CH-04 27.005 CH-05 27.015 CH-06 27.025 CH-07 27.035 CH-08 27.055 CH-09 27.065 CH-10 27.075 CH-11 27.085 CH-12 27.105 CH-13 27.115 CH-14 27.125 CH-15 27.135 CH-16 27.155 CH-17 27.165 CH-18 27.175 CH-19 27.185 CH-20 27.205 CH-21 27.215 CH-22 27.225 CH-23 27.255 CH-24 27.235 CH-25 27.245 CH-26 27.265 CH-27 27.275 CH-28 27.285 CH-29 27.295 CH-30 27.305 CH-31 27.315 CH-32 27.325 CH-33 27.335 CH-34 27.
Specification Modulation Mode Frequency Range Frequency Tolerance Input Voltage Dimensions(in mm) Weight Ferquency Control Operating Temperature Range Transmit Current Drain Receive VOL Max Antenna Connector Power Output Transmission interference Frequency Response Modulated signal distortion Output Impedance Sensitivity Image Rejection Adjacent Channel Rejection IF Frequencies Automatic Gain Control(AGC) Squelch Audio Output Power Frequency Response 13 GENERAL AM/FM 26.965-27.405Mhz ±5.0ppm 13.
compliant
CONDITIONS OF GUARANTEE Our transceivers CRT SUPERSTAR are guaranteed on 2 year. The other equipments: 6 months. Any abnormality of functioning must be indicated to your retailer, who will intervene or will send it to our technical service for control. The spare parts of our devices are the object of no sending under guarantee. Are excluded of the guarantee: - The damages caused by accidents, shocks, natural elements (lightning, thunderstorm, static electricity etc.
16