M5STAMP C3 2021
CONTENTS 1. OUTLINE ............................................................................................................................. 3 1.1. ESP32 C3 ..................................................................................................................................... 3 2. SPECIFICATIONS ............................................................................................................. 4 3. QUICK START................................................................
1. OUTLINE C3 is the smallest ESP32 system board launched by M5Stack. It focuses on cost-effectiveness and simplification. It embeds an ESP32-C3 IoT control on a small and exquisite PCB board as small as a stamp (STAMP). Provide 13 IO expansion pins and a programmable RGB LED, combined with ESP32 internal interface resources (UART, I2C, SPI, etc.), can expand various peripheral sensors. It can be embedded in all kinds of IoT devices as the control core. 1.1.
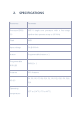
2.
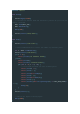
3. QUICK START 3.1. ARDUINO IDE Visit Arduino's official website(https://www.arduino.cc/en/Main/Software),Select the installation package for your own operating system to download. >1.Open up Arduino IDE, navigate to `File`->`Peferences`->`Settings` >2.Copy the following M5Stack Boards Manager url to `Additional Boards Manager URLs:` https://raw.githubusercontent.com/espressif/arduino-esp32/ghpages/package_esp32_dev_index.json >3.Navigate to `Tools`->`Board:`->`Boards Manager...` >4.
#include "BluetoothSerial.h" #if !defined(CONFIG_BT_ENABLED) || !defined(CONFIG_BLUEDROID_ENABLED) #error Bluetooth is not enabled! Please run `make menuconfig` to and en able it #endif BluetoothSerial SerialBT; void setup() { Serial.
SerialBT.begin("ESP32test"); //Bluetooth device name Serial.println("The device started, now you can pair it with bluetoot h!"); } void loop() { if (Serial.available()) { SerialBT.write(Serial.read()); } if (SerialBT.available()) { Serial.write(SerialBT.read()); } delay(20); } 3.3. WIFI SCANNING Open the Arduino IDE and open the example program `File`->`Examples`->`WiFi`->`WiFiScan`. Connect the device to the computer and select the corresponding port to burn.
#include "WiFi.h" void setup() { Serial.begin(115200); // Set WiFi to station mode and disconnect from an AP if it was pre viously connected WiFi.mode(WIFI_STA); WiFi.disconnect(); delay(100); Serial.println("Setup done"); } void loop() { Serial.println("scan start"); // WiFi.scanNetworks will return the number of networks found int n = WiFi.scanNetworks(); Serial.println("scan done"); if (n == 0) { Serial.println("no networks found"); } else { Serial.print(n); Serial.
FCC Statement: Any Changes or modifications not expressly approved by the party responsible for compliance could void the user’s authority to operate the equipment. This device complies with part 15 of the FCC Rules. Operation is subject to the following two conditions: (1) This device may not cause harmful interference, and (2) This device must accept any interference received, including interference that may cause undesired operation.