Installation Manual IM-DOC-021 ® Using the DiskOnChip with Linux OS DEC-99 91-SR-005-10-7L REV. 2.
Using the DiskOnChip with Linux OS LIMITED WARRANTY (a) M-Systems warrants that the Licensed Software — prior to modification and adaptation by Licensee — will conform to the documentation provided by M-Systems. M-Systems does not warrant that the Licensed Software will meet the needs of the Licensee or of any particular customer of Licensee, nor does it make any representations whatsoever about Licensed Software that has been modified or adapted by Licensee.
Using the DiskOnChip with Linux OS Contents 1 Introduction................................................................................................................................... 4 2 Hardware Requirements for the DiskOnChip .......................................................................... 4 3 Requirements for Installation of the DiskOnChip into Linux ................................................. 5 3.1 Utilities Diskette Content ..................................................
Using the DiskOnChip with Linux OS 1 Introduction M-Systems’ DiskOnChip is a family of flash disks. It contains built-in firmware that provides full hard disk emulation and allows the DiskOnChip to operate as a boot device. When used under Linux, the DiskOnChip is managed by a device driver, based on M-Systems’ TrueFFS (True Flash File System) technology. The TrueFFS driver is attached to the standard Linux file system [ext2]. M-Systems provides two different TrueFFS drivers for Linux.
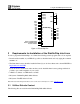
Using the DiskOnChip with Linux OS 1 2 3 29 28 SA12 SA11 SA10 SA9 SA8 SA7 SA6 SA5 SA4 SA3 SA2 SA1 SA0 Active Low Chip Enable Active Low Output Enable Active Low Write 4 25 23 26 27 5 6 7 8 9 10 11 12 NC NC (A16) NC (A15) NC (A14) NC (A13) 5V 30 VCC 32 GND A12 A11 A10 A9 A8 DiskOnChip A7 D0 A6 D1 A5 D2 A4 D3 A3 D4 A2 D5 A1 D6 A0 D7 0.
Using the DiskOnChip with Linux OS dformat DiskOnChip formatting utility dupdate Utility for updating DiskOnChip firmware docpmap Utility to retrieve information about the DiskOnChip doc121.ex b DiskOnChip firmware image. “121” is the firmware version, the actual diskette might contain higher versions of the firmware, e.g. doc122.exb, doc123.exb, etc. doc2.fff Alternative firmware image for the DiskOnChip Note: The file doc2.
Using the DiskOnChip with Linux OS 4 Installing the DiskOnChip as an Additional Drive Before the DiskOnChip can be used as the boot disk for Linux (see Chapter 5), it first needs to be installed as an additional disk in the system (Linux is booted from a HDD). This chapter describes how to prepare the DiskOnChip and Linux to configure the DiskOnChip as an additional disk in the system. To achieve this, the firmware on the DiskOnChip needs to be updated (par. 4.
Using the DiskOnChip with Linux OS 1. The floppy drive must be active. Verify this by typing: # mount If the /dev/fd0 doesn’t appear in the first column, type: # mount/dev/fd0 /mnt From this point, it is assumed that the diskette that contains the TrueFFS driver for Linux is mounted at /mnt. 2. The kernel sources must be installed. To check this, type: # ls /usr/src/linux If this directory exists, then the kernel sources are installed. If not, refer to http://sunsite.unc.
Using the DiskOnChip with Linux OS 5. Configure the kernel as follows: # cd /usr/src/linux # make menuconfig or # make config if the last command doesn’t work. Define your system by marking the correct devices. If you aren’t sure what the purpose of the device is, then leave it as it is. Make sure that you mark the DiskOnChip as “Y”es under ‘Floppy, IDE and other devices’. When you are finished, exit and the new configuration will be saved.
Using the DiskOnChip with Linux OS Make[1]:Leaving directory ‘/usr/src/ linux-2.0.32/arch/i386/boot’ If there are any compilation errors, refer to Chapter 6 “Troubleshooting”. 4.2.3 Booting the Compiled Kernel from HDD The new compiled kernel needs to be booted from the HDD. The following steps need to be performed: 1. Type the following commands: # cp /usr/src/linux/arch/i386/boot/zImage/doc2000 # vi /etc/lilo.conf 2.
Using the DiskOnChip with Linux OS 7. When the Lilo prompt is displayed, press or or . The screen will show : Lilo boot: 8. Load the recompiled kernel: Lilo boot:doc2000 4.2.4 Creating a Linux Partition on the DiskOnChip To create a Linux partition on the DiskOnChip, all the DOS partitions on the DiskOnChip need to be removed and a Linux partition with the native Linux File system [ext2] needs to be created. 1. Run the fdisk utility.
Using the DiskOnChip with Linux OS 7. Recheck the partition table: Command (m for help): p Disk /dev/fla: 16 heads, 9 sectors, 1002 Cylinder units = cylinders of 144 * 512 bytes Device /dev/fla1 boot begin Start End Blocks Id System * 1 1 1002 72139+ 83 Linux native 8. Save the new partition table (disregard any fdisk warnings): Command (m for help): w 9. Reboot the machine to let the new partition table load into memory and load Linux again with the new compiled kernel.
Using the DiskOnChip with Linux OS 5 Booting Linux from the DiskOnChip Being able to boot Linux from the DiskOnChip makes it possible to use the DiskOnChip as the only disk in the system, holding the OS itself in addition to all other applications and files. In order to make a block device bootable on Linux, the kernel and the Lilo program should be copied to the block device and a root file system needs to be created.
Using the DiskOnChip with Linux OS 5.1.2 Overview A root file system must contain everything that is needed to support a full Linux system. To achieve this, the disk must include the minimum requirements for a Linux system: • Basic file system structure • Minimum set of directories: /dev, /proc, /bin, /etc, /lib, /usr, /tmp • Basic set of commands: sh, ls, cp, mv, etc. • Minimum set of config files: rc, inittab, fstab, etc. • Devices: /dev/hd*, /dev/tty*, /dev/fd0, etc.
Using the DiskOnChip with Linux OS Press , ‘:’, ‘w’, ‘q’ to save the file. It is possible to add more devices here (for more information, refer to the man pages). 6. For RedHat and Caldera it is also necessary to copy the configuration file for the pam library (responsible for making authentic users): # cp /tmp/doc-driver/pam.d/other /diskonchip/etc/pam.d/other Note: Appendix I explains how to create your own root file system manually.
Using the DiskOnChip with Linux OS # cp /tmp/doc-driver/boot.b /diskonchip/boot # cp /tmp/doc-driver/lilo.conf /diskonchip/etc # /diskonchip/sbin/plilo -C /diskonchip/etc/lilo.conf -i /diskonchip/boot/boot.b -m /diskonchip/boot/map 2. Verify that after the last command, the device doc2000 is listed on the screen. 3. If it is required to load other partitions, then the file /diskonchip/etc/lilo.conf should be edited.
Using the DiskOnChip with Linux OS VFS: Unable to mount -. Most likely, you forgot to do: # rdev /diskonchip/boot/doc2000 • /dev/fla1 If the DiskOnChip boots and the kernel is loading, but it gets stuck after: VFS: Mounted root (ext 2 filesystem) readonly. Most likely, the init program or some if its configuration files weren’t copied. Cannot log in If you cannot login when booting Linux from the DiskOnChip, make sure that: • Your default shell is installed.
Using the DiskOnChip with Linux OS 7 Additional Information and Tools Additional information about the DiskOnChip, including Application Notes, can be found at http://www.msys.com.
Using the DiskOnChip with Linux OS Appendix I: Making a Root File System To create your own root file system, perform the following steps: 1. Make the following directories: # cd /diskonchip # mkdir bin dev etc lib mnt proc sbin tmp usr var 2. Create devices in the /dev directory. You can either do this manually or just copy the /dev directory from the HDD. If you wish to save space, it is possible to remove non-required devices (i.e. if you don’t have a SCSI drive, then remove all the sd* devices).
Using the DiskOnChip with Linux OS not listed below are considered optional.
Using the DiskOnChip with Linux OS For example: # ldd /sbin/mke2fs libext2fs.so.2 libcom_err.so.2 libuuid.so.1 libc.so.5 /lib/libext2fs.so.2 /lib/libcom_err.so.2 lib/libuuid.so.1 /lib/libc.so.5 This will show which libraries are needed for the program mke2fs. In this example, it is necessary to copy the following four libraries: # cp /lib/ext2fs.so.2 /diskonchip/lib # cp /lib/libcom_err.so.2 # cp /lib/libuuid.so.1 # cp /lib/libc.so.
Using the DiskOnChip with Linux OS Appendix II: Booting from a HDD when the DiskOnChip Firmware is Active Since Lilo and the DiskOnChip firmware (i.e. doc121.exb) share the same area in RAM, the system will hang during boot when using an unpatched Lilo. Updating Lilo solves this problem. The existing boot loader needs to be updated as follows: # /tmp/doc-driver/plilo -i /tmp/doc-driver/boot.b This command uses the patched Lilo supplied by the TrueFFS driver and patched boot.b, and your default /etc/lilo.
Using the DiskOnChip with Linux OS Appendix III: Applying a Patch Manually There are two ways to integrate the TrueFFS driver into the kernel: manually or with a patch utility. The TrueFFS driver for kernel versions 2.0.## contains patch files for kernel versions 2.0.29-2.0.35 (/tmp/doc-driver/doc-patch-2.0.##). See paragraph 4.2.1 for detailed information on how to patch your kernel with these patch files. When using the TrueFFS driver for kernel versions 2.2.##, the kernel needs to be patched manually.
Using the DiskOnChip with Linux OS In the above example, the file /usr/src/linux/include/linux/major.h is patched. The two lines that start with the ‘+’ mark are added to the current source code, and the lines that start with the ‘‘ mark are removed from the source code. Repeat this process for all five of the above-mentioned files. 91-SR-005-10-7L REV. 2.
Using the DiskOnChip with Linux OS How to Contact Us Internet: http://www.m-sys.com E-mail: info@m-sys.com USA Office: M-Systems Inc. 8371 Central Ave, Suite A Newark CA 94560, U.S.A Phone: 1-510-494-2090 Fax: 1-510-494-5545 Japan Office: M-Systems Japan Inc. 1-11-15 Higashi Gotonda Shinagawa-ku Tokyo, 141-0022 Japan Phone: 03-3445-9042 Fax: 03-3445-9045 Taiwan Office: M-System Asia Ltd. 11F-2, No. 81,Sec.2, Chang Teh Rd. Taipei, Taiwan, R.O.C. Phone: 886-2-2550-1741 Fax: 886-2-2550-1745 U.K.