MIB60
Geachte Klant, We danken U hartelijk voor het in ons gestelde vertrouwen bij uw keuze van de vitrokeramische inductiekookplaat. Teneinde dit apparaat goed te kennen raden we U aan deze gebruiksaanwijzing volledig en aandachtig door te lezen en ze te bewaren om ten gepaste tijde te kunnen raadplegen.
VEILIGHEID Voorzorgsmaatregelen voor gebruik van het toestel Verwijder alle verpakkingen. De installatie en de elektrische aansluiting van het apparaat dienen aan een erkende vakman toevertrouwd te worden. De fabrikant kan niet verantwoordelijk gesteld worden voor eventuele schade voortkomend uit een foutieve inbouw of aansluiting. Het apparaat mag enkel gebruikt worden wanneer het gemonteerd en geïnstalleerd is in een meubel met een gehomologeerd en aangepast werkvlak.
Laat geen voorwerpen (zelfs kleine) op de vitrokeramiek vallen. Vermijd het stoten van kookpotten tegen de rand van het glas. Verzeker u ervan dat de ventilatie van het apparaat verloopt volgens de instructies van de fabrikant. Plaats of laat geen lege kookpotten op de kookplaat. Vermijd het contact van suiker, synthetische stoffen of aluminiumfolie met de hete zones.
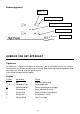
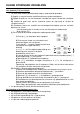
Bedieningspaneel Toets [ + ] Vermogenaanduiding Toets [-] voor de 4 zones Lampje kookzone Toets aan/uit GEBRUIK VAN HET APPARAAT Tiptoetsen Uw apparaat is uitgerust met tiptoetsen waarmee u de verschillende functies kan instellen. Het aanraken van de toets zet de functie in werking. Deze activering wordt weergegeven door een lichtje, een aflezing en/of een geluidssignaal. Druk niet op meerdere toetsen tegelijk.
Aanduiding restwarmte Het lampje « H » licht op wanneer de overeenstemmende kookzone heet is (de kookzones worden door de bodem van de kookpotten verhit). In dit geval is er gevaar voor brandwonden. De restwarmte kan gebruikt worden om de gerechten warm te houden. Ventilatie De koelingsventilator functioneert helemaal automatisch. Hij komt langzaam op gang zodra de door de elektronica vrijgekomen calorieën een bepaalde hoeveelheid overschrijden.
In- en uitschakelen van een verwarmingszone: Actie Bedieningspaneel Display Kiezen Verhogen Verlagen Uitschakelen druk op [ + ] van de zone druk op [ + ] van de zone druk op [ - ] druk tegelijkertijd op [ + ] en [ - ] of druk op [ - ] [ 0. ] [ 1 ] tot [ 9 ] [ 9 ] tot [ 1 ] [ 0 ] of [ H ] [ 0 ] of [ H ] Indien binnen de 20 seconden geen regeling is uitgevoerd, valt de elektronica terug op de wachtpositie.
Niet aangepaste kookpotten : aluminium en inox zonder magnetische bodem, koper, messing, keramiek, porselein De fabrikanten vermelden of hun producten geschikt zijn voor inductie. Om u ervan te verzekeren of de kookpotten geschikt zijn: Giet een beetje water in een kookpot en plaats deze op een inductie kookzone geregeld op [ 9 ]. Het water moet binnen enkele seconden opwarmen. Houd een magneet tegen de bodem van de kookpot. De magneet moet blijven plakken.
KLEINE STORINGEN VERHELPEN Het symbool [ E 4 ] verschijnt: De plaat moet worden geconfigureerd volgens onderstaande procedure: I) Opgelet: u mag niet meteen recipiënten plaatsen op de inductieplaat. II) Koppel de plaat los van het stroomnet: verwijder de stop of schakel de schakelaar uit. III) Verbind de plaat weer op het stroomnet: plaats de stop terug of schakel de schakelaar weer in. IV) Procedure: Neem een recipiënt met ferromagnetische bodem met een minimale diameter van 16 cm.
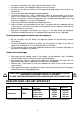
Het symbool [ U ] licht op : er staat geen kookpot op de kookzone de kookpot is niet geschikt voor inductie de diameter van de bodem van de kookpot is te klein in vergelijking met de kookzone Het symbool [ F ] licht op : u kan deze kookzone niet meer gebruiken doe beroep op de dienst na verkoop Het symbool [ E ] licht op : het elektronisch systeem is defect zet het apparaat uit en weer aan Een enkele zone of alle zones vallen uit: de veiligheid is in werking getreden deze treedt
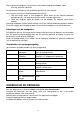
INSTALLATIEVOORSCHRIFTEN De montage dient enkel door erkende specialisten te worden uitgevoerd. De gebruiker dient de wetgeving en de normen van het land van zijn verblijfplaats na te leven. Plaatsen van de waterdicht strip De zelfklevende strip geleverd met het apparaat vermijdt infiltratie in het meubel. Het plaatsen dien met grote zorg volgens onderstaande tekening te worden uitgevoerd.
ELEKTRISCHE AANSLUITING De installatie en de aansluiting op het elektrisch net mag enkel toevertrouwd worden aan een vakman (elektricien) die op hoogte is van de voorgeschreven normen. Na het monteren moeten de stukken die onder spanning staan beschermd blijven. De nodige aansluitgegevens staan op het kenplaatje et het aansluitingsplaatje aan de onderkant van het apparaat. Het apparaat dient door middel van een meerpolige stroomverbreker van het net gescheiden te zijn.
Dear clients, Thank you for having chosen our induction ceramic hob. In order to make the best use of your appliance, we would advise you to read carefully the following notes and to keep them for a later consulting.
SAFETY Precautions before using Unpack all the materials. The installation and connecting of the appliance have to be done by approved specialists. The manufacturer can not be responsible for damage caused by building-in or connecting errors. To be used, the appliance must be well-equipped and installed in a kitchen unit and an adapted and approved work surface.
Sugar , synthetic materials or aluminium sheets must not contact with the heating zones. These may cause breaks or other alterations of the vitroceramic glass by cooling : switch on the appliance and take them immediately out of the hot heating zone (be careful : do not burn yourself). Never place any hot container over the control panel.
Control panel [ + ] key [-] key for all 4 heating zones Power display Control light cooking zone On/Off key USE OF THE APPLIANCE Sensitive touches Your ceramic hob is equipped with electronic controls with sensitive touch keys.When your finger touches the key, the corresponding command is activated. This activation is validated by a control light, a letter or a number in the display and/or a “beep” sound. Touch only one key on the same time.
Ventilation The cooling system is fully automatic. The cooling fan starts with a low speed when the calories brought out by the electronic system reach a certain level. The ventilation starts his high speed when the hob is intensively used. The cooling fan reduces his speed and stops automatically when the electronic circuit is cooled enough. STARTING-UP AND APPLIANCE MANAGEMENT Before the first use Clean your hob with a damp cloth, and then dry the surface thoroughly.
Pan detection The pan detection ensures a perfect safety. The induction doesn’t work : If there is no pan on the heating zone or if this pan is not adapted to the induction. In this case it is impossible to increase the power and the display shows [ U ]. This symbol disappears when a pan is put on the heating zone. If the pan is removed from the heating zone the operation is stopped. The display shows [ U ]. The symbol [ U ] disappears when the pan is put back to the heating zone.
To check if pans are compatibles : Put a little water in a pan placed on an induction heating zone set at level [ 9 ].This water must heat in a few seconds. A magnet stucks on the bottom of the pan. Certain pans can make noise when they are placed on an induction cooking zone. These noise doesn’t mean any failure on the appliance and doesn’t influence the cooking operating. Pan dimension The cooking zones are, until a certain limit, automatically adapted to the diameter of the pan.
WHAT TO DO IN CASE OF A PROBLEM The symbol [ E 4 ] displays : The hob must be configured according to the following procedure. I) Warning : before starting all pots must be removed from the cooktop. II) Disconnect the cooktop from the main supply : remove fuse or disconnect circuit breaker. III) Connect the cooktop to the main supply : replace the fuse or connect the circuit breaker. IV) Procedure : You must provide yourself with a ferromagnetic bottom container 16 cm minimum diametre.
The symbol [ F ] displays : You cannot use this cooking zone anymore. Call the After-sales Service. The symbol [ E ] displays : The electronic system is defective. Disconnect and replug the hob. Call the After-sales Service. One or all cooking zones cut-off : The safety system functioned You forgot to cut-off the cooking zone for a long time. One or more sensitive keys are covered. The pan is empty and its bottom overheated.
INSTALLATION INSTRUCTIONS The installation comes under the exclusive responsibility of specialists. The installer is held to respect the legislation and the standards enforce in his home country.
How to stick the gasket: The gasket supplied with the hob avoids all infiltration of liquids in the cabinet. His installation has to be done carelessly, in conformity of the following drawing. Stick the gasket (2) two millimeters from the external edge of the glass, after removing the protection sheet (3).
Connection of the hob The ceramic hob can be connected in different ways: Monophase 230V~1P+N Biphase 400V~2P+N Setting up the configurations: For the various kinds of connection, use the brass bridges which are in the box next the terminal Monophase 230V~1P+N Put the 1st bridge between terminal 1 and 2, the 2nd between 3 and 4. Attach the earth to the terminal “earth”, the neutral N to terminal 3 or 4, the Phase L to one of the terminals 1 or 2. Biphase 400V~2P+N Put a bridge between terminal 3 and 4.
Chère cliente, cher client, Nous vous remercions de la confiance que vous nous avez accordée en choisissant notre table de cuisson vitrocéramique à induction. Afin de bien connaître cet appareil nous vous recommandons de lire attentivement cette notice d’utilisation dans son intégralité et de la conserver pour une consultation ultérieure.
SECURITE Précautions avant utilisation en cuisson Retirez toutes les parties de l’emballage. L’installation et le branchement électrique de l’appareil sont à confier à des spécialistes agrées. Le fabricant ne saurait être tenu responsable des dommages résultant d’une erreur d’encastrement ou de raccordement. L’appareil ne doit être utilisé que s’il est monté et installé dans un meuble et un plan de travail homologué et adapté.
S’assurer que la ventilation de l’appareil se fasse suivant les instructions du constructeur. Ne posez pas ou ne pas laisser de casseroles vides sur la table de cuisson. Eviter que le sucre, les matières synthétiques ou une feuille d’aluminium ne touchent les zones chaudes.
Bandeau de commande Touche [ - ] commune aux 4 foyers Touche [ + ] Affichage du niveau de puissance Voyant de sélection de foyer Touche Marche/Arrêt UTILISATION DE L’APPAREIL Touches sensitives Votre appareil est équipé de touches sensitives permettant de commander les différentes fonctions. Un effleurage de la touche active leur fonctionnement. Cette activation est validée par un voyant, un affichage et/ou par un signal sonore. N’appuyez que sur une seule touche à la fois.
MISE EN ROUTE ET GESTION DE L’APPAREIL Avant la première utilisation Nettoyez votre appareil avec un chiffon humide, puis séchez le. N’utilisez pas de détergent qui risquerait de provoquer une coloration bleutée sur les surfaces vitrées. Principe de l’induction Une bobine d’induction se trouve sous chaque foyer de cuisson. Lorsque celle-ci est enclenchée, elle produit un champ électromagnétique variable qui, à son tour produit des courants induits dans le fond ferro-magnétique du récipient.
Si en cours de cuisson le récipient est enlevé de la zone de cuisson, le fonctionnement est interrompu. Dans l’afficheur le symbole [ U ] apparaît. Le [ U ] disparaît lorsque le récipient est remis sur le foyer de cuisson. La cuisson reprend au niveau de puissance sélectionnée au préalable.
Dimension des casseroles Les zones de cuisson s’adaptent automatiquement à la dimension du fond de la casserole jusqu’à une certaine limite. Le fond de cette casserole doit cependant avoir un diamètre minimum en fonction du diamètre de la zone de cuisson correspondante. Afin d’obtenir le rendement maximum de votre table de cuisson, veuillez placer la casserole bien au centre de la zone de cuisson.
V) Il faut d'abord annuler la configuration existante 1) Appuyer sur [ - ] et rester appuyé. 2) Avec un doigt de l'autre main appuyer successivement et rapidement ( en moins de 2s )sur les [ + ].En partant de la zone Avant-Droite et en tournant dans le sens c b inverse des aiguilles d'une montre (a -> b -> c -> d). Un double "bip" signifie une a d erreur de manipulation. Dans ce cas, refaire l'opération depuis l'étape n° 1.
L’une des zones ou l’ensemble du plan de cuisson se déclenche : le déclenchement de sécurité a fonctionné celui-ci s’actionne dans le cas ou vous avez oublié de couper une des zones de chauffe il s’enclenche également lorsque une ou plusieurs touches sensitives sont couvertes une des casseroles est vide et son fond a surchauffé la table dispose également d’un dispositif de réduction automatique de niveau de puissance et de coupure automatique en cas de surchauffe La soufflerie de ventilation con
INSTRUCTIONS D’INSTALLATION Le montage relève de la compétence exclusive de spécialistes. L’utilisateur est tenu de respecter la législation et les normes en vigueur dans son pays de résidence. Mise en place du joint d’étanchéité Le joint adhésif fourni avec l’appareil permet d’éviter toute infiltration dans le meuble. Sa mise en place doit être effectuée avec un grand soin suivant le croquis ci-dessous.
CONNEXION ELECTRIQUE L’installation de cet appareil et son branchement au réseau électrique ne doit être confiés qu’à un électricien parfaitement au fait des prescriptions normatives. La protection contre les pièces sous tension doit être assurée après le montage. Les données de raccordement nécessaires se trouvent sur la plaque signalétique et la plaque de branchement placées sous l’appareil. Cet appareil doit être séparé du secteur par un dispositif de sectionnement omnipôles.
Apreciada clienta, apreciado cliente, Le agradecemos la confianza que nos ha otorgado al elegir nuestra placa de cocción vitrocerámica a inducción. Con el fin de conocer bien este aparato, le recomendamos lea atentamente estas instrucciones de utilización en su totalidad y las conserve para consultas posteriores.
SEGURIDAD Precauciones antes de utilizarla para cocinar Retire todos los elementos del embalaje. La instalación y el conexionado eléctrico del aparato deben encargarse a un especialista autorizado. El fabricante no será responsable de los daños resultantes de un error de empotramiento o de conexionado. El aparato sólo debe utilizarse si está montado e instalado en un mueble y una superficie de trabajo homologados y adaptados.
No dé golpes a los bordes del cristal con las cacerolas. Asegúrese de que la ventilación del aparato se haga según las instrucciones del fabricante. No coloque ni deje cacerolas vacías sobre la placa de cocción. Evite que azúcar, materiales sintéticos o papel de aluminio toquen las zonas calientes.
Zona de mandos Tecla [+] Indicador del nivel de potencia Piloto de selección del fogón Tecla [-] común a los fogones Tecla Marcha/Paro UTILIZACIÓN DEL APARATO Teclas táctiles Su aparato está provisto de teclas táctiles que permiten controlar las distintas funciones. Un pequeño roce con la tecla activa su funcionamiento. Esta activación queda confirmada por un piloto, un indicador y/o por una señal sonora. No toque una tecla más de una vez.
Ventilación El ventilador de enfriamiento tiene un funcionamiento totalmente automático. Se pone en marcha a velocidad baja a partir del momento en que las calorías desprendidas por la electrónica sobrepasan un cierto umbral. La ventilación conecta su velocidad alta cuando la placa de cocción se usa de forma intensiva. El ventilador reduce su velocidad y se para automáticamente cuando el circuito electrónico está suficientemente frío.
Si no se hace ningún ajuste en el plazo de 20 segundos, la electrónica vuelve a la posición de espera. Detección del recipiente La detección del recipiente asegura una seguridad perfecta. La inducción no funciona: Cuando no hay recipiente sobre la zona de cocción o cuando este recipiente no es adecuado para la inducción. En este caso es imposible aumentar la potencia y aparece el símbolo [U] en el indicador. La [U] desaparece cuando se coloca una cacerola en la zona de cocción.
Ponga un poco de agua en una cacerola colocada sobre una zona de cocción por inducción regulada a nivel [9]. Este agua debe calentarse en algunos segundos. Ponga un imán sobre el fondo externo de la cacerola; debe quedarse pegado. Algunas cacerolas pueden hacer ruido al colocarlas sobre una zona de cocción por inducción. Estos ruidos no representan en ningún caso un defecto en el aparato ni tienen influencia en su funcionamiento.
QUÉ HACER EN CASO DE PROBLEMA Aparece el símbolo [ E 4 ] : La placa debe ser reconfigurada según el procedimiento de más abajo: I) Atención: al inicio no poner recipientes sobre la placa de inducción. II) Desconectar la placa de la red eléctrica: bajar el magnetotérmico o desconectar el cable. III) Conectar la placa a la red eléctrica: subir el magnetotérmico o conectar el cable. IV) Procedimiento: Tener a mano de un recipiente con fondo ferromagnético de diámetro 16 cm mínimo.
El símbolo [U] se enciende: No hay cacerola en la zona de cocción El recipiente utilizado no es compatible con la inducción El diámetro del fondo de la cacerola es demasiado pequeño respecto a la zona de cocción El símbolo [F] se enciende: No puede utilizar esta zona de cocción Llame al Servicio Posventa El símbolo [E] se enciende: El sistema electrónico es defectuoso Desconecte y vuelva a conectar el aparato Una de las zonas o el conjunto de la placa de cocción se desconecta:
INSTRUCCIONES DE INSTALACIÓN El montaje es competencia exclusiva de especialistas. El usuario está obligado a respetar la legislación y las normas en vigor en su país de residencia. Colocación de la junta de estanqueidad La junta adhesiva suministrada con el aparato permite evitar cualquier filtración en el mueble. Su colocación debe efectuarse con gran cuidado según el croquis adjunto.
CONEXIÓN ELÉCTRICA La instalación de este aparato y su conexión a la red eléctrica sólo deben confiarse a un electricista que esté al día de las prescripciones reglamentarias. La protección contra las piezas bajo tensión eléctrica debe asegurarse después del montaje. Los datos necesarios para la conexión se encuentran en la placa de características y en la placa de conexión situadas debajo del aparato.
11977/3