MI-76 Gebruiksaanwijzing NL Notice FR d’emploi Bedienungsanleitung D O p e r at i n g EN instructions ©Boretti B.V.
VOORWOORD Boretti feliciteert u met uw nieuwe aanwinst voor uw keuken. Tevens dankt Boretti u voor het getoonde vertrouwen in het merk door de aanschaf van dit product. Wij adviseren u om voor het gebruik deze handleiding aandachtig door te lezen teneinde problemen te voorkomen en u ervan te verzekeren dat u als gebruiker op de hoogte bent van de juiste en veilige werking van dit product.
Inhoudsopgave Veiligheid Voorzorgsmaatregelen voor gebruik van het toestel Gebruik van het apparaat Voorzorgsmaatregelen tegen beschadigingen Voorzorgsmaatregelen bij defect van het apparaat Andere beschermingen 4 4 4 5 5 Beschrijving van het apparaat Technische kenmerken Bedieningspaneel 6 6 Gebruik van het apparaat Display Ventilatie 7 7 Inwerkingstelling en gebruik Voor het eerste gebruik Principe van inductie Tiptoetsen Inwerkingstelling Detectie van de pan Aanduiding restwarmte Booster functie Ti
Veiligheid Voorzorgsmaatregelen voor gebruik van het toestel • Verwijder alle verpakkingen. • De installatie en de elektrische aansluiting van het apparaat dienen aan een erkende vakman toevertrouwd te worden. De fabrikant kan niet verantwoordelijk gesteld worden voor eventuele schade voortkomend uit een foutieve inbouw of aansluiting. • Het apparaat mag enkel gebruikt worden wanneer het gemonteerd en geïnstalleerd is in een meubel met een gehomologeerd en aangepast werkvlak.
• Plaats of laat geen lege pannen op de kookplaat. • Vermijd het contact van suiker, synthetische stoffen of aluminiumfolie met de hete zones. Deze stoffen kunnen tijdens het afkoelen het vitrokeramische oppervlak doen barsten of aantasten: schakel het apparaat uit en verwijder ze onmiddellijk van de nog hete zones (opgepast: risico voor brandwonden) • Plaats nooit een warme pan op de bedieningszone.
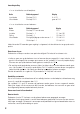
Beschrijving van het apparaat Technische kenmerken Type Totaal Positie van de Diameter Nominaal Boostervermogen kookzone vermogen* vermogen* Minimum diameter detection MI-76 7100 W Linksvoor 180 mm 1400 W 2000 W 110 mm Linksachter 170 mm 1400 W 110 mm Rechtsvoor 220 mm 2300 W 3000 W 120 mm Rechtsachter 145 mm 1400 W 110 mm * het vermogen kan variëren in functie van de afmetingen en het materiaal van de pannen.
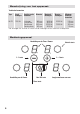
Gebruik van het apparaat Display 0. 1…9 U E H P L Naam Nul Vermogenniveau Detectie pan Foutmelding Restwarmte Booster Vergrendeling Functie Kookzone geactiveerd Keuze kookniveau Geen of onaangepaste pan Defect elektronisch circuit De kookzone is warm Het turbovermogen is geactiveerd Tafel is beveiligd Ventilatie De koelingsventilator functioneert helemaal automatisch. Hij komt langzaam op gang zodra de door de elektronica vrijgekomen calorieën een bepaalde hoeveelheid overschrijden.
Inwerkingstelling • In- en uitschakelen van de kookplaat: Actie Inschakelen Uitschakelen Bedieningspaneel Druk op [ 0/I ] Druk op [ 0/I ] Display 4x[0] geen of [ H ] • In- en uitschakelen van een kookzone : Actie Kiezen Instellen Daling Uitschakelen Bedieningspaneel Druk op [ O ] van de zone Druk op [ + ] Druk op [ - ] Druk gelijktijdig op van de zone en [ - ] Of druk op [ - ] Display [0] [ 1 ] tot [ 9 ] [ 9 ] tot [ 1 ] [ 0 ] of [ H ] [ 0 ] of [ H ] Indien binnen de 20 seconden geen regeling is uitg
• In en uitschakelen van de booster : Actie De zone kiezen Het vermogen kiezen De booster inschakelen De booster uitschakelen Bedieningspaneel Druk op [ O ] van de zone Druk op [ + ] Druk op [ + ] Druk op [ - ] Display [0] [ 1 ] tot [ 9 ] [P] [9] • Beheer van het maximaal vermogen : Het geheel van de kookplaat is voorzien van een maximaal vermogen.
• Automatisch uitschakelen op het einde van de kooktijd: Wanneer de gekozen tijd verlopen is, geeft het lampje van de timer al knipperend [ 00 ] weer en een geluidssignaal weerklinkt. Druk op een toets om het geluid en het knipperen te beëindigen.
Kookadvies Kwaliteit van de pannen Aangepaste pannen : staal, geëmailleerd staal, gietijzer, inox met magnetische bodem, aluminium met magnetische bodem Niet aangepaste pannen: aluminium en inox zonder magnetische bodem, koper,messing, keramiek, porselein De fabrikanten vermelden of hun producten geschikt zijn voor inductie. Om u ervan te verzekeren of de pannen geschikt zijn: • Giet een beetje water in een pan en plaats deze op een inductie kookzone geregeld op [ 9 ].
Voorbeelden van vermogensregeling (de hieronder vermelde waarden zijn enkel richtgevend) 1-2 3-4 4-5 Smelten Opwarmen Opzwellen Ontdooien Stoom Water 6-7 Zachtjes koken 7-8 Koken Braden Braden Op kooktemperatuur brengen Braden Op kooktemperatuur brengen 2-3 9 P Sauzen, boter, chocolade, gelatine Kant- en klaargerechten Rijst, pudding en bereidde gerechten Groenten, vis, diepgevroren producten Groenten, vis, vlees Gekookte aardappelen, soep, pasta Verse groenten Vlees, lever, eieren, braadworsten
Kleine storingen verhelpen [ E4 ] verschijnt in het display: De plaat moet worden geconfigureerd volgens onderstaande procedure : I) Opgelet: u mag niet meteen pannen plaatsen op de inductieplaat. II) Koppel de plaat los van het stroomnet: verwijder de stop of schakel de zekering uit. III) Verbind de plaat weer op het stroomnet: plaats de stop terug of schakel de zekering weer in. IV) Procedure: * Neem een pan met magnetische bodem met een minimale diameter van 16 cm.
De kookplaat of de kookzone werkt niet : • De kookplaat is verkeerd op het elektrisch net aangesloten • De zekering is gesprongen --> controleer de zekering in de meterkast.
Installatievoorschriften De montage dient enkel door erkende specialisten te worden uitgevoerd. De gebruiker dient de wetgeving en de normen van het land van zijn verblijfplaats na te leven. Plaatsen van de waterdichte strip De zelfklevende strip geleverd met het apparaat voorkomt waterlekkage in het aanrechtblad. Het plaatsen dient met grote zorg volgens onderstaande tekening te worden uitgevoerd.
Elektrische aansluiting • De installatie en de aansluiting op het elektrische net mag enkel toevertrouwd worden aan een vakman (elektricien) die op de hoogte is van de voorgeschreven normen. • Na het monteren moeten de stukken die onder spanning staan beschermd blijven. • De nodige aansluitgegevens staan op het kenplaatje en het aansluitingsplaatje aan de onderkant van het apparaat. • Het apparaat dient door middel van een meerpolige stroomonderbreker van het net gescheiden te zijn.
We kunnen niet verantwoordelijk gesteld worden voor ongevallen voortkomend uit een slechte aansluiting of ongevallen die gebeuren door toestellen zonder of met een defecte aarding. Milieuvoorschriften • de verpakkingsmaterialen zijn ecologisch en recycleerbaar. • de elektronische apparaten bevatten edele metalen. Informeer u bij uw Gemeente over de recyclagemogelijkheden.
Avant-propos Boretti vous félicite de cette nouvelle acquisition pour votre cuisine. Boretti vous remercie également de la confiance que vous manifestez pour notre marque en achetant ce produit. Avant d’en faire usage, nous vous conseillons de lire attentivement son mode d’emploi afin d’éviter tout problème et de vous garantir une utilisation correcte et en toute sécurité.
Sommaire Securite Precautions avant utilisation en cuisson Utilisation de l’appareil Precautions pour ne pas deteriorer l’appareil Precautions en cas de defaillance de l’appareil Autres protections 20 20 20 21 21 Description de l’appareil Caractéristiques techniques Bandeau de commande 22 22 Utilisation de l’appareil Affichage Ventilation 23 23 Mise en route et gestion de l’appareil Avant la premiere utilisation Principe de l’induction Touches sensitives Mise en route Detection de recipient Indicateur
Securite Précautions avant utilisation en cuisson • Retirez toutes les parties de l’emballage. • L’installation et le branchement électrique de l’appareil sont à confier à des spécialistes agrées. Le fabricant ne saurait être tenu responsable des dommages résultant d’une erreur d’encastrement ou de raccordement. • L’appareil ne doit être utilisé que s’il est monté et installé dans un meuble et un plan de travail homologué et adapté.
• Eviter que le sucre, les matières synthétiques ou une feuille d’aluminium ne touchent les zones chaudes. Ces substances peuvent au refroidissement provoquer des cassures ou d’autres modifications de la surface vitrocéramique: Eteindre l’appareil et enlevez-les immédiatement de la zone de cuisson encore chaude (attention : risque de brûlures). • Ne placez jamais de récipients chauds au dessus de la zone de commande.
Description de l’appareil Caractéristiques techniques Type Puissance totale MI-76 7100 W Position du Diamètre foyer Avant Gauche Arrière Gauche Arrière Droit Avant Droit Puissance nominale* 180 mm 170 mm 220 mm 145 mm Puissance du booster* 1400 W 1400 W 2300 W 1400 W Détection mini 2000 W 3000 W - 110 mm 110 mm 120 mm 110 mm * Puissances moyennes constatées.
Utilisation de l’appareil Affichage 0. 1…9 U E H P L Désignation Zéro Niveau de puissance Détection de casserole Message d’erreur Chaleur résiduelle Booster Verrouillage Description La zone de chauffe est activée. Choix du niveau de cuisson. Récipient manquant ou inapproprié. Défaut de circuit électronique. La zone de cuisson est chaude. La puissance turbo est activée. La table est sécurisée. Ventilation Le ventilateur de refroidissement a un fonctionnement entièrement automatique.
Mise en route • Enclencher / arrêter la table de cuisson : Action Enclencher Arrêter Bandeau de commande Appuyer sur [ 0/I ] Appuyer sur [ 0/I ] Afficheur 4x[0] Aucun ou [ H ] • Enclencher / arrêter une zone de chauffe : Action Sélectionner Augmenter Diminuer Arrêter Bandeau de commande Appuyer sur [ O ] de la zone Appuyer sur [ + ] Appuyer sur [ - ] Appuyer simultanément sur [ O ] de la zone et [ - ] ou appuyer sur [ - ] Afficheur [0] [ 1 ] jusqu’à [ 9 ] [ 9 ] jusqu’à [ 1 ] [ 0 ] ou [ H ] [ 0 ] ou [
• Enclencher / arrêter la fonction booster : Action Sélectionner la zone Sélectionner la puissance Enclencher le booster Stopper le booster Bandeau de commande Appuyer sur [ O ] de la zone Appuyer sur [ + ] Appuyer sur [ + ] Appuyer sur [ - ] Afficheur [0] [ 1 ] jusqu’à [ 9 ] [ P ] pendant 5 mn [9] • Gestion de la puissance maximale : L’ensemble de la table de cuisson est doté d’une puissance maximale.
• Arrêt automatique en fin de cuisson : Dès que le temps de cuisson sélectionné est écoulé la minuterie affiche en clignotant [ 00 ] et un signal sonore retentit. Pour stopper le son et le clignotement il suffit d’appuyer sur une touche.
Conseils de cuisson Qualité des casseroles Matériaux adaptés : acier, acier émaillé, fonte, inox à fond ferromagnétique, aluminium à fond ferro-magnétique. Matériaux non adaptés : aluminium et inox à fond non ferro-magnétique, cuivre, laiton, verre, céramique, porcelaine. Les fabricants spécifient si leurs produits sont compatibles induction. Pour vérifier si des casseroles sont compatibles : • Placez un peu d’eau dans une casserole placée sur une zone de cuisson induction réglée au niveau [ 9 ].
Exemples de réglage des puissances de cuisson (Les valeurs ci-dessous sont indicatives) 1-2 3-4 4-5 Faire fondre Réchauffer Gonfler Décongélation Vapeur Eau 6-7 Cuire à feu doux 7-8 Cuire Frire Frire, Porter à ébullition Frire, Porter à ébullition 2-3 9 P Sauces, beurre, chocolat, gélatine Plats pré-cuisinés Riz, pudding et plats cuisinés Légumes, poisson, produits congelés Légumes, poissons, viande Pommes de terre à l’eau, soupes, pâtes Légumes frais Viandes, foie, œufs, saucisses Goulasch, rou
Que faire en cas de probleme Le symbole [ E 4 ] s’affiche : La table doit être reconfigurée suivant la procédure ci-dessous : I) S’assurer qu’il n’y ait pas de récipients sur la table à induction. II) Débrancher la table du réseau électrique : enlever le fusible ou couper le disjoncteur. III) Rebrancher la table au réseau électrique : remettre le fusible ou rebrancher le disjoncteur. IV) Procédure : Vous munir d’un récipient à fond ferromagnétique de diamèter 16 cm minimum.
La table de cuisson ou les zones de cuisson ne s’enclenchent pas : • La table est mal connectée au réseau électrique • Le fusible de protection a sauté • Vérifiez si le verrouillage n’est pas activé • Les touches sensitives sont couvertes d’eau ou de graisse • Un objet est posé sur les touches sensitives Le symbole [ U ] s’affiche : • Il n’y a pas de casserole sur la zone de cuisson • Le récipient utilisé n’est pas compatible avec l’induction • Le diamètre du fond de casserole est trop petit par rap
Instructions d’installation Le montage relève de la compétence exclusive de spécialistes. L’utilisateur est tenu de respecter la législation et les normes en vigueur dans son pays de résidence. Mise en place du joint d’étanchéité Le joint adhésif fourni avec l’appareil permet d’éviter toute infiltration dans le meuble. Sa mise en place doit être effectuée avec un grand soin suivant le croquis ci-dessous.
Connexion electrique • L’installation de cet appareil et son branchement au réseau électrique ne doit être confiés qu’à un électricien parfaitement au fait des prescriptions normatives. • La protection contre les pièces sous tension doit être assurée après le montage. • Les données de raccordement nécessaires se trouvent sur la plaque signalétique et la plaque de branchement placées sous l’appareil. • Cet appareil doit être séparé du secteur par un dispositif de sectionnement omnipôles.
Notre responsabilité ne saurait être engagée pour tout incident résultant d’un mauvais branchement, ou qui pourrait survenir à l’usage d’un appareil non relié à la terre ou équipé d’une terre défectueuse. Directives relatives à l’environnement • Les matériaux d’emballage sont écologiques et recyclables. • Les appareils électroniques sont composés de matériaux recyclables et parfois de matériaux nocifs pour l’environnement, mais nécessaires au bon fonctionnement et à la sécurité de l’appareil.
Vorwort Herzlichen Glückwunsch! Jetzt nennen Sie offi ziell einen Boretti Ihr Eigen. In den kommenden Jahren werden Sie entdecken, dass ein Boretti das Kochen zu einem wahren Fest werden lässt. Bei der Entwicklung Ihres Einbaugeräts haben wir alles getan, damit Sie als Koch im Mittelpunkt stehen. Deshalb halten Sie auch keine Anleitung im Format eines Telefonbuchs in den Händen, sondern ein handliches, sehr gut lesbares Exemplar. Genau so ist auch Ihr Einbaugerät, das heißt: verständlich und übersichtlich.
Inhalt Sicherheit Vorsichtsmaßnahme vor der inbetriebnahme Allgemeine sicherheits-hinweise Schütz vor beschädigung Vorsichtsmaßnahmen bei geräteausfall Schutz vor weiteren gefahren 36 36 36 37 37 Gerätebeschreibung Technische beschreibung Bedienfeld 38 38 Bedienung des kochfeldes Anzeige Belüftung 39 39 Inbetriebnahme des kochfeldes Vor dem ersten aufheizen Induktionsprinzip Funktion der sensorschaltfelder Kochfeld ein- und ausschalten Topferkennung Restwärmeanzeige Powerfunktion Zeitschaltuhr Verrieg
Sicherheit 36 Vorsichtsmaßnahmen vor der Inbetriebnahme • Alle Teile der Verpackung abnehmen. • Das Gerät darf nur von einem Elektrofachmann eingebaut und angeschlossen werden. Der Hersteller kann nicht verantwortlich gemacht werden für Schäden, die durch Fehler beim einbauen oder anschließen verursacht werden. Benutzen Sie das Gerät nur im eingebauten Zustand.
doch nicht unzerbrechlich. Besonders spitze und harte Gegenstände, die auf die Kochfläche fallen, können sie beschädigen. • Töpfe und Ränder nicht an der Scheibe anstoßen. • Die Kochzonen nicht mit leerem Kochgeschirr benützen. • Vermeiden Sie Zucker, Kunstoff, oder Alufolie auf den heißen Kochzonen. Diese Stoffe schmelzen, kleben fest und können dadurch beim Abkühlen Risse, Brüche oder andere bleibende Veränderungen in der Scheibe verursachen.
Gerätebeschreibung Technische Beschreibung Typ Gesamt Leistung MI-76 7100 W Kochzonen Durchmesser Nennleistung* Booster Minimum Leistung* Topferkennung Vorne links Hinten links Hinten rechts Vorne rechts 2000 W 3000 W - 180 mm 170 mm 220 mm 145 mm 1400 W 1400 W 2300 W 1400 W 110 mm 110 mm 120 mm 110 mm * Durschnittsleistungen. Die Maximalen gemessenen Leistungen können diese Werte überschreiten je nach Größe, Form und Qualität der verwendeten Töpfe.
Bedienung des kochfeldes Anzeige 0. 1…9 U E H P L Benennung Null Leistungsstufe Topferkennung Fehleranzeige Restwärme Booster Verriegelung Beschreibung Die Kochzone ist aktiviert Einstellung der Leistung Topf nicht aufgesetzt oder nicht geeignet Fehler der Elektronik Kochzone ist heiß Die Booster Leistung ist aktiviert. Die Mulde ist abgesichert Belüftung Der Lüfter funktioniert automatisch.
Kochfeld ein- und ausschalten • Kochfeld: einschalten/ ausschalten : Betätigung Einschalten : Ausschalten : Bedienfeld Auf [ 0/I ] drücken Auf [ 0/I ] drücken Anzeige 4x[0] keine oder [ H ] • Kochzone: einschalten/ ausschalten : Betätigung Auswahlen der Kochzone Leistung erhöhen Leistung verringern Ausschalten Bedienfeld Auf [ O ] drücken Auf [ + ] drücken Auf [ - ] drücken Auf [ O ] und [ - ] gemeinsam drücken oder auf [ - ] drücken Anzeige 4x[0] [ 1 ] bis [ 9 ] [ 9 ] bis [ 1 ] [ 0 ] oder [ H ] [ 0 ]
• Power einschalten/ ausschalten : Betätigung Auswählen der Kochzone Leistung erhöhen Power einschalten Power ausschalten Bedienfeld Auf [ O ] drücken Auf [ + ] drücken Auf [ + ] drücken Auf [ - ] drücken Anzeige [0] [ 1 ] bis [ 9 ] [ P ] während 5 min [9] • Automatische Steuerung des Power: Die Kochmulde ist mit einer Höchstleistung ausgestattet.
• Automatisches Ausschalten: Nach Ablauf der programmierte Kochdauer wird [ 00 ] blinkend angezeigt und ein akustisches Signal wird erfolgen. Um den Signalton und das blinken abzuschalten, brauchen Sie nur eine beliebige Taste zu betätigen. Ankochautomatik Alle Kochzonen sind mit einer Ankochautomatik bestückt. Bei aktivierter Ankochautomatik heizt die Kochzone automatisch mit höchster Leistung an und schaltet dann auf die von Ihnen gewählte Fortkochstufe zurück.
Kochempfehlungen Kochgeschirr Geeignete Materialien: Stahl, emaillierter Stahl, Gußeisen, Edelstahl mit magnetischem Boden, Aluminium mit magnetischem Boden Nicht geeignete Materialien: Aluminium und Edelstahl ohne magnetischem Boden, Kupfer, Messing, Glas, Steingut, Porzellan Die Topfhersteller spezifizieren ob ihre Produkte Induktiongeeignet sind. So überprüfen Sie die Induktions-Kompatibilität der Töpfe: • Füllen Sie das Geschirr mit etwas Wasser und setzen Sie es auf die Induktions-Kochzone.
Einstellbereiche (diese Angaben sind Richtwerte) 1-2 Schmelzen, Auflösen, Zubereitung 2-3 Quellen, Auftauen, Warmhalten 3-4 4-5 Dampfgaren, Dünsten Dünsten, Quellen, Auftauen 6-7 Ankochen, Fortkochen 7-8 Schonendes Braten Saucen, Butter, Schokolade GelatineYoghurt Reis, Gefrorene Gerichte, Fisch, Gemüse Fisch, Gemüse, Obst Fisch, Gemüse, Teigwaren, Getreide, Hülsenfrüchte, Tiefkühlkost Fleisch, Leber , Eier, Wurst Gulasch, Rouladen Fisch, Schnitzel, Bratwurst, Spiegeleier Backen, Ankochen Steaks
Was tun wenn… [ E4 ] in der Anzeige erscheint : Das Kochfeld muss neu konfiguriert werden. Bitte folgen Sie nachstehende Hinweise: I) Entfernen Sie alle Töpfe von Ihrem Kochfeld II) Das Kochfeld muss zuerst vom Stromnetz getrennt werden: nehmen Sie den Anschlusskabel weg oder schalten Sie die Sicherung am Schalttafel ab. III) Schalten Sie den Strom wieder ein. IV) Verfahrens: Anschlusskabel weg oder schalten Sie die Sicherung am Schalttafel ab.
Die Kochmulde oder die Kochzonen nicht einschalten: • • Die Mulde ist falsch am Netz angeschlossen. • Die Sicherung der Hausinstallation ist nicht korrekt eingesetzt. • Die Kochmulde ist verriegelt. • Die Sensortasten sind mit Wasser oder Schmutz bedeckt. • Ein Kochgeschirr bedeckt die Tasten. In der Anzeige erscheint [ U ] : • Das Kochgeschirr ist nicht auf der Kochzone. • Das Kochgeschirr ist nicht Induktiongeeignet • Der Topfboden-Durchmesser ist zu klein für diese Kochzone.
Montagehinweise Montage und Anschluss dürfen nur durch einen autorisierten Fachmann vorgenommen werden. Der Benutzer muss darauf achten dass die in seinem Wohnsitz geltenden Normen eingehalten werden. Dichtung Einbau : Die mit dem Kochfeld gelieferte Dichtung verhindert das Eindringen von Flüssigkeiten in das Gerät. Die Installation muss sorgfältig und gemäß folgender Zeichnung durchgeführt werden.
Elektroanschluss • Zum Anschluss des Gerätes an das Elektronetz beauftragen Sie einen Elektrofachmann, der die landesüblichen Vorschriften der örtlichen Elektroversorgungsunternehmen genau kennt und sorgfältig beachtet. • Der Berührungsschutz betriebsisolierter Teile muss nach der Montage sichergestellt sein. • Ob die erforderlichen Anschlussdaten mit denen des Netzes übereinstimmen, finden Sie auf dem Typenschild. • Das Gerät muss durch Trenneinrichtungen allpolig vom Netz abgeschaltet werden können.
Wir sind nicht verantwortlich für Zwischenfälle die durch falschen Anschluß, oder nicht vorhandenen oder unrichtigem Erdungsanschluß entstehen. Umweltvorschriften Lassen Sie die Verpackungsreste in keinem Fall unbeaufsichtigt zurück. Trennen Sie die verschiedenen Verpackungsmaterialien und geben Sie sie bei der nächsten Abfallentsorgungsstelle in Ihrer Gemeinde ab. Wir verwenden zur Verpackung unserer Produkte nicht verunreinigende und daher umweltfreundliche und recyclingfähige Werkstoffe.
Introduction Boretti would like to congratulate you on your new kitchen purchase, and to thank you for choosing a Boretti brand product. Please read this manual carefully before going on to use the product. This will prevent possible problems and ensure that you are aware of the correct and safe use of this product In the event that queries arise once you have read the manual or at any time during the use of your Boretti product, we will be happy to help you.
Summary Safety Precautions before using Using the appliance Precautions not to damage the appliance Precautions in case of appliance failure Other protections 52 52 52 53 53 Description of the appliance Technical characteristics Control panel 54 54 Use of the appliance Display Ventilation 55 55 Starting-up and appliance management Before the first use Induction principle Sensitive touch Starting-up Pan detection Residual heat indication Booster function Timer Control panel locking 55 55 55 56 56 56 5
Safety Precautions before using • Unpack all the materials. • T he installation and connecting of the appliance have to be done by approved specialists. The manufacturer can not be responsible for damage caused by building-in or connecting errors. • To be used, the appliance must be well-equipped and installed in a kitchen unit and an adapted and approved work surface. • T his domestic appliance is exclusively for the cooking of food, to the exclusion of any other domestic, commercial or industrial use.
of the appliance is large enough (2 cm). This is essential to guaranty a correct ventilation. • Never put any inflammable object (ex. sprays) into the drawer situated under the vitroceramic hob. The eventual cutlery drawers must be resistant to heat. Precautions in case of appliance failure • If a defect is noticed, switch off the appliance and turn off the electrical supplying. • If the ceramic glass is cracked or fissured, you must unplug the appliance and contact the after sales service.
Description of the appliance Technical characteristics Type Total Position of the Diameter Nominal Booster Power heating zone Power* Power* Minimum diameter detection MI-76 7100 W Front left 180 mm 1400 W 2000 W 110 mm Rear left 170 mm 1400 W 110 mm Rear right 220 mm 2300 W 3000 W 120 mm Front right 145 mm 1400 W 110 mm * Average measured power. According to the form, size and quality of the pan, the maximum measured power can exceed these figures.
Use of the appliance Display 0. 1…9 U E H P L Designation Zero Power level Pan detection Error message Residual heat Booster Locking Function The heating zone is activated. Selection of the cooking level. No pan or inadequate pan. Electronic failure. The heating zone is hot. The boosted power is activated. Control panel locking. Ventilation The cooling system is fully automatic. The cooling fan starts with a low speed when the calories brought out by the electronic system reach a certain level.
Starting-up • Start up / switch off the hob: Action To start Touch the key Control panel Press key [ 0/I ] Press key [ 0/I ] Display 4x[0] Nothing or [ H ] • Start-up/ switch off a heating zone : Action Zone selection Increase power Decrease power Stop Control panel Press key [ O ] from the zone Press key [ + ] Press key [ - ] Press simultaneous [ - ] and [ O ] or press keys [ - ] Display [0] [ 1 ] to [ 9 ] [ 9 ] to [ 1 ] [ 0 ] or [ H ] [ 0 ] or [ H ] If no action is made within 20 second the electron
• Start up / Stop the booster function : Action Zone selection Increase power Start up the booster Stop the booster Control panel Press key [ O ] from the zone Press key [ + ] Press key [ + ] Press key [ - ] Display [0] [ 1 ] to [ 9 ] [ P ] during 5 min [9] • Power management : The hole cooking hob is equipped by a maximum of power. When the booster function is activated, and not to exceed the maximum power, the electronic system orders to reduce automatically the power level of an other heating zone.
• Automatic stop at the end of the cooking time : As soon as the selected cooking time is finished the timer displays blinking [ 00 ] and a sound rings. To stop the sound and the blinking it is enough to press any key. • Egg timer function : Action Activate the hob Select« Timer » Decrease the time Increase the time Control panel Press key [ 0/I ] Press simultaneously [ - ] and [ + ] Press key [ - ] Press key [ + ] Display 4 x [ 0 ] or [ H ] Timer [ 00 ] min [ 00 ] wents to 30,29….
Cooking advices Pan quality Adapted materials : steel, enamelled steel, cast iron, ferromagnetic stainless-steel, aluminium with ferromagnetic bottom. Not adapted materials : aluminium and stainless-steel without ferromagnetic bottom, cupper, brass, glass, ceramic, porcelain. The manufacturers specify if their products are compatible induction. To check if pans are compatibles : • Put a little water in a pan placed on an induction heating zone set at level [ 9 ].This water must heat in a few seconds.
Examples of cooking power setting (the values below are indicative) 1-2 2-3 3-4 4-5 6-7 7-8 9 P Melting Reheating Simmering Defrosting Steam Water Medium cooking Simmering Cooking Sauces, butter, chocolate, gelatine Dishes prepared beforehand Rice, pudding, sugar syrup Dried vegetables, fish, frozen products Vegetables, fish, meat Steamed potatoes, soups, pasta, fresh vegetables Meat, lever, eggs, sausages Goulash, roulade, tripe Potatoes, fritters, wafers Frying, roosting Boiling water Frying, roosti
Trouble shooting When the symbol [ E 4 ] appears : The table must be reconfigured. Please implement the following steps: I) Make sure there is no more pot on the hob. II) Disconnect the appliance from the grid by removing the fuse or turning the circuit breaker off. III) Reconnect the table to the grid.
The hob or the cooking zone doesn’t start-up : • T he hob is badly connected on the electrical network. • T he protection fuse cut-off. • T he locking function is activated. • T he sensitive keys are covered with grease or water. • An object is put on a key. The control panel displays [ U ] : • T here is no pan on the cooking zone. • T he pan is not compatible with induction. • T he bottom diameter of the pan is too small. The control panel displays [ C ] or [ E ] : • Call the After-sales Service.
Installation instructions The installation comes under the exclusive responsibility of specialists. The installer is held to respect the legislation and the standards enforce in his home country. How to stick the gasket: The gasket supplied with the hob avoids all infiltration of liquids in the cabinet. His installation has to be done carefully, in conformity of the following drawing. 2 mm Stick the gasket (2) two millimeters from the external edge of the glass, after removing the protection sheet (3).
Electrical connection • T he installation of this appliance and the connection to the electrical network should be entrusted only to an electrician perfectly to the fact of the normative regulations and which respects them scrupulously. • Protection against the parts under tension must be ensured after the building-in. • T he data of connection necessary are on the stickers place on the hob casing near the connection box.
We cannot be held responsible for any incident resulting from incorrect connection or which could arise from the use of an appliance which has not been earthed or has been equipped with a faulty earth connection. Environmental Regulations Should you wish to discard the machine for any reason, please comply with the following: Take the machine to the local authorized company that collects discarded household appliances. Correct processing enable valuable materials to be recycled in an intelligent manner.
BORET TI BV De Dollard 17 1454 AT Watergang T +31(0) 20-4363439 F +31(0) 20-4361326 S +31(0) 20-4363525 (service) E info @ boret ti.com The Netherlands NV BORET TI SA Rupelweg 16 2850 Boom T +32 (0) 3-4508180 F +32 (0) 3-4586847 E info.be @ boret ti.