Geachte Klant, We danken U hartelijk voor het in ons gestelde vertrouwen bij uw keuze van de vitrokeramische inductiekookplaat. Teneinde dit apparaat goed te kennen raden we U aan deze gebruiksaanwijzing volledig en aandachtig door te lezen en ze te bewaren om ten gepaste tijde te kunnen raadplegen.
INHOUD Veiligheid Voorzorgsmaatregelen voor gebruik van het toestel Gebruik van het apparaat Reiniging Voorzorgsmaatregelen tegen beschadiging Voorzorgsmaatregelen bij defect van het apparaat Andere beschermingen Beschrijving van het apparaat Technische kenmerken Bedieningspaneel Gebruik van het apparaat Tiptoetsen Display Aanduiding restwarmte Ventilatie In werking stellen Voor het eerste gebruik Principe van inductie Inwerkingstelling Detectie van de kookpot Aanduiding restwarmte Booster functie Timer
VEILIGHEID Voorzorgsmaatregelen voor gebruik van het toestel • • • • • • • • • • Verwijder alle verpakkingen. De installatie en de elektrische aansluiting van het apparaat dienen aan een erkende vakman toevertrouwd te worden. De fabrikant kan niet verantwoordelijk gesteld worden voor eventuele schade voortkomend uit een foutieve inbouw of aansluiting. Het apparaat mag enkel gebruikt worden wanneer het gemonteerd en geïnstalleerd is in een meubel met een gehomologeerd en aangepast werkvlak.
• • • • • • • Vermijd het stoten van kookpotten tegen de rand van het glas. Verzeker u ervan dat de ventilatie van het apparaat verloopt volgens de instructies van de fabrikant. Plaats of laat geen lege kookpotten op de kookplaat. Vermijd het contact van suiker, synthetische stoffen of aluminiumfolie met de hete zones.
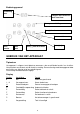
Bedieningspaneel Aanduiding timer Lampjes voor keuze van zone voor timer Vermogenaanduiding Lampje kookzone Toets aan/uit Toets Booster Toets timer Toets [-] voor de 4 zones Toets [ + ] GEBRUIK VAN HET APPARAAT Tiptoetsen Uw apparaat is uitgerust met tiptoetsen waarmee u de verschillende functies kan instellen. Het aanraken van de toets zet de functie in werking. Deze activering wordt weergegeven door een lichtje, een aflezing en/of een geluidssignaal. Druk niet op meerdere toetsen tegelijk.
Aanduiding restwarmte Het lampje « H » licht op wanneer de overeenstemmende kookzone heet is (de kookzones worden door de bodem van de kookpotten verhit). In dit geval is er gevaar voor brandwonden. De restwarmte kan gebruikt worden om de gerechten warm te houden. Ventilatie De koelingsventilator functioneert helemaal automatisch. Hij komt langzaam op gang zodra de door de elektronica vrijgekomen calorieën een bepaalde hoeveelheid overschrijden.
• In- en uitschakelen van een verwarmingszone: Actie Bedieningspaneel Display Kiezen Verhogen Verlagen Uitschakelen druk op [ + ] van de zone druk op [ + ] van de zone druk op [ - ] druk tegelijkertijd op [ + ] en [ - ] of druk op [ - ] [ 0. ] [ 1 ] tot [ 9 ] [ 9 ] tot [ 1 ] [ 0 ] of [ H ] [ 0 ] of [ H ] Indien binnen de 20 seconden geen regeling is uitgevoerd, valt de elektronica terug op de wachtpositie.
• Gebruik van het maximaal vermogen : Het geheel van de kooktafel is met een maximaal vermogen uitgerust. Wanneer de booster functie in werking is, en om dit maximaal vermogen niet te overschrijden, wordt het vermogen van een andere kookzone automatisch verminderd. De display van deze kookzone zal gedurende enkele seconden knipperend [ 9 ] aanduiden en duidt dan het maximum vermogen aan: Gekozen kookzone Andere kookzone ( bv.
Programmeren van automatisch koken « go and stop » Alle kookzones zijn uitgerust met een automatisch kookdispositief. De kookzone functioneert eerst een zekere tijd op volle kracht en vermindert dan automatisch het vermogen op de uitgekozen warmte.
De fabrikanten vermelden of hun producten geschikt zijn voor inductie. Om u ervan te verzekeren of de kookpotten geschikt zijn: • Giet een beetje water in een kookpot en plaats deze op een inductie kookzone geregeld op [ 9 ]. Het water moet binnen enkele seconden opwarmen. • Houd een magneet tegen de bodem van de kookpot. De magneet moet blijven plakken. Sommige kookpotten maken lawaai wanneer ze op een inductie kookzone geplaatst worden.
KLEINE STORINGEN VERHELPEN De kookplaat of de kookzone werkt niet : • • • • • de kookplaat is slecht op het elektrisch net aangesloten de veiligheidszekering is gesprongen kijk na of de vergrendeling niet is ingeschakeld de tiptoetsen zijn met water of vet bespat er staat een voorwerp op de tiptoetsen Het symbool [ U ] licht op : • • er staat geen kookpot op de kookzone de kookpot is niet geschikt voor inductie • de diameter van de bodem van de kookpot is te klein in vergelijking met de kookzone Het s
INSTALLATIEVOORSCHRIFTEN De montage dient enkel door erkende specialisten te worden uitgevoerd. De gebruiker dient de wetgeving en de normen van het land van zijn verblijfplaats na te leven. Plaatsen van de waterdicht strip De zelfklevende strip geleverd met het apparaat vermijdt infiltratie in het meubel. Het plaatsen dien met grote zorg volgens onderstaande tekening te worden uitgevoerd.
ELEKTRISCHE AANSLUITING • • • • • De installatie en de aansluiting op het elektrisch net mag enkel toevertrouwd worden aan een vakman (elektricien) die op hoogte is van de voorgeschreven normen. Na het monteren moeten de stukken die onder spanning staan beschermd blijven. De nodige aansluitgegevens staan op het kenplaatje et het aansluitingsplaatje aan de onderkant van het apparaat. Het apparaat dient door middel van een meerpolige stroomverbreker van het net gescheiden te zijn.
Dear clients, Thank you for having chosen our induction ceramic hob. In order to make the best use of your appliance, we would advise you to read carefully the following notes and to keep them for a later consulting.
SUMMARY Safety 17 Precautions before using Using the appliance Cleaning Precautions not to damage the appliance Precautions in case of appliance failure Other protections Description of the appliance 17 17 17 17 18 18 18 Technical data Control panel 18 19 Use of the appliance 19 Sensitive touches Display Residual heat indicator Ventilation 19 19 19 20 Starting-up and appliance management Before the first use Induction principle Starting-up Pan detection Residual heat indication Timer Booster fun
SAFETY Precautions before using • • • • • • • • • • Unpack all the materials. The installation and connecting of the appliance have to be done by approved specialists. The manufacturer can not be responsible for damage caused by building-in or connecting errors. To be used, the appliance must be well-equipped and installed in a kitchen unit and an adapted and approved work surface.
• • • • Sugar , synthetic materials or aluminium sheets must not contact with the heating zones. These may cause breaks or other alterations of the vitroceramic glass by cooling : switch on the appliance and take them immediately out of the hot heating zone (be careful : do not burn yourself). Never place any hot container over the control panel.
Timer display Control panel Control light timer Booster key Power display Control light cooking zone [ + ] key Timer key [-] key for all 4 heating zones On/Off key USE OF THE APPLIANCE Sensitive touches Your ceramic hob is equipped with electronic controls with sensitive touch keys.When your finger touches the key, the corresponding command is activated. This activation is validated by a control light, a letter or a number in the display and/or a “beep” sound. Touch only one key on the same time.
Ventilation The cooling system is fully automatic. The cooling fan starts with a low speed when the calories brought out by the electronic system reach a certain level. The ventilation starts his high speed when the hob is intensively used. The cooling fan reduces his speed and stops automatically when the electronic circuit is cooled enough. STARTING-UP AND APPLIANCE MANAGEMENT Before the first use Clean your hob with a damp cloth, and then dry the surface thoroughly.
Pan detection The pan detection ensures a perfect safety. The induction doesn’t work : • If there is no pan on the heating zone or if this pan is not adapted to the induction. In this case it is impossible to increase the power and the display shows [ U ]. This symbol disappears when a pan is put on the heating zone. • If the pan is removed from the heating zone the operation is stopped. The display shows [ U ]. The symbol [ U ] disappears when the pan is put back to the heating zone.
• Egg timer function : Action Activate the hob Select« Timer » Decrease the time 59,58,57,…… Increase the time Control panel Press on key [ 0/I ] Press on key [ ] Press on key [ - ] Press on key [ Display The zone control lights are on Time [ 00 ] minutes [60] wents to ] The time increases… After a few seconds the control light stops with blinking. As soon as the selected cooking time is finished the timer displays blinking [00] and a sound rings.
• Start-up : Action Control panel Display Zone selection Full power setting Automatic cooking Power level selection (for example « 7 ») Press on key [ + ] Press on key [ + ] Press on key [ + ] Press on key [ - ] [ 0 ] and control light on [ 1 ] …… to……. [ 9 ] [ 9 ] is blinking with [ A ] [ 9 ] [ 8 ] [ 7 ] …..….
Pan dimension The cooking zones are, until a certain limit, automatically adapted to the diameter of the pan. However the bottom of this pan must have a minimum of diameter according to the corresponding cooking zone. To obtain the best efficiency of your hob, please place the pan well in the center of the cooking zone.
The symbol [ U ] displays : • There is no pan on the cooking zone. • The pan is not compatible with induction. • The bottom diameter of the pan is too small. The symbol [ F ] displays : • You cannot use this cooking zone anymore. • Call the After-sales Service. The symbol [ E ] displays : • The electronic system is defective. • Disconnect and replug the hob. • Call the After-sales Service.
INSTALLATION INSTRUCTIONS The installation comes under the exclusive responsibility of specialists. The installer is held to respect the legislation and the standards enforce in his home country.
How to stick the gasket: The gasket supplied with the hob avoids all infiltration of liquids in the cabinet. His installation has to be done carelessly, in conformity of the following drawing. Stick the gasket (2) two millimeters from the external edge of the glass, after removing the protection sheet (3).
Connection of the hob The ceramic hob can be connected in different ways: Monophase 230V~1P+N Biphase 400V~2P+N Setting up the configurations: For the various kinds of connection, use the brass bridges which are in the box next the terminal Monophase 230V~1P+N Put the 1st bridge between terminal 1 and 2, the 2nd between 4 and 5. Attach the earth to the terminat “earth”, the neutral N to terminal 5 (or 4), the Phase L to one of the terminals 1 or 2. Biphase 400V~2P+N Put a bridge between terminal 4 and 5.
Chère cliente, cher client, Nous vous remercions de la confiance que vous nous avez accordée en choisissant notre table de cuisson vitrocéramique à induction. Afin de bien connaître cet appareil nous vous recommandons de lire attentivement cette notice d’utilisation dans son intégralité et de la conserver pour une consultation ultérieure.
SOMMAIRE Sécurité 31 Précautions avant utilisation en cuisson Utilisation de l’appareil Nettoyage Précautions pour ne pas détériorer l’appareil Précautions en cas de défaillance de l’appareil Autres protections Description de l’appareil 31 31 31 32 32 32 33 Caractéristiques techniques Bandeau de commande 33 33 Utilisation de l’appareil 34 Touches sensitives Affichage Indicateur de chaleur résiduelle Ventilation 34 34 34 34 Mise en route et gestion de l’appareil Avant la première utilisation Prin
SECURITE Précautions avant utilisation en cuisson • • • • • • • • • • Retirez toutes les parties de l’emballage. L’installation et le branchement électrique de l’appareil sont à confier à des spécialistes agrées. Le fabricant ne saurait être tenu responsable des dommages résultant d’une erreur d’encastrement ou de raccordement. L’appareil ne doit être utilisé que s’il est monté et installé dans un meuble et un plan de travail homologué et adapté.
Précautions pour ne pas détériorer l’appareil • • • • • • • • • • Les casseroles à semelles brutes (fonte non émaillée,…) ou abîmées peuvent endommager la vitrocéramique. La présence de sable ou d’autres matériaux abrasifs peut endommager la vitrocéramique. Evitez de faire chuter des objets, mêmes petits, sur la vitrocéramique. Ne heurtez pas les bords de la vitre avec les casseroles. S’assurer que la ventilation de l’appareil se fasse suivant les instructions du constructeur.
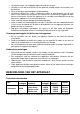
DESCRIPTION DE L’APPAREIL Caractéristiques techniques Type 4 foyers Puissance Position totale du foyer Avant Gauche Arrière Gauche 7400W Arrière Droit Avant Droit Puissance Puissance Diamètre Nominale * du booster * 1850W 2500W 180mm 1850W 2500W 180 mm 1400W 1800W 145 mm 2300W 3200W 210 mm * la puissance peut varier en fonction des dimensions et des matériaux des casseroles.
UTILISATION DE L’APPAREIL Touches sensitives Votre appareil est équipé de touches sensitives permettant de commander les différentes fonctions. Un effleurage de la touche active leur fonctionnement. Cette activation est validée par un voyant, un affichage et/ou par un signal sonore. N’appuyez que sur une seule touche à la fois.
Bien entendu le récipient doit être adapté : • Sont recommandés tous les récipients métalliques ferro-magnétiques (à vérifier éventuellement avec un petit aimant) tels que : cocotte en fonte, poêle en fer noir, casseroles métalliques émaillées, en inox à semelle ferro-magnétique… • Sont exclus les récipients en cuivre, inox, aluminium, verre, bois, céramique, grès, terre cuite, inox non ferro-magnétique… La zone de cuisson à induction prend automatiquement en compte la taille du récipient utilisé.
Fonction booster La fonction booster [ P ] octroie un renforcement de puissance à la zone de cuisson sélectionnée. Si cette fonction est activée, ces zones de cuisson fonctionnent pendant 10 minutes avec une puissance nettement plus élevée. Le booster est conçu par exemple pour faire chauffer rapidement de grandes quantités d’eau, comme pour la cuisson des pâtes.
Lorsque plusieurs minuteries sont activées il suffit de répéter l’opération. Arrêt automatique en fin de cuisson : Dès que le temps de cuisson sélectionné est écoulé la minuterie affiche en clignotant [00] et un signal sonore retentit. Pour stopper le son et le clignotement il suffit d’appuyer sur la touche [ M ].
Dans les 5 secondes après la mise en route : Déverrouiller la table Appuyer ensemble [ - ] et [ + ] de la zone avant droite Ré appuyer sur [ - ] [ 0 ] sur les 4 afficheurs Les afficheurs sont éteints CONSEILS DE CUISSON Qualité des casseroles Matériaux adaptés : acier, acier émaillé, fonte, inox à fond ferromagnétique, aluminium à fond ferromagnétique Matériaux non adaptés : aluminium et inox à fond non ferromagnétique, cuivre, laiton, verre, céramique, porcelaine Les fabricants spécifient si leurs produ
ENTRETIEN ET NETTOYAGE Laissez refroidir l’appareil, car risques de brûlures. Nettoyez les restes de cuisson avec de l’eau additionnée de produit vaisselle ou un produit du commerce conseillé pour la vitrocéramique. N’utilisez pas de produits de nettoyage abrasifs qui pourraient endommager l’appareil. Séchez l’appareil avec un chiffon propre. Enlevez immédiatement le sucre et les mets contenant du sucre.
PROTECTION DE L’ENVIRONNEMENT • • les matériaux d’emballage sont écologiques et recyclables les appareils électroniques sont composés de matériaux recyclables et parfois de matériaux nocifs pour l’environnement, mais nécessaires au bon fonctionnement et à la sécurité de l’appareil • • ne jetez en aucun cas votre appareil avec les déchets ménagers faites appel au service d’enlèvement ou aux sites de dépôt mis en place par votre commune et adaptés au recyclage des appareils électroménagers INSTRUCTIONS D’I
• • • • • • Les matériaux des plans de travail peuvent gonfler au contact de l’humidité. Pour protéger le chant de la découpe, appliquer un vernis ou une colle spéciale.
Apreciada clienta, apreciado cliente, Le agradecemos la confianza que nos ha otorgado al elegir nuestra placa de cocción vitrocerámica a inducción. Con el fin de conocer bien este aparato, le recomendamos lea atentamente estas instrucciones de utilización en su totalidad y las conserve para consultas posteriores.
RESUMEN Seguridad 44 Precauciones antes de utilizarla para cocinar 44 Utilización del aparato 44 Limpieza 44 Precauciones para no deteriorar el aparato 45 Precauciones en caso de fallo del aparato 45 Otras precauciones 45 Descripción del aparato 46 Caractéristicas tecnicas 46 Zona de mandos 46 Utilización del aparato 47 Teclas táctiles 47 Indicacones 47 Indicador de calor residual 47 Ventilación 47 Puesta en marcha y gestión del aparato 47 Antes de la primera utilización 47
SEGURIDAD Precauciones antes de utilizarla para cocinar • • • • • • • • • • Retire todos los elementos del embalaje. La instalación y el conexionado eléctrico del aparato deben encargarse a un especialista autorizado. El fabricante no será responsable de los daños resultantes de un error de empotramiento o de conexionado. El aparato sólo debe utilizarse si está montado e instalado en un mueble y una superficie de trabajo homologados y adaptados.
Precauciones para no deteriorar el aparato • • • • • • • • • • Las cacerolas con suelas sin pulir (fundición no esmaltada,…) o estropeadas pueden dañar la vitrocerámica. La presencia de arena u otros materiales abrasivos puede dañar la vitrocerámica. Evite dejar caer objetos, aunque sean pequeños, sobre la vitrocerámica. No dé golpes a los bordes del cristal con las cacerolas. Asegúrese de que la ventilación del aparato se haga según las instrucciones del fabricante.
DESCRIPCIÓN DEL APARATO Caractéristicas tecnicas Potenciatot otal * MI-60 MI-75 7400W Posicion Potencia Del fogon nominal * Izquierdo delante 1850W Detrás izquierdo 1850W Detrás derecha 1400W Derecha delante 2300W Potencia Diamètro De refuerzo* 2500W 180mm 2500W 180 mm 1800W 145 mm 3200W 210 mm * la potencia puede variar en función de las dimensiones y de los materiales de las cacerolas. .
UTILIZACIÓN DEL APARATO Teclas táctiles Su aparato está provisto de teclas táctiles que permiten controlar las distintas funciones. Un pequeño roce con la tecla activa su funcionamiento. Esta activación queda confirmada por un piloto, un indicador y/o por una señal sonora. No toque una tecla más de una vez.
Principio de la inducción Debajo de cada placa de cocción hay una bobina de inducción. Cuando ésta está conectada, produce un campo electromagnético variable el cual produce a su vez corrientes inducidos en el fondo ferromagnético del recipiente. De ello resulta un calentamiento del recipiente colocado sobre la zona de calentamiento.
Detección del recipiente La detección del recipiente asegura una seguridad perfecta. La inducción no funciona: • Cuando no hay recipiente sobre la zona de cocción o cuando este recipiente no es adecuado para la inducción. En este caso es imposible aumentar la potencia y aparece el símbolo [U] en el indicador. La [U] desaparece cuando se coloca una cacerola en la zona de cocción. Si en el curso de la cocción se retira el recipiente de la zona de cocción, el funcionamiento se interrumpe.
Función minutero (para los modelos que la tienen) El minutero puede asignarse simultáneamente a las 4 placas de cocción y con ajustes diferentes de tiempo en minutos (de 0 a 99 minutos) para cada una de las placas. Ajuste o modificación de la duración de la cocción: Acción Zona de mandos Indicador Seleccionar la zona Pulsar [+] El piloto de la zona se enciende Seleccionar la potencia Pulsar [+] o [-] [1] ….
Puesta en marcha del automatismo: Acción Zona de mandos Indicador Seleccionar la zona Pulsar [+] [0] y piloto de zona encendido Activar la potencia total Pulsar de nuevo [+] Pasa de [1] a [9] Activar el automatismo Pulsar de nuevo [+] [9] centellea con [A] Seleccionar nivel Pulsar [-] [ (por ejemplo "7") 9] pasa a [8] [7] …… [7] centellea con [A] Parada del automatismo: Acción Zona de mandos Indicador Seleccionar la zona Pulsar [-] [9] pasa a [8] [7]… Seleccionar nivel Pulsar [+] Ni
Algunas cacerolas pueden hacer ruido al colocarlas sobre una zona de cocción por inducción. Estos ruidos no representan en ningún caso un defecto en el aparato ni tienen influencia en su funcionamiento. Dimensión de las cacerolas Las zonas de cocción se adaptan automáticamente a la dimensión del fondo de la cacerola, hasta un cierto límite. Por ello, el fondo de esta cacerola debe tener un diámetro mínimo en función del diámetro de la zona de cocción correspondiente.
QUÉ HACER EN CASO DE PROBLEMA La placa de cocción o las zonas de cocción no se encienden: • • • • • La placa está mal conectada a la red eléctrica El fusible de protección ha saltado Verifique que no esté activado el bloqueo Las teclas táctiles están cubiertas de agua o de grasa Hay un objeto encima de las teclas táctiles El símbolo [U] se enciende: • • • No hay cacerola en la zona de cocción El recipiente utilizado no es compatible con la inducción El diámetro del fondo de la cacerola es demasiado peque
• No tirar nunca su aparato con los residuos domésticos • Llame al servicio de retirada de electrodomésticos o déjelo en los lugares de depósito establecidos por su municipio y adaptados al reciclaje de los aparatos electrodomésticos INSTRUCCIONES DE INSTALACIÓN El montaje es competencia exclusiva de especialistas. El usuario está obligado a respetar la legislación y las normas en vigor en su país de residencia.
• • • Si hay un cajón debajo de la superficie de cocción, evite guardar en él objetos inflamables (por ejemplo: sprays) y objetos que no resistan el calor La distancia de seguridad entre la placa de cocción y la campana de aspiración situada encima debe respetar las indicaciones del fabricante de la campana.
11322/0