
User`s guide


5
SYSTEM SETTINGS
Several general system options are setup
at the Master Station including:
• Setting the display brightness.
• Setting the clock
• Setting the Scan Mode
• Setting the automatic music on and off times
• Setting the volume, loudness,
treble, and bass.
Display Brightness
The display on the Master Station can be
set to three brightness levels to suit the
installation location.
Clock Settings
You can set two clock functions:
• Time Display — Displays the current time of
day with AM or PM indication.
• Music Auto On/Off — Sets the times to
automatically turn the last music source on
and then off.
✓ NOTE: You can enable or disable the Music
Auto On/Off function.
System Setup
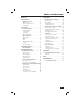
Figure 5. Master Station Buttons
Setting the Display Brightness:
1. Simultaneously press the TUNE ▲ and
POWER buttons. Each press will cycle the
display through the three brightness levels:
low, medium, then high.
2. Press the TUNE ▲ and POWER buttons
repeatedly until you reach the brightness
you prefer.
Changing the Clock Settings:
1. Press TIME. The hour number blinks and
SET TIME appears on the display.
2. Press VOLUME ▲ or VOLUME ▼ to set
the current hour. An A or P indicates AM
or PM.
3. Press TIME. The minute number blinks.
4. Press VOLUME ▲ or VOLUME ▼ to set
the current minute.
5. Press TIME. The hour number blinks and
AUTO SET ON TIME appears on the display.
6. Press VOLUME ▲ or VOLUME ▼ to set
the auto on time hour. An A or P indicates
AM or PM.
7. Press TIME. The minute number blinks.
8. Press VOLUME ▲ or VOLUME ▼ to set
the auto on time minute.
9. Press TIME. The hour number blinks and
AUTO SET OFF TIME appears on the display.
10. Press VOLUME ▲ or VOLUME ▼ to set
the auto off time hour. An A or P indicates
AM or PM.
11. Press TIME. The minute number blinks.
12. Press VOLUME ▲ or VOLUME ▼ to set
the auto off time minute.
13. Press TIME to return to current time
display.