
Operator's manual User guide

16
Gas sampling and gas conditioning technology 6-1.1.7-ME
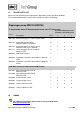
Valve plates, sealing rings (2 per each pump head) and structured diaphragms (1 per pump
head) according to spare parts list, chapter 17.
NOTE!
It is recommended to change the valve plates and diaphragms always
at the same time.
Change the diaphragm(s) and the valve plates in the following sequence:
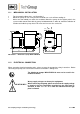
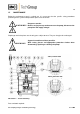
15.1 CHANGE OF THE PUMP DIAPHRAGM
Mark the position between the housing A , the diaphragm head B and the pressure plate C
with a pencil.
Loosen the 4 hexagon screws H and remove the pressure plate C and the diaphragm head B.
Unscrew the diaphragm K by hand out of the tapping hole of the rod L (counter-clockwise).
Loosen the 4 screws M and remove the cover N.
Screw in the new diaphragm K into the rod L and tighten by hand.
Turn the fly wheel P until rod L is in central position. Control that the bulge of the diaphragm K
is placed inside the groove of the housing A.
Put on the diaphragm head B and the pressure plate C according to the pencil marks. Tighten
the 4 hexagon screws H crosswise until the disc springs R are flat. Control the easy running
when turning the disk flywheel P and mount the cover N.
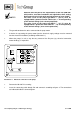
15.2 CHANGE OF THE VALVE PLATE
Loosen the 6 hexagon screws D and remove the pressure rings E . Loosen the valve bodies F
and G .
Replace the O-ring S on the valve body F (pressure side) by a new one. Remove the valve
plate T and replace it by a new one. Take care that the protection ring U is placed in the right
position and that the 6 supports of the valve plate T show upwards. Screw the valve body F in
again and tighten moderately.
Replace the O-ring S on the valve body G (suction side) by a new one. Remove the valve
plate T and replace it by a new one. Take care that the protection ring U is placed in the right
position and that the 6 supports of the valve plate T show downwards. Screw the valve body G
in again and tighten moderately.
Put on the pressure rings E and tighten the 6 hexagon screws D.