
Operator's manual


28
Gas sampling and gas conditioning technology 2-1.1.7.6-ME
16.3 CHANGE AND CLEANING OF THE INJECTION NOZZLE
NOTE!
For cleaning the injector, it is not necessary to remove the nozzle out of the
crosspiece. The nozzle can be cleaned together with the complete cross-
piece in an ultrasonic bath.
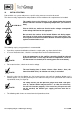
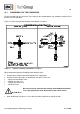
For changing the injector nozzle, see figure 14:
Loosen nut 3 and remove jet pipe;
Push the injection nozzle out of the jet pipe side by using the mounting tools (item 8, figure 14);
Check the o-ring and change it if necessary;
Push the new nozzle with o-ring until blocking.
16.4 REMOVING THE BYPASS T-PIECE
For cleaning or changing the bypass injector, the bypass T-piece can be completely disassembled.
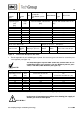
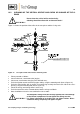
The following figure shows the bypass T-piece.
Injection nozzle
O-ring
Bypass T-piece
Jet pipe
Nut 2
Nut 1
Nut 3
Sample gas
Dilution gas
Figure 15 Bypass T-piece with injection nozzle and o-ring
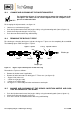
Dismantle the T-piece as follows:
Romove insulation cover if applicable;
Remove all tube connectors on the bypass-T. These are: (see figure 15):
- Bypass inlet union nut 1
- Union nut 2 (jet pipe side)
- Union nut 3 (sample inlet).
The bypass-T is now ready for further maintenance and repair.
16.5 CHANGE AND CLEANING OF THE BYPASS INJECTION NOZZLE AND CON-
TROL OR CHANGE OF THE O-RING
Push the injection nozzle out of the jet pipe side by using the mounting tools (item 8, figure 14);
Check the o-ring and change if necessary;
Push in the new or cleaned old nozzle with o-ring until blocking.