
User Guide Keyboard KeyStudio 25
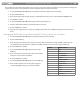

Table Of Contents
- Session KeyStudio 25 User Guide
- Introduction
- Session KeyStudio Features
- What’s in the Box?
- Minimum System Requirements
- Installation and Setup
- Getting Started Making Music with Session
- More Information on Configuring Session
- Using KeyStudio with GarageBand
- About MIDI and Software Synthesis
- The KeyStudio 25 Keyboard
- Using the KeyStudio 25 Keyboard
- KeyStudio 25 Advanced Features
- Recalling Presets
- Storing Presets
- Duplicating and Organizing Presets
- Enigma Software
- Sending a Snap Shot
- Muting All Controllers
- Program Mode Overview
- Assigning MIDI CCs
- Assigning MIDI Channels
- Reassigning MIDI CC for the Modulation Control
- Reassigning MIDI CC for the Pitch Control
- Reassigning MIDI CC for the Sustain Pedal input
- Limiting the Range of the Controls
- Setting Toggle Values for the Buttons
- Assigning MIDI Machine Control (MMC) Commands to a Button
- Assigning a Note to a Button
- Assigning RPN/NRPN to a Fader or Knob
- About SysEx Messages and Device ID
- Assigning the Device ID
- Memory Dump
- MIDI Messages In-Depth
- Troubleshooting
- Appendices - Useful MIDI Data
- Appendix A: MIDI Implementation Chart
- Appendix B: Assignable MIDI CC’s on KeyStudio 25
- Appendix C: Hexadecimal Conversion Chart
- Appendix D: General MIDI Preset Specification
- Appendix E: MIDI Note Numbers
- Appendix F: Standard MIDI Controller Numbers (MIDI CC’s)
- Appendix G: Roland GS and Yamaha XG NRPN Support
- Appendix H: General MIDI Reverb and Chorus Types
- Technical Info
- Warranty
- Contact
|
23
Session KeyStudio 25 User Guide
The procedure described above will toggle the value each time you press the button or footswitch. It is also possible to congure the
control so that it sends one value when it is pressed, and another value when released. To do this:
1. Press the ADVANCED FUNCTION button and push the footswitch or button you wish to modify.
2. Press the CTRL ASGN key.
3. Enter 146 using the numerical data entry keys or DEC/INC buttons. This sets the control for MIDI CC (On/O) mode.
4. Press ENTER to conrm.
5. Press the ADVANCED FUNCTION button again, followed by the DATA 1 key.
6. Enter the number of the MIDI CC you want the button to send out.
7. Press the ENTER key to conrm.
8. Assign the two toggle values for “control press” (DATA 3) and “control release” (DATA 2) using the procedure described
above.
Assigning MIDI Machine Control (MMC) Commands to a Button
1. Press the ADVANCED FUNCTION button and push the button you wish to modify.
2. Press the CTRL ASGN key.
3. Enter “149” using the numerical data entry keys to indicate that you would like to assign an MMC command to your
selected button (see Appendix B for a complete list of MIDI CC numbers and their corresponding commands).
4. Press the ENTER key to conrm
5. Press the ADVANCED FUNCTION button, then the CHAN
ASGN key.
6. Enter “127” using the numerical keypad. This ensures that the
message is sent to all device ID numbers.
7. Press the ENTER key to conrm.
8. Press the ADVANCED FUNCTION button, then the DATA 2 key.
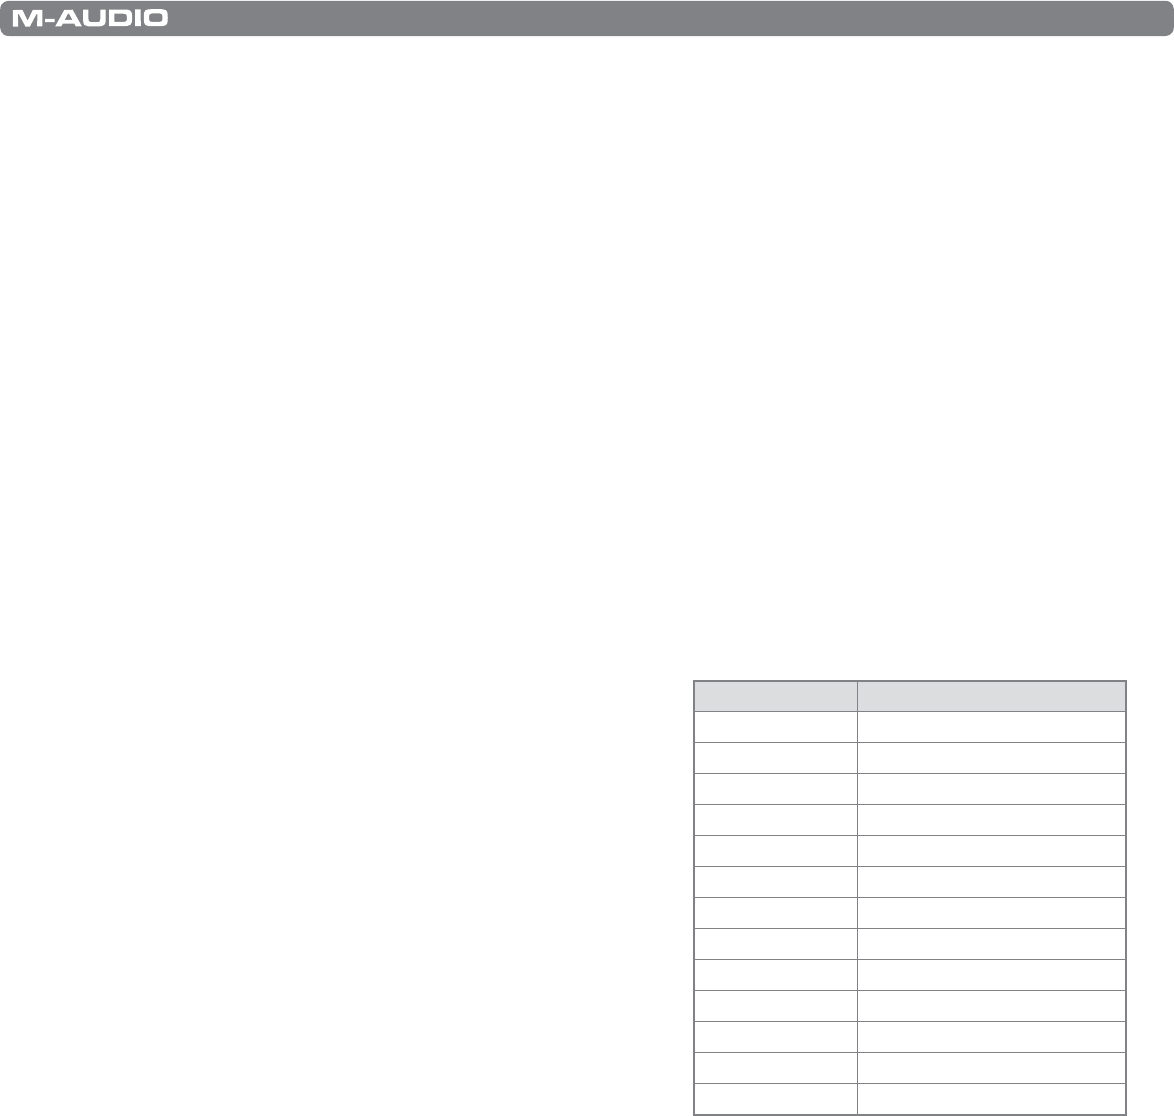
9. Enter a number from the chart on the right to assign the
corresponding MMC message to your selected button.
Number MMC Command
01 STOP
02 PLAY
03 DEFERRED PLAY
04 FAST FORWARD
05 REWIND
06 RECORD STROBE
07 RECORD EXIT
08 RECORD PAUSE
09 PAUSE
10 EJECT
11 CHASE
12 COMMAND ERROR RESET
13 MMC RESET