
User Guide Keyboard KeyStudio 25
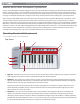
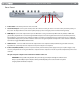

Table Of Contents
- Session KeyStudio 25 User Guide
- Introduction
- Session KeyStudio Features
- What’s in the Box?
- Minimum System Requirements
- Installation and Setup
- Getting Started Making Music with Session
- More Information on Configuring Session
- Using KeyStudio with GarageBand
- About MIDI and Software Synthesis
- The KeyStudio 25 Keyboard
- Using the KeyStudio 25 Keyboard
- KeyStudio 25 Advanced Features
- Recalling Presets
- Storing Presets
- Duplicating and Organizing Presets
- Enigma Software
- Sending a Snap Shot
- Muting All Controllers
- Program Mode Overview
- Assigning MIDI CCs
- Assigning MIDI Channels
- Reassigning MIDI CC for the Modulation Control
- Reassigning MIDI CC for the Pitch Control
- Reassigning MIDI CC for the Sustain Pedal input
- Limiting the Range of the Controls
- Setting Toggle Values for the Buttons
- Assigning MIDI Machine Control (MMC) Commands to a Button
- Assigning a Note to a Button
- Assigning RPN/NRPN to a Fader or Knob
- About SysEx Messages and Device ID
- Assigning the Device ID
- Memory Dump
- MIDI Messages In-Depth
- Troubleshooting
- Appendices - Useful MIDI Data
- Appendix A: MIDI Implementation Chart
- Appendix B: Assignable MIDI CC’s on KeyStudio 25
- Appendix C: Hexadecimal Conversion Chart
- Appendix D: General MIDI Preset Specification
- Appendix E: MIDI Note Numbers
- Appendix F: Standard MIDI Controller Numbers (MIDI CC’s)
- Appendix G: Roland GS and Yamaha XG NRPN Support
- Appendix H: General MIDI Reverb and Chorus Types
- Technical Info
- Warranty
- Contact

|
18
Session KeyStudio 25 User Guide
KeyStudio 25 Advanced Features
This section deals with the more advanced features found within the KeyStudio 25 keyboard. We have included this information
for “power users” who want to explore and use the keyboard’s in-depth features and additional capabilities to their full extent. This
information is not required reading for most users and readers who are not interested in more advanced MIDI programming concepts
can feel free to skip this section.
Recalling Presets
KeyStudio 25 is capable of storing ve “presets” containing all control assignments and keyboard conguration settings. Use the
“DEC” and “INC“ buttons to step through the ve available presets. The LED will display the preset number preceded by a “P” to
indicate which preset is currently loaded.
The following is a list of the ve “factory default presets” that have been pre-programmed into KeyStudio 25:
< 01 GM Preset (precongured for use with Session)
< 02 Reason Native
< 03 Reason Mixer
< 04 Yamaha XG/Roland JV Preset
< 05 Undened CC’s for MIDI learn*
Note that these default settings can be modied to suit your particular needs (this is described below, beginning with the
“Program Mode Overview” section.)
* Some applications do not have any default settings and require you to set the MIDI controllers for the application’s parameters
yourself. This normally involves placing the application into a “MIDI Learn” mode, selecting an on-screen control and moving the
hardware controller you wish to assign to it. When working with such an application, it is recommended that the controller numbers
used by MIDI controls on the keyboard do not already have another function associated with them – this is how preset #5 is congured.
Storing Presets
KeyStudio 25 uses “non-volatile” memory allowing presets to be stored even after the keyboard has been switched o. All controller
and channel assignments are automatically stored under the current preset number as soon as you conrm a change—there is no
need to “save” the preset. Additional settings are also stored including: the program number, bank LSB and bank MSB data, global
channel setting, MIDI Out from USB conguration, and last used memory preset.
Duplicating and Organizing Presets
You may want to duplicate or reorganize the order of the presets on your KeyStudio 25 controller. For example, let’s say you wanted
to copy preset #2 (“Reason Native”) to location #4. This can be done through the following procedure:
1. Recall preset #2 by using the DEC/INC buttons.
2. Press the ADVANCED FUNCTION button.
3. Press the MEM STORE key on the keyboard.
4. Enter “4” using the numerical data entry keys or the DEC/INC buttons.
5. Press the ENTER key to conrm.
This will save or store the current setup to preset location #4. Note that this operation will overwrite the contents of the
existing preset.