
User Guide Keyboard KeyStudio 25
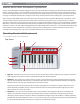
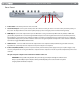

Table Of Contents
- Session KeyStudio 25 User Guide
- Introduction
- Session KeyStudio Features
- What’s in the Box?
- Minimum System Requirements
- Installation and Setup
- Getting Started Making Music with Session
- More Information on Configuring Session
- Using KeyStudio with GarageBand
- About MIDI and Software Synthesis
- The KeyStudio 25 Keyboard
- Using the KeyStudio 25 Keyboard
- KeyStudio 25 Advanced Features
- Recalling Presets
- Storing Presets
- Duplicating and Organizing Presets
- Enigma Software
- Sending a Snap Shot
- Muting All Controllers
- Program Mode Overview
- Assigning MIDI CCs
- Assigning MIDI Channels
- Reassigning MIDI CC for the Modulation Control
- Reassigning MIDI CC for the Pitch Control
- Reassigning MIDI CC for the Sustain Pedal input
- Limiting the Range of the Controls
- Setting Toggle Values for the Buttons
- Assigning MIDI Machine Control (MMC) Commands to a Button
- Assigning a Note to a Button
- Assigning RPN/NRPN to a Fader or Knob
- About SysEx Messages and Device ID
- Assigning the Device ID
- Memory Dump
- MIDI Messages In-Depth
- Troubleshooting
- Appendices - Useful MIDI Data
- Appendix A: MIDI Implementation Chart
- Appendix B: Assignable MIDI CC’s on KeyStudio 25
- Appendix C: Hexadecimal Conversion Chart
- Appendix D: General MIDI Preset Specification
- Appendix E: MIDI Note Numbers
- Appendix F: Standard MIDI Controller Numbers (MIDI CC’s)
- Appendix G: Roland GS and Yamaha XG NRPN Support
- Appendix H: General MIDI Reverb and Chorus Types
- Technical Info
- Warranty
- Contact
|
14
Session KeyStudio 25 User Guide
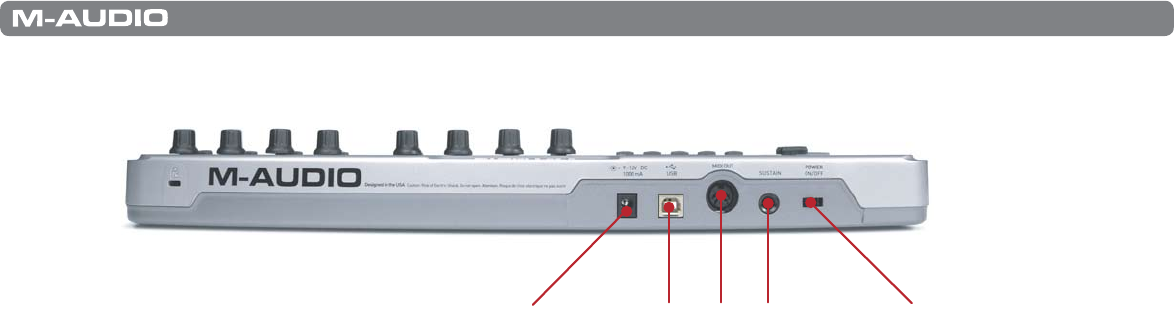
Rear Panel
14 1013 12 11
10. Power Switch – This switch powers the unit on and o.
11. Sustain Pedal Input – Connect your sustain pedal’s 1⁄4” connector to this jack. There is no need to worry about the polarity of
the pedal—the keyboard detects the sustain pedal polarity by auto-sensing the pedal’s orientation during startup.
12. MIDI Output – Connect this output to the input of a MIDI device using a standard 5-pin MIDI cable. By default, all MIDI data
generated by KeyStudio 25 is sent out through this MIDI output as well as through the USB connection (if available). However,
if KeyStudio 25 is connected to your computer via USB, it is possible to recongure this port so that it appears as a completely
separate MIDI output port to your music software. Refer to the “Using the KeyStudio 25 Keyboard” section of this User Guide to
learn how to engage “MIDI Out from USB” mode.
13. USB Connector – Connect a USB cable from this output to the host computer’s USB port. When using the USB connection,
KeyStudio 25 is powered by the host computer and a power adapter is not required.
14. Power Jack (9V DC, 500 mA) – Connect an optional 9V DC, 500mA external power supply to this jack. A power supply is only
necessary if KeyStudio 25 is being used without a computer or if the computer is not able to provide adequate bus power to the
controller.
The optional power adapter can be ordered from www.m-audio.com
IMPORTANT: The KeyStudio 25 keyboard is “bus-powered” by your computer through the USB connection.
Only use a power adapter if your computer cannot provide adequate power to the controller or if you are
using KeyStudio 25 without a computer.