
User Guide Keyboard KeyStudio 25
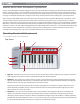
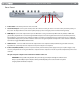

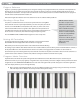
Table Of Contents
- Session KeyStudio 25 User Guide
- Introduction
- Session KeyStudio Features
- What’s in the Box?
- Minimum System Requirements
- Installation and Setup
- Getting Started Making Music with Session
- More Information on Configuring Session
- Using KeyStudio with GarageBand
- About MIDI and Software Synthesis
- The KeyStudio 25 Keyboard
- Using the KeyStudio 25 Keyboard
- KeyStudio 25 Advanced Features
- Recalling Presets
- Storing Presets
- Duplicating and Organizing Presets
- Enigma Software
- Sending a Snap Shot
- Muting All Controllers
- Program Mode Overview
- Assigning MIDI CCs
- Assigning MIDI Channels
- Reassigning MIDI CC for the Modulation Control
- Reassigning MIDI CC for the Pitch Control
- Reassigning MIDI CC for the Sustain Pedal input
- Limiting the Range of the Controls
- Setting Toggle Values for the Buttons
- Assigning MIDI Machine Control (MMC) Commands to a Button
- Assigning a Note to a Button
- Assigning RPN/NRPN to a Fader or Knob
- About SysEx Messages and Device ID
- Assigning the Device ID
- Memory Dump
- MIDI Messages In-Depth
- Troubleshooting
- Appendices - Useful MIDI Data
- Appendix A: MIDI Implementation Chart
- Appendix B: Assignable MIDI CC’s on KeyStudio 25
- Appendix C: Hexadecimal Conversion Chart
- Appendix D: General MIDI Preset Specification
- Appendix E: MIDI Note Numbers
- Appendix F: Standard MIDI Controller Numbers (MIDI CC’s)
- Appendix G: Roland GS and Yamaha XG NRPN Support
- Appendix H: General MIDI Reverb and Chorus Types
- Technical Info
- Warranty
- Contact

|
13
Session KeyStudio 25 User Guide
4. Octave and Transpose Up/Down – By default, the Octave/Transpose Up/Down control “shifts” the keyboard’s octave range in
order to let you play higher or lower notes. Press the right side of the control to shift the keyboard up one octave; press the left
side of the control to shift the keyboard down one octave. Note that it is possible to shift several octaves in each direction by
pressing the left or right side of this control more than once.
In some cases, it may be useful to increase or decrease the transmitted pitch of KeyStudio 25 by a small number of semitones,
rather than a whole octave. For example, you may be playing a song with a singer and the singer is having trouble hitting the
high or low notes. In this case, you can try raising or lowering the pitch by one or more semitones. This is achieved using a
function called “Transpose.”
To use the Transpose function:
1. Press Octave/Transpose + and Octave/Transpose – together.
2. Press the Octave/Transpose + or - key for every semi tone you want to transpose up or down.
To make the Octave/Transpose control return to an Octave shift function, press the Advanced Function button, and the
black key labeled CANCEL.
5. Assignable Slider (C9) – This slider sends out MIDI Continuous Controller (CC) data, giving you real-time control over your MIDI
hardware or software instruments. By default, this slider is set to control MIDI CC number 7. This corresponds to volume on most
MIDI hardware devices and software applications.
6. Function Buttons – These buttons are used to access various functions and features of the keyboard. They are described in the
“Using the KeyStudio 25 Keyboard” section of this guide.
7. LED Display – The LED screen displays MIDI functions and data selections.
8. MIDI Controller Knobs (C1 – C8) – These eight MIDI Controller knobs give you real-time control over your MIDI hardware and
software through MIDI Continuous Controller (CC) messages.
9. MIDI Controller Buttons (C12 – C19) – Like the MIDI Controller knobs described above, these eight MIDI Controller buttons
give you real-time control over your MIDI hardware and software through MIDI Continuous Controller (CC) messages.