The Compact Make-Music-Now Keyboard Studio English User Guide
Session KeyStudio 25 User Guide Introduction . . | 1 . . . . . . . . . . . . . . . . . . . . . . . . . . . . . . . . . . . . . . . . . . . . . . . . . . . . . . . . . . . . 3 Session KeyStudio Features. . . . . . . . . . . . . . . . . . . . . . . . . . . . . . . . . . . . . . . . . . . . . . 3 What’s in the Box?. . . . . . . . . . . . . . . . . . . . . . . . . . . . .
Session KeyStudio 25 User Guide Assigning MIDI Machine Control (MMC) Commands to a Button . . . . . . . . . . . . . . . . . . . . . . . . . . . . . . . . . . . 23 Assigning a Note to a Button . . . . . . . . . . . . . . . . . . . . . . . . . . . . . . . . . . . . . . . . . . . . . . . . . . . . . . . 24 Assigning RPN/NRPN to a Fader or Knob . . . . . . . . . . . . . . . . . . . . . . . . . . .
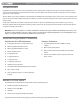
Session KeyStudio 25 User Guide | 3 Introduction Congratulations on your purchase of Session KeyStudio 25. This complete music production package contains the KeyStudio 25-note velocity sensitive USB keyboard and powerful Session music creation software. This provides you with everything you need to compose great music on your computer. This User Guide covers setup and features of the KeyStudio 25 USB keyboard and installation of the Session music creation software.
Session KeyStudio 25 User Guide | 4 Minimum System Requirements Windows XP (SP2) or higher* < Pentium 4 1.6 GHz processor (CPU may be higher for laptops) < 512MB RAM < 4GB free hard disk space for complete Session software installation 32MB video RAM ** < 1024 x 768 video resolution (1280 x 1024 recommended) < Built-in or third-party audio interface ☨ < DVD drive for Session software installation < One native USB port Windows Vista 32-bit < Pentium 4 1.
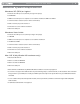
Session KeyStudio 25 User Guide | 5 Installation and Setup 1. Connect the KeyStudio 25 keyboard. The KeyStudio 25 USB keyboard is class-compliant. This means that you may simply connect the KeyStudio 25 keyboard to your Windows XP, Windows Vista or Mac OS X computer using the provided USB cable and switch the keyboard on. No additional installation or drivers are required.
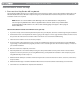
Session KeyStudio 25 User Guide | 6 2. Install the Session Music Creation Software. 1. Insert the M-Audio Session DVD-ROM into your computer’s DVD-ROM drive. 2. The computer will automatically display the install screen. If your computer fails to launch the installer, manually start it by clicking on Start > My Computer* and then double-clicking Session. 3. Follow the software installer’s on-screen instructions.
Session KeyStudio 25 User Guide | 7 Getting Started Making Music with Session 1. Connect the KeyStudio 25 keyboard to your computer using the supplied USB cable and make sure the keyboard is switched on. 2. Launch Session by clicking Start > All Programs > M-Audio > Session > Session. Alternatively, if you chose to create a desktop shortcut icon during installation, you can double-click the shortcut. 3. Click the button labeled “New” in the Session Startup window. 4.
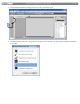
Session KeyStudio 25 User Guide 5. | 8 Click the Add a Track button in the upper left corner of the Session Main Screen. 6. The “What would you like to do?” dialog box will now appear. For this example, select Play and Record with your Keyboard, and click OK.
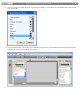
Session KeyStudio 25 User Guide | 9 7. In the “Select Keyboard Sound” dialog box, select the bank of sounds you would like to associate with the first track of your new song, and click OK. 8. A new track will now appear in the main Session window. You may click the specific instrument you would like to play from the instrument list appearing on the left side of the screen.
Session KeyStudio 25 User Guide | 10 9. Try playing notes on your KeyStudio 25 keyboard. If you can hear instrument sounds,you may skip steps 10-12. If your computer does not yet generate sounds when KeyStudio 25 is played, proceed to step 10 for additional configuration instructions. 10. Go to Options > Audio Hardware and make sure the sound card you wish you use (i.e.
Session KeyStudio 25 User Guide | 11 Use Low Latency Streaming Checkbox When checked, Session attempts to open the selected audio interface in low latency mode (WDM Kernel Streaming). While most sound cards should “open” in this mode, results vary widely based on the sound card in use. See the “About Latency” section of this User Guide for further information on this. OK Button After making the desired settings, press the OK button to commit your changes and close the Audio Hardware dialog.
| Session KeyStudio 25 User Guide 12 About MIDI and Software Synthesis If you are new to MIDI (Musical Instrument Digital Interface), you may initially find it challenging to understand how KeyStudio interacts with the computer.
Session KeyStudio 25 User Guide | 13 4. Octave and Transpose Up/Down – By default, the Octave/Transpose Up/Down control “shifts” the keyboard’s octave range in order to let you play higher or lower notes. Press the right side of the control to shift the keyboard up one octave; press the left side of the control to shift the keyboard down one octave. Note that it is possible to shift several octaves in each direction by pressing the left or right side of this control more than once.
| Session KeyStudio 25 User Guide 14 Rear Panel 14 13 12 11 10 10. Power Switch – This switch powers the unit on and off. 11. Sustain Pedal Input – Connect your sustain pedal’s 1⁄4” connector to this jack. There is no need to worry about the polarity of the pedal—the keyboard detects the sustain pedal polarity by auto-sensing the pedal’s orientation during startup. 12. MIDI Output – Connect this output to the input of a MIDI device using a standard 5-pin MIDI cable.
Session KeyStudio 25 User Guide | 15 Using the KeyStudio 25 Keyboard In many cases, once KeyStudio 25 has been installed, you can simply launch your music program and begin making music right away. Many programs will be able to use KeyStudio 25 “out of the box” and require no further configuration. Certain other programs may require you to select KeyStudio 25 as a MIDI input source or to map KeyStudio’s assignable MIDI controls (buttons, knobs, sliders, etc.
| Session KeyStudio 25 User Guide 16 Sending Program Changes If your software or MIDI device supports “program change” messages, you can recall different presets (sounds) straight from the KeyStudio 25 keyboard without having to reach for the MIDI device (or computer). To send a program change message: 1. Press the ADVANCED FUNCTION button. 2. Press the PROG CHG key on the keyboard. 3. Enter the program number you wish to send, using the numerical data entry keys, or the DEC/INC buttons. 4.
Session KeyStudio 25 User Guide | 17 Setting the Global MIDI Channel KeyStudio 25 can transmit on any of the standard 16 MIDI channels. If you are using a computer-based system, the software usually controls the routing of MIDI signals, and this parameter can be left in its default setting.
Session KeyStudio 25 User Guide | 18 KeyStudio 25 Advanced Features This section deals with the more advanced features found within the KeyStudio 25 keyboard. We have included this information for “power users” who want to explore and use the keyboard’s in-depth features and additional capabilities to their full extent. This information is not required reading for most users and readers who are not interested in more advanced MIDI programming concepts can feel free to skip this section.
Session KeyStudio 25 User Guide | 19 Enigma Software Enigma is a powerful program that allows you to change the settings of any assignable slider, knob, or button on the KeyStudio 25 through an easy-to-use graphical user interface. The program also allows you to store a virtually unlimited amount of presets on your computer’s hard drive—a handy tool for users who have created custom presets for each of their MIDI devices. The program is available for free download at www.m-audio.
Session KeyStudio 25 User Guide | 20 < Each of the assignable controllers on KeyStudio 25 can send MIDI CC, RPN/NRPN, GM 1&2, and predefined SysEx messages on its own individual MIDI channel. < ertain parameters require you to enter additional information such as the MIDI channel or CC number. Use the 0-9 keys (on the C right hand side of the keyboard) or the DEC/INC buttons to set these values. The LED display will indicate the current value.
| Session KeyStudio 25 User Guide 21 Reassigning MIDI CC for the Pitch Control To edit a MIDI CC mapping for the Pitch Bend control: 1. Press the ADVANCED FUNCTION button. 2. Press the CTRL SEL key. 3. Enter “10” using the numerical data entry keys or the DEC/INC buttons. This number corresponds to the Modulation control (each slider, button, or knob’s control number is printed next to it on the KeyStudio 25 keyboard). 4. Press the ENTER key to confirm the selection and exit Program mode. 5.
Session KeyStudio 25 User Guide | 22 Using Controls to Increment or Decrement Values Buttons and the pedal can be set to decrement or increment MIDI data values within a defined range and one by one. This is useful if you need precise control over MIDI CC or you would like to use buttons to step forward or backward through programs (using a program change message). To do this: 1. Press the ADVANCED FUNCTION button and push the footswitch or button you wish to modify. 2. Press the CTRL ASGN key. 3.
| Session KeyStudio 25 User Guide 23 The procedure described above will toggle the value each time you press the button or footswitch. It is also possible to configure the control so that it sends one value when it is pressed, and another value when released. To do this: 1. Press the ADVANCED FUNCTION button and push the footswitch or button you wish to modify. 2. Press the CTRL ASGN key. 3. Enter 146 using the numerical data entry keys or DEC/INC buttons.
Session KeyStudio 25 User Guide | 24 Assigning a Note to a Button The following shows the procedure for setting a button to transmit a MIDI Note On message when pressed, and a MIDI Note Off message when released. 1. Press the ADVANCED FUNCTION button and push the button you wish to modify. 2. Press the CTRL ASGN key. 3. Enter “147” using the numerical data entry keys or the DEC/INC buttons. This is the MIDI CC number that corresponds to Note On/Off mode (see Appendix B for all MIDI CC numbers). 4.
Session KeyStudio 25 User Guide 5. Enter your RPN/NRPN MSB value and press the ENTER key to confirm. 6. Press the ADVANCED FUNCTION button, then the DATA 2 key. This assigns the number for the RPN/NRPN LSB. 7. Enter your RPN/NRPN LSB value and press the ENTER key to confirm. 8. Finally, press the ADVANCED FUNCTION button, then the CHAN ASGN key. 9. Enter the channel that the message should be sent on. | 25 10. Press the ENTER key to confirm your selection.
| Session KeyStudio 25 User Guide 26 MIDI Messages In-Depth Program & Bank Changes When the MIDI standard was first established, it enabled the user to access only 128 different sounds using program change messages (0-127). As MIDI devices grew to be more sophisticated and contain more sounds, bank change messages were included in an updated MIDI specification to allow for more than 128 sounds to be accessed.
Session KeyStudio 25 User Guide | 27 You will find many MIDI devices respond to program change commands and many are organized according to the GM listing. In General MIDI devices, different sounds are organized in the same way from device to device. Piano sounds are in their particular place, string sounds are in their place, drum sounds are in their place, and so on.
Session KeyStudio 25 User Guide | 28 Troubleshooting The KeyStudio 25 keyboard has been tested under a wide variety of conditions. Despite our thorough testing, the controller can be used in virtually limitless situations and certain scenarios may result in unexpected performance. This section will highlight some of the most common difficulties users may experience and provide tips to remedy these problems.
| Session KeyStudio 25 User Guide 29 Problem 7: When I press a key, or attempt to monitor my microphone or instrument input, there is a noticeable delay before I hear any sound. This phenomenon is known as latency. On certain audio interfaces, latency may be adjusted by changing the buffer size setting in the audio interface’s control panel. Consult your audio interface’s documentation to learn if it is possible to reduce latency on your system.
Session KeyStudio 25 User Guide | 30 Problem 10: I hear crackles, clicks, or pops when playing or recording audio. Make sure that Session’s Master Volume control does not indicate clipping. This control indicates clipping by drawing two red dots at the far right edge of the volume meter. If you see clipping, move the Master Volume control slider to the left.
| Session KeyStudio 25 User Guide Appendices - Useful MIDI Data Appendix A: MIDI Implementation Chart Function Transmitted Basic Default 1-16 Channel Changed 1-16 Mode Default Messages X ********* Number True Voice ********* Velocity Note ON 0 Note OFF X After Keys X Touch Ch’s 0 0-127 Pitch Bend Control 0-119 Change 120-127 Change True Number X X X X 0 X 0 X ********* GM, GM2, MMC System X 0 0-127 Program X --------- Altered Note Received X Memory Dump Excl
Session KeyStudio 25 User Guide Appendix B: Assignable MIDI CC’s on KeyStudio 25 Table B1: Knobs and fader assignments * MIDI CC Description Data LSB Data MSB 0-119 Standard MIDI CC’s - - 120-127 Channel Mode Messages - - 128 Pitch Bend Sensitivity - - 129 Channel Fine Tune - - 130 Channel Coarse Tune - - 131 Channel Pressure - - 132 RPN Coarse RPN LSB RPN MSB 133 RPN Fine RPN LSB RPN MSB 134 NRPN Coarse NRPN LSB NRPN MSB 135 NRPN Fine NRPN LSB NRPN MSB 136 Ma
Session KeyStudio 25 User Guide Table B2: Buttons and Sustain Pedal Assignments MIDI CC Description Program Data LSB Data MSB 0-119 Standard MIDI CC’s - Toggle value 2 Toggle value 1 120-127 Channel Mode Messages - Toggle value 2 Toggle value 1 128 Pitch Bend Range - Sensitivity value - 129 Channel Fine Tune - Tuning amount - 130 Channel Coarse Tune - Tuning amount - 131 Channel Pressure - Pressure amount - 132 RPN Coarse Value RPN LSB RPN MSB 133 RPN Fine Value R
| Session KeyStudio 25 User Guide Appendix C: Hexadecimal Conversion Chart Hexadecimal Value Decimal Value Hexadecimal Value Decimal Value Hexadecimal Value Decimal Value 0 0 2B 43 56 86 1 1 2C 44 57 87 2 2 2D 45 58 88 3 3 2E 46 59 89 4 4 2F 47 5A 90 5 5 30 48 5B 91 6 6 31 49 5C 92 7 7 32 50 5D 93 8 8 33 51 5E 94 9 9 34 52 5F 95 0A 10 35 53 60 96 0B 11 36 54 61 97 0C 12 37 55 62 98 0D 13 38 56 63 99 0E 14 39 57 6
| Session KeyStudio 25 User Guide Appendix D: General MIDI Preset Specification Piano Bass Reed Synth Effects 0 Acoustic Grand Piano 32 Acoustic Bass 64 Soprano Sax 96 SFX Rain 1 Bright Acoustic Piano 33 Fingered Bass 65 Alto Sax 97 SFX Soundtrack 2 Electric grand Piano 34 Electric Picked Bass 66 Tenor Sax 98 SFX Crystal 3 Honky Tonk Piano 35 Fretless Bass 67 Baritone Sax 99 SFX Atmosphere 4 Electric Piano 1 36 Slap Bass 1 68 Oboe 100 SFX Brightness 5 Electric Piano 2 37 Slap Bass
| Session KeyStudio 25 User Guide Appendix F: Standard MIDI Controller Numbers (MIDI CC’s) 00 Bank Select 34 Breath Control LSB 68 Legato Pedal 102 Controller 102 01 Modulation 35 Controller 35 69 Hold 2 103 Controller 103 02 Breath Control 36 Foot Control LSB 70 Sound Variation 104 Controller 104 03 Controller 3 37 Porta Time LSB 71 Resonance 105 Controller 105 04 Foot Control 38 Data Entry LSB 72 Release Time 106 Controller 106 05 Porta Time 39 Channel Volume L
Session KeyStudio 25 User Guide Appendix G: Roland GS and Yamaha XG NRPN Support NRPN NRPN Data Data MSB LSB MSB LSB CC99 CC98 CC06 CC38 01 08 00-7F n/a (-64 - 0 - +63) Vibrato Rate (relative change) 01 09 00-7F n/a (-64 - 0 - +63) Vibrato Depth (relative change) 01 0A 00-7F n/a (-64 - 0 - +63) Vibrato Delay (relative change) 01 20 00-7F n/a (-64 - 0 - +63) Filter Cutoff Freq.
Session KeyStudio 25 User Guide | 38 Technical Info Caution: Electro Static Discharge, Electrical Fast Transient and Conducted RF interference may cause the unit malfunctioning. In such case, unplug the unit and plug it in again to restore normal operation. Note: Your M-Audio product has been tested to comply with FCC Standards FOR HOME OR OFFICE USE. Modifications not authorized by the manufacturer may void users authority to operate this device.
M-Audio USA M-Audio Germany Technical Support Technical Support 5795 Martin Rd., Irwindale, CA 91706 Kuhallmand 34, D-74613 Ohringen, Germany web . . . . . . . . . . . . . . . . . . . . . . www.m-audio.com/tech email. . . . . . . . . . . . . . . . . . . . . . . support@m-audio.de tel (pro products). . . . . . . . . . . . . . . . . . . (626) 633-9055 tel . . . . . . . . . . . . . . . . . . . . . .