
Assembly guide
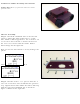
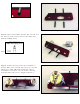


Step 5. Align the two halves of the robot as shown
and install the bottom panel. Now the robot will
start to take shape.
6 x
Figure 7.
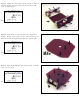
Step 6. Install the 1" spacers into the top panel
using 6 of the 4-40 x 3/8 screws. The screws go in
from the back and protrude from the "good" side.
6 x
Figure 8.
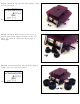
Step 7. Install the lid onto the robot using 6 of the
4-40 x 3/8 screws.
6 x
Figure 9.