SMARTGRILL USER MANUAL
SmartGrill by LynxTM
WARNING Never use dented, rusty or damaged propane cylinders. Never store addi onal or empty propane cylinders in the grill cabinet or in the vicinity of this or any other appliance. Do not store propane cylinders indoors or on their sides. Children should never be le alone or una ended in an area where the grill is located. Place your grill well away from where children play.
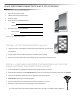
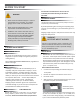
QUICK START POWER CONNECTIVITY & WI‐FI SET UP PROCESS* STEP #1—REQUIREMENTS Smart device (phone or tablet) 110 volt GFIC outlet at the SmartGrill Proper gas supply Home network name (SSID) & password Name: Password: SmartGrill by Lynx™ serial number/PIN* Serial number: iPhone 5 or greater or iPad version 2.0 or greater PIN: Located on the back of the top of your PC case.
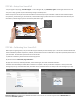
STEP #4—Setup Wi‐Fi Connectivity On your Phone or Tablet, verify that you have at least 60% wireless signal at your SmartGrill. On your SmartGrill, press the power bu on and wait about 30 seconds for the SmartGrill to say “Please setup your Wi‐Fi connec on," then "SmartGrill, at your service”. On your phone or tablet, switch to your Wi‐Fi se ngs and locate the wireless network called SmartGrill xxxx (xxxx is the last four digits of your serial number) and connect to it. The password is lynxgrill.
STEP #5—Setup Your SmartGrill Turn your lights on by saying, “SmartGrill Lights”. To turn the lights off, say “SmartGrill, Lights” and the lights will now turn off. To try out a recipe, go back to your SmartGrill App and go to the Recipe icon. Select a recipe from the recipe list and click Cook Now to send the recipe to your SmartGrill. Follow the voice commands (how many burners, place food on grill, turn food over, remove food from grill).
A MESSAGE FROM LYNX Thank you for your purchase of a SmartGrill by Lynx™ by Lynx. You’ve just entered the future of grilling, a world of amateur and professional chefs who are taking the world of outdoor cooking to new levels through technology. Your SmartGrill by Lynx™has been designed to the same exac ng standards and me culous a en on to detail every Lynx product enjoys.
WARNINGS WARNING 1. Do not open the central electronics container as there are no user‐serviceable parts inside, and doing so will void all warran es. All other services should be performed by a qualified technician. 2. All gas lines must have a gas shut‐off valve that is readily and easily accessible. Be sure you know where the shut‐off is located. If you smell gas, check for gas leaks immediately. Check only with a soap and water solu on. Never check for gas leaks with an open flame.
IMPORTANT SAFETY PRECAUTIONS…(Con nued) 8. 9. 10. 11. 12. 13. 14. 15. 16. 17. 18. 19. Do not heat unopened food containers as pressure build‐up will cause the container to explode. Do not use aluminum foil to line SmartGrill racks or drip pans. This will alter the airflow or trap excessive heat in the con‐ trol area and can melt control knobs and igni on modules. Such damage is specifically excluded from your warranty. Never use charcoal or any other solid fuel in the SmartGrill cavity.
BEFORE YOU START WARNING the electronics containment box. There are no user serviceable parts inside and doing so will void all warran es. UNPACKING & ASSEMBLY Never locate the SmartGrill by Lynx™ under an unprotected roof or overhang, in a building, garage, shed or other such enclosed area. Never locate the SmartGrill by Lynx™ under unprotected combus ble construc on.
BEFORE YOU START…(Con nued) One way to safely move the grill off the pallet is by li ing one end of the grill high enough to place a ramp under the wheel and then li the other end while rolling the grill off the pallet. the jacket must be supported from the bo om by a ledge on each side or a full deck beneath the jacket. Pay special a en on to the provisions shown for gas‐line hookup. The enclosure should have ven la on holes to prevent gas build‐up in the event of a leak.
BEFORE YOU START…(Con nued) Dégagement horizontal minimal entre les parois latérales et l’arrière de l’appareil et la construction verticale combustible au-dessus de l’appareil (45.7 cm à partir des parois latérales et 45.7 cm à partir de l’arrière). Do not use this appliance under overhead combus ble surfaces Ne pas u lier cet appareil sous une surface combus ble If the grill is to be placed into a combus ble enclosure, an approved insulated jacket is necessary and is available only from your Lynx dealer.
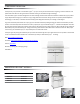
CUTOUT SPECIFICATIONS The guides, measurements and dimensions detailed below are designated to assist you with planning your outdoor kitchen. NOTE: Due to con nuing product innova on, specifica ons are subject to change without no ce. IMPORTANT: Please reference the Care & Use / Installa on manual for details on gas plumbing requirements, electrical specifica ons and the proper installa on of your Lynx outdoor kitchen equipment. This manual can be downloaded from the Lynx website at www.lynxgrills.
SPECIFICATIONS & INSTALLATION SmartGrill requires space for the cpu unit below the grill in built in applica ons.
GAS CONNECTIONS WARNING NEVER CONNECT A GAS LINE DIRECTLY TO THE SMARTGRILL BY LYNX™. A PRESSURE REGULATOR MUST BE INSTALLED ON ALL GAS EQUIPMENT. ALL LOCAL CODES REQURE IT AND LYNX GRILLS SUPPLIES THE CORRECT REGULATOR FOR USE WITH YOU GRILL. REMOVING OR FAILING TO INSTALL THE PRESSURE REGULATOR CAN RESULT IN FIRE AND SERIOUS PERSONAL INJURY AND WILL VOID THE WARRANTY. The SmartGrill by Lynx™ is factory set to use either liquid propane or natural gas.
GAS CONNECTIONS...con nued LIQUID PROPANE GAS WARNING Grills set up for liquid propane gas come equipped with a liquid propane hose/regulator assembly for connec on to a standard 20 lb. liquid propane cylinder (Type 1). All fi ngs necessary to a ach the assembly to the grill are included. LP cylinder with type 1 valve connec on Permanently plumbed liquid propane connec ons, such as those in line with a bulk cylinder, require a 4/11 regulator.
GAS CONNECTIONS...con nued Always leak test the connec on a er refilling or exchanging liquid propane cylinders. (See INDEX: “Leak Test” for further details.) FOR INSTALLNG A SIDE BURNER ON TO A FREESTANDING SMARTGRILL TO CONNECT A BUILT‐IN SIDEBURNER Shut off the gas supply at the main valve. Shut off the gas supply at the main valve. Disconnect all plumbing (if already a ached) from the grill and the gas supply valve. Remove all the fi ngs from the grill manifold.
ELECTRICAL CONNECTIONS WARNING: ELECTRICAL GROUNDING Product installa on must meet local electrical codes, or in the absence of local codes, the latest edi on of the Na onal Electrical Code ANSI/NFPA No. 70 or the Canadian Electrical Code CSA C22.1. Use only a Ground Fault Interrupter (GFI) protected circuit with this outdoor cooking gas appliance. Do not use this outdoor cooking appliance if it has been submerged underwater without a thorough inspec on by a qualified technician.
FINAL CHECKS LEAK TESTING DANGER! To prevent fire or explosion hazard, DO NOT smoke or allow any poten al source of igni on (sparks, electrical arcing, etc) in the area while performing a leak test. Leak tests should be conducted outdoors only. Never conduct a leak test using fire or flame. Leak Test Procedure: FINAL CHECK Finally, check all the burners for proper opera on. Make sure the control knobs turn freely and completely through their full range.
GETTING STARTED MEET YOUR SMARTGRILL BY LYNX™ TURNING ON YOUR SMARTGRILL BY LYNX™ Congratula ons on your purchase of a SmartGrill by Lynx™! You’ve joined a select group of cooking enthusiasts boldly paving the way toward a bright new grilling future. Your SmartGrill by Lynx™ is ac vated by pressing the round POWER ON/OFF switch located on the le hand side of the grill. The pages that follow will help you get the most out of your SmartGrill by Lynx™.
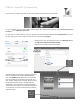
GETTING STARTED...con nued Shut down the Se ngs app Ac vate the SmartGrill by Lynx™ app If this is the first me you’ve ac vated your SmartGrill by Lynx™ app, you will be asked to input the serial number then the PIN number for the CPU. The PIN and serial numbers assigned to each CPU and can be found on the PC case. Open the SmartGrill App and click Create Account then enter your grill serial number and PIN then click Con nue.
SMARTGRILL BY LYNX™ SAFETY SYSTEMS Your SmartGrill by Lynx™ is designed with a number of safety systems that ensure that the grill can be operated in a safe and secure manner. TURNING OFF YOUR SMARTGRILL BY LYNX™ Your SmartGrill by Lynx™ can be shut down by any of the following methods. Your SmartGrill by Lynx™ can be deac vated by pressing the POWER ON/OFF switch located on the le hand side of the grill. Your SmartGrill by Lynx™ can be shut off by saying “SmartGrill shut down.
PRE‐GRILL CHECKLIST...con nued SmartGrill will automatically shutdown when calibration is complete. It will say "Calibration complete" or send you the same message on your app. If the calibration fails, SmartGrill will say "Calibration failed" or send you the same message on your app. AT EACH NEW SEASON At the start of each new grilling season you should remove the grilling racks and check the burners, venturis, orifices, and valves for obstructions.
BASIC OPERATIONS MANUAL MODE During Manual Cook, temperature is controlled by the knobs on the front panel of the SmartGrill by Lynx™. Manual Cook operates just like a tradi onal grill where you control the temperature and me to cook your meal. Spin the knob of the burner you wish to use two full rota ons clockwise to light the burner. Spin the knob two full rota ons counter‐clockwise to turn the burner off. (This will not turn the grill power off.
BASIC OPERATIONS...con nued PARTY MODE Party mode allows you to con nually cook foods on all your SmartGrill burners, perfect for when you are hos ng a party and need a constant stream of goodies coming off your grill! To enter Party Mode: Select My Chef Select Party Mode VOICE COMMANDS BASIC COMMANDS Your SmartGrill by Lynx™ can be completely controlled by using a series of pre‐set voice commands.
VOICE COMMANDS...con nued adjusted me the user specified the last me the recipe was used. Command: “SmartGrill, Add 30 seconds.” Function: Adds 30 seconds to the amount of me specified in the recipe or to the adjusted me you specified the last me the recipe was used. See the Time Phrases list page 27. Command: “SmartGrill, Subtract 30 seconds.” Function: SmartGrill will subtract 30 seconds to the amount of me specified in the recipe, or to the adjusted me you specified the last me the recipe was used.
USING YOUR SMARTGRILL BY LYNX™ RECIPE DATABASE...con nued recipes at a me. Your 101st recipe will replace the least used recipe, and will con nue to cycle, allowing you to access 100 different recipes by voice command at any me. You can always send a new recipe to the SmartGrill, and grill using either voice commands or the app or both to complete the recipe. My Recipes The “My Recipes” tab is where you can store your own recipes that will then be followed by the SmartGrill by Lynx™.
ADVANCE OPERATIONS Func on: A er you cancel a recipe, this command will shut down the grill’s burners. Note that this command does not shut off the grill. To shut off the grill, press the bu on on the le front, give the voice command "SmartGrill, shutdown" or use the app and click on shutdown. Command: “SmartGrill, Cook Manually.” Func on: A er you cancel a recipe, this command will move the SmartGrill by Lynx™ into Manual cooking mode.
CLEANING YOUR SMARTGRILL BY LYNX™ STAINLESS STEEL Lynx products are known for their a rac ve appearance. We achieve this by selec ng only the finest grades of stainless steel and applying exac ng workmanship. In order to maintain this a rac ve appearance over the life of the smoker, it is important to take the following steps: • A er each use, wipe down the exterior of the grill to remove grease and spla ers.
CLEANING YOUR SMARTGRILL BY LYNX™...con nued PROSEAR 2 BURNERS With the hood up, turn all burners on high for 5 minutes. Do not touch the ceramic surfaces, and do not use water or cleaner on the ceramic surface. Do not poke anything into the holes in the ceramic. Every three to six months, remove the burners and in‐ spect the venturi (inlet) and orifice to ensure they are free of obstruc ons. Food debris on the inside of the burners can be gently shaken out.
TROUBLESHOOTING YOUR SMARTGRILL BY LYNX™...con nued Do you have the correct opera ng system on your smart device? Check the Igniters iPhone 5, 5C, 6, or newer, iPad version 2.0 or newer or Android 4.4 opera ng system or newer Your Lynx SmartGrill by Lynx™ uses an electric igni on system that does not spark.
TROUBLESHOOTING YOUR SMARTGRILL BY LYNX™...con nued Liquid Propane Units Is the cylinder almost empty? Almost empty cylinders may not have sufficient pressure to run the burners at high heat. Have the line pressure checked by a qualified technician. Flow limi ng device. Improper ligh ng procedure may have ac vated the liquid propane cylinder’s flow control device, reducing heat output. To reset the flow control: Shut off all burner controls and close the liquid propane cylinder valve.
TROUBLESHOOTING YOUR SMARTGRILL BY LYNX™...con nued Check to see if the gas is turned on. Wait 5 minutes for the gas to dissipate, then try ligh ng it again. Check If it s ll does not light, call Lynx at 888‐289‐5969. Audible: "Burner turned on unexpectedly." Text: "Burner turned on unexpectedly." Check grill to see if someone else is using the grill manually. If not, shut down that burner and watch to see if it lights unexpectedly again. If so, call Lynx at 888‐289‐5969.
OBTAINING SERVICE FROM LYNX Before calling Lynx Customer Care, please make sure you have the following informa on: For Warranty Service or a referral for an authorized service agent near you, contact Lynx Customer Care at: Model number (888) 289‐5969 Date of purchase Proof of purchase by the original owner Agents are available Mon‐Fri from 6AM to 4:30 PM, and Saturday from 8AM to 1PM Pacific Time.
WIRING DIAGRAMS 30” SmartGrill Electrical Diagram
WIRING DIAGRAMS 36”, and 42” SmartGrill Electrical Diagram
EXPLODED PARTS DIAGRAMS
EXPLODED PARTS DIAGRAMS
EXPLODED PARTS LIST
EXPLODED PARTS LIST AND DIAGRAMS
EXPLODED PARTS LIST AND DIAGRAMS
EXPLODED PARTS LIST AND DIAGRAMS
BTU OUTPUTS, MODEL SPECIFIC MODEL-SPECIFIC BTU OUTPUTS MODEL SMART30(F) SMART36(F) SMART42(F) ROTISSERIE 1 @ 14,000 1 @ 14,000 1 @ 16,000 PROSEAR™ 2 2 @ 23,000 3 @ 23,000 3 @ 23,000 TOTAL INPUT 60,000 Btu/Hr 83,000 Btu/Hr 85,000 Btu/Hr MAXIMUM RUNS FOR ALL APPLIANCES ON SUPPLY LINE Run Length 3/4” Pipe (in feet) Max BTU for all Appliances on line 10 360,000 20 245,000 30 198,000 40 169,000 50 150,000 60 135,000 70 123,000 80 115,000 NOTE: IF A 1/2 INCH LINE IS USED WITH NATURAL GAS IT
INDEX # 4/11 Regulator ................................................................. 16 B Before Each Use ............................................................... 23 Before You Start ............................................................... 10 BTU Outputs, Model Specific ........................................... 43 Burner Placement ............................................................ 30 C Checklist Before Each Use ................................................
LYNX LIMITED WARRANTY I. Limited Lifetime Warranty The stainless steel grill body, brass grill burners, ProSear™ burner and rotisserie infrared burner are warranted to be free from defects in material and workmanship when subjected to normal domestic use and service for the lifetime of the original purchaser. This warranty excludes surface corrosion, scratches, and discoloration which may occur during normal use.
LYNX COMMON AREA LIMITED WARRANTY The Lynx Limited Warranty covers residential installations only and is non-transferable to any other party. This 'non residential' warranty applies when the product is installed in common areas where more than a single party has rightful access to its use or in locations considered beyond normal residential use such as B&B's, and private clubs.
The best outdoor kitchen products come from: Lynx Grills, Inc. 62201 Hwy 82 West Greenwood, MS 38930 For more informa on please call, 1-888-289-5969 or visit www.lynxgrills.