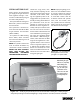
Care & Use of Your Lynx Professional Grill *," -- " Ê , -
A Message to Our Customers… Thank You for choosing LYNX as your new gas grill. With proper use and care, we’re confident that our product will provide years of trouble-free service. Careful attention has been put into every detail of this grill and, by reading this entire manual before your first use, you will be assured of maximum performance and enjoyment. This manual also contains important safety tips and some hints for better grilling.
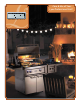
Installation, Care and Use of Your Lynx Professional Cooking Product This manual covers the following 2007 Lynx products: GRILL MODELS PROSEAR MODELS SIDE BURNER MODELS L27 & L27F L30PSR & L30PSFR LSB2PC L27R & L27FR L36PSR & L36PSFR LSB1 L30R & L30FR L42PSR & L42PSFR LSB2 L36R & L36FR L54PSR & L54PSFR L42R & L42FR LPSGE F O R O U T D O O R U S E O N LY IMPROPER INSTALLATION, ADJUSTMENT, ALTERATION, SERVICE OR MAINTENANCE CAN CAUSE PROPERTY DAMAGE, INJURY OR DEATH.
Important Safety Considerations WARNING! Read this manual carefully and completely before using your grill to reduce the risk of fire, burn hazard or other injury, and to ensure proper installation and servicing. FOR YOUR SAFE T Y AV E R T I S S E M E N T If you smell gas: S’il y a une odeur de gaz: 1. Shut off gas to the appliance. 2. Extinguish any open flames. 2. Open lid. 4. If odor continues, keep away from the appliance and immediately call your gas supplier or fire department. 1.
Table of Contents Precautions for Installation and Storage. . . . . . . . . . . . . . . . . . . . . . . . . . . . . . . . . . . . . . . . . . . . . . . . . . . . . . . . . . . . .2 Locating Your Grill . . . . . . . . . . . . . . . . . . . . . . . . . . . . . . . . . . . . . . . . . . . . . . . . . . . . . . . . . . . . . . . . . . . . . . . . . . . . . . . . . 4 Cutout Dimensions for Built-ins. . . . . . . . . . . . . . . . . . . . . . . . . . . . . . . . . . . . . . . . . . . . . . . . . . . . . . . . . .
Precautions for Installation and Storage 1) DO NOT store or use gasoline 5) Always adhere to the required 9) Keep any electrical supply or other flammable vapors and liquids in the vicinity of this or any other appliance. 2) Never store additional or empty propane cylinders in the grill cabinet or around the grill. Do not store propane cylinders indoors or on their sides. Never use dented, rusty or damaged propane cylinders. clearances from combustibles as detailed.
SPECIAL NOTE FOR LP USE Never connect any unregulated gas supply to the grill. The hose with regulator and Type 1 connection included with your grill has these safety features: • The system will not allow gas to flow until a positive connection has been made. •The system has a thermal element that will shut-off the flow of gas between 115 and 150ºC (240 and 300ºF). • The system has a flow limiting device which, when activated, will restrict the flow of gas to 10 cubic feet per hour.
Locating Your Grill When selecting a suitable location, take into account concerns such as exposure to wind and traffic paths. Try to keep all gas supply lines as short as possible. Never locate the grill in a building, garage, shed or other such enclosed area. A carpenter’s “spirit level” should be used to assure that the unit is level both front-to-back and side-to-side. If it is not level, burner combustion may be erratic or the unit may not function efficiently.
Cutout Dimensions for Built-ins A 12" min. 2" 0 or 2" square holes for manifold connection (rear or bottom access) 10 1/8" for L36 models B *CocktailPro should have an open bottom for plumbing and drain access. 2 1/4" 29" 1 1/8" min. for model LUDE 3 1/2" min. for model LUDXL 2 1/2" min. for model LDR C Side Burner 2" Grill 1 1/8" min. CocktailPro* Access Doors F Utility Drawer 19" E Specifications are subject to change without notice.
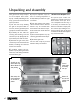
Unpacking and Assembly Your grill arrives nearly ready to use and requires little assembly. By carefully following these steps, you will be assured of safe initial operation. 5) Inspect briquette trays for TO REPLACE BRIQUETTES loose or missing briquettes. If found, follow procedure at right to reinstall. 6) Cut and remove wire and/or 1) Cut the main strap holding cable ties from burners. ProSear the grill to the pallet. With assistance, remove grill from pallet and place into desired location.
Electrical Requirements & Hook-up WARNING 2) Disengage the cover from the battery compartment by pushing the clips on the top and bottom of the compartment together and remove the cover. Electrical Grounding Instructions: This outdoor gas cooking appliance is equipped with a threeprong (grounding) plug for your protection against shock hazard and should be plugged directly into a properly grounded threeprong outlet. Do not cut or remove the third prong from this plug.
Gas Requirements & Hook-up Your grill is setup to use either propane (LP) or natural gas (NAT). It is very important that the grill rating plate matches with your gas supply. The rating plate is located in one or more of the following places: • under the drip tray • on the heat shield behind the front panel • on the inside left cabinet wall (most freestanding grills) Do not attempt to operate the grill on any gas other than what the grill is orificed for and what the regulator is set for.
L.P. GAS Grills orificed for use with L.P. gas come equipped with an LP hose/ regulator assembly for connection to a standard 20 lb. L.P. cylinder (Type 1). All fittings necessary to attach the hose/regulator to the grill are included. The L.P. tank is not included. Operating pressure: 10.0”W.C. Turn off LP-gas supply at cylinder when appliance is not in use. Fermez l’alimentation en GPL à la bouteille si l’appareil ne fonctionne pas.
Precautions for Using Your Grill READ THIS MANUAL CAREFULLY AND COMPLETELY BEFORE USING YOUR GRILL TO REDUCE THE RISK OF FIRE, BURN HAZARD OR OTHER INJURY. Safety Precautions 1) NEVER LEAVE THE GRILL UNATTENDED WHILE COOKING. 2) Avoid wearing loose-fitting garments or long sleeves while using the grill. Never touch the grill racks, hood or immediate surrounding metal surfaces with your bare hands as these areas become extremely hot during use and could cause burns.
Leak Testing To Perform Leak Test 1) Create a soapy solution of equal parts mild dishwashing detergent and water. 2) Confirm that all control knobs are in the off position. 3) Turn on fuel supply. For natu- C AU T I O N DANGER To prevent fire or explosion hazard, DO NOT use or permit sources of ignition in the area while performing a leak test. Perform leak test outdoors only. Never perform a leak test with fire or flame.
Model Identification 54” Professional Light Rotis Switch Grill Grill Grill Grill Grill (opt. ProSear) Light Rotis Switch Grill Rotis Grill Grill (opt. ProSear) 27” Professional 36” Professional Light Rotis Switch ProSear 30” Professional 42” Professional Light Rotis Switch Grill Grill Grill (opt. ProSear) Light Rotis Switch (opt.) Grill Grill BURNER TYPE IDENTIFICATION Depending on the model, your Lynx grill may be equipped with up to three different burner types.
Using the Grill Grilling requires high heat for searing and proper browning. Most foods are cooked at the “HI” heat setting for the entire cooking time (with the lid open). However, when grilling large pieces of meat or poultry, it may be necessary to turn the heat to a lower setting after the initial browning. This cooks the food through without burning the outside. Foods cooked for a long time or foods basted with a sugary marinade may need a lower heat setting near the end of the cooking time.
Lighting the Brass Burners WA R N I N G Never attempt to light grill if odor of gas is present. Hood must be open when lighting. Keep face and body as far from grill as possible when lighting. Always wait at least 5 minutes before attempting to relight a hot burner. Before proceeding, make sure you have completed the checklist on the previous page. These checks should be performed before each use of the grill. Follow these steps to light the main brass grill burners: ers and set to HIGH.
Using the ProSear Burner The ProSear burner has some special components and warnings specific to its design. Be sure to read this section completely before using your ProSear. SAFETY PRECAUTIONS 1) Do not light the grill until you have carefully read and understand the lighting instructions. LIGHTING THE PROSEAR any food particles or drip1) Open hood completely. Do pings. Operate the burners not attempt to light grill with the on “HI” for 5 minutes. hood closed.
Using the Rotisserie The rotisserie system consists of three main parts - the motor, the skewer which holds the food, and the infrared rotis burner. The rotisserie evenly cooks large cuts of meat by turning them continuously in front of a high-intensity burner. The rotis is capable of turning up to a 25 lb. cut of meat. THE MOTOR The rotisserie motor runs on 12 volt DC power that is supplied by the grill.
6) If burner does not light, turn knob to OFF, wait 5 minutes to allow gas to dissipate, and repeat step 5 above. Once lit, the rotis burner should reach cooking temperatures in about 1 minute. The glow will even out in about 5 minutes. If the burner will only stay lit with the control knob depressed, the thermocouple position may need to be adjusted (see figure 17-1) to ensure proper function.
Cleaning the Grill The best way to keep your grill looking great is to use a cover, supplied by Lynx, when the grill is not in use. While stainless steel is very durable, some care is required to ensure the long life of your grill. STAINLESS STEEL Your grill has a directional polished grain - any cleaning should be carried out along this grain and not across it. The grill is made from non-rusting and non-magnetic stainless steel.
Burner Cleaning & Adjustment Before removing burners ensure the gas supply is off and the knobs are in the “off” position. Make sure the grill has completely cooled before proceeding. and stable with no yellow tips, excessive noise or lifting. If any of these conditions exist, check if the air shutter or burner ports are blocked by dirt, debris, or spider webs. If needed, proceed with air shutter adjustment. To Remove Brass Burners: Remove the grill racks and briquette trays.
Troubleshooting If the Grill does not function properly, use this checklist before contacting Lynx for service. GRILL WON’T LIGHT If the igniters are working correctly, next determine if gas is reaching the burners. Ensure the gas supply is turned on, and that there are no leaks, according to the procedure on page 11. Attempt to match-light a burner according to the procedure on page 14.
Light Bulb Replacement TO CHANGE LIGHT BULBS Remove the glass light cover by grasping the edge of the glass and gently prying it off. It may be necessary to remove one screw. Pull the old bulb straight out from socket - do not twist. Replacement bulbs are halogen, 12 volt, T3 type with a G4 bipin base. The 54” grill uses two 5W bulbs, all others use one 10W. avoid touching the glass of new bulbs. Install new bulb by gently pressing it into the socket. Replace glass cover by gently snapping back into place.
Side Burner/LPSGE Gas Hookup BUILT-IN INSTALLATION 1) Shut off gas supply at main Natural Gas valve. 2) Disconnect all plumbing (if already attached) from grill and gas supply valve. 3) Remove all fittings from grill manifold. 4) Install side burner into cutout in countertop. 5) Connect gas supply to grill and side burner as shown in the figure at right for your proper gas type. 6) Turn gas supply on and leak test all connections. CART INSTALLATION 1) Shut off gas supply at main valve.
Lighting the Side Burner or LPSGE WA R N I N G Never attempt to light burner if odor of gas is present. Lid must be open/off when lighting. Keep face and body as far from unit as possible when lighting. Always wait at least 5 minutes before attempting to relight a hot burner. Before proceeding, make sure you have completed a leak test. This check should be performed before each use of the side burner or grill extender. Follow these steps to light the burners: 1) Open or remove lid completely.
Warranty I. Limited Lifetime Warranty. The stainless steel body housings, the solid brass grill burners and the ProSear burners* are warranted to be free from defects in material and workmanship when subjected to normal domestic use and service for the lifetime of the original purchaser. This warranty excludes surface corrosion, scratches, and discoloration which may occur during regular use. This warranty is limited to the replacement of the defective parts.
How to Obtain Service Before you call for service: 1) Is there Gas Supplied to the Grill? 2) Is there a power outage in the area (lights will not work)? 3) Have you recently refilled the LP Tank? Before calling for service, please make sure you have the following information: 1) Model number 2) Date of purchase 3) Proof of purchase by the original owner 4) Serial number.
Wiring Diagrams Dome Light DOME LIGHT Inside Grill Key for 30”, 36”, 42”, and 54” Grills INSIDE GRILL Orange Wires to Igniters Transformer Power in for Ignition and Rotis TRANSFORMER POWER IN FOR IGNITION AND ROTIS Transformer Power inPOWER for TRANSFORMER IN FOR LIGHTS Lights Red Wires Black Wires Insulated Wire to Lamp Side Burner Connector SIDE BURNER CONNECTOR for FORLED’S LED’S ROTIS ToTORotis CONNECTORS Connectors .250 x .032 Terminal .110 x .031 Terminals 3 .187 x .
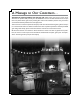
*," -- " Ê , - The Lynx Story… Lynx began as the vision of a group of people with over a century of collective experience, who for 35 years were manufacturing top-of-the-line stainless steel products for the commercial food service industry. Lynx has taken that same quality, workmanship, service and innovation and incorporated it into the Lynx Professional Grills line of products.