
User Manual


5 Ins
t
Please i
n
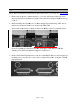
1. Rem
o
large
cove
r
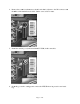
2. Befo
r
that
c
Slid
e
If yo
u
swit
c
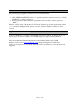
3. Rem
o
mou
n
after
t
allation
P
n
sure that th
e
o
ve the AC
p
screws plu
s
r
on.
r
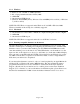
e installing
c
orrects the
c
switch 4 (l
a
u
are updati
n
c
hes, please
c
o
ve the LS
L
n
ting screws
installation.
P
rocedure
s
e
Aurora ha
p
ower cord
a
s
one small
s
the LT-US
B
c
urrent dra
w
a
beled W4 o
n
g an older
A
c
all Lynx T
e
L
OT Expans
i
. Set these t
w
P
s
s
f
irmware
2
a
nd take the
s
crew near t
h
B
card, you
m
w
for an Aur
o
n PCB) of
S
A
urora that
h
e
chnical Su
p
i
on Port cov
e
w
o screws a
age 8 of 45
2
4 or above
top cover o
f
h
e center of
t
m
ust chang
e
o
ra with an
L
S
W1 to the
O
h
as jumper
p
p
port for ins
t
e
r above the
side, as the
y
before proc
e
ff of the Au
r
t
he front fa
c
e
a dipswitc
h
L
T-USB
O
FF positio
n
p
ins at JP6,
i
t
ructions.
e
AES I/O P
o
y
will be use
d
eeding. See
r
ora. There
a
c
eplate th
a
t
h
h
setting on
t
n
(towards b
a
i
nstead of t
h
o
rts by rem
o
d to secure
t
Section 2.2.
3
a
re seven
h
olds the to
p
t
he Aurora
a
ck panel).
h
e W4
o
ving the tw
o
t
he LT-USB
3
p
o