LT--USB B USB 2.0 LSL LOT T Intterfaace Usser Man M nual Lynx Stu udio Techn nology, Incc. www.lynxxstudio.com m suppport@lynxxstudio.
User Manual Table of o Contentts 1 Intro oduction .......................................................................................................................3 1.1 Overv view ..........................................................................................................3 1.2 Featurres ............................................................................................................4 ore you begiin ..............................................................................
1 Introduction Thank you for purchasing the LT-USB™! We are proud to provide you with a reliable, professional-quality product for your digital audio requirements. This manual covers operation, product characteristics, and information to help you get started. Additional information is available via our website’s support resources. Please refer to Section 10, Support, at the end of this manual for support contact information.
1.2 Features ¾ USB 2.0 Device port (Type B) ¾ USB Audio Class 2.0 compliant ¾ With an Aurora 16, provides 16 channels of I/O at sample rates up to 96 kHz and 8 channels at up to 176.4/192 kHz ¾ With an Aurora 8, provides 8 channels of I/O at all sample rates ¾ Supports routing of USB audio streams to Aurora’s AES/EBU outputs ¾ Works with almost any USB 2.0-equipped computer ¾ Supports ASIO and WDM for Windows and CoreAudio for Mac OS X ¾ Fully supports current operating systems, Windows 7 and OS X 10.6.
2 Before you begin We recommend that you read through the entire manual to acquire an overview of the installation procedure and use of the LT-USB. This manual will presume a working knowledge of the Aurora converter. For additional information, please refer to the Aurora User Manual. It is also highly recommended that you have a good working knowledge of Windows and/or Macintosh operating system basics and an understanding of computer hardware basics.
2.2.1 ¾ ¾ ¾ ¾ ¾ Windows Intel Core 2 @ 1.6 GHz, or AMD equivalent PC or laptop manufactured after January 2006 1GB RAM One functional USB 2.0 port Windows XP with SP3 (32-bit), Windows Vista with SP2 (32-bit or 64-bit) or Windows 7 (32-bit or 64-bit) NOTE: The LT-USB is not supported under Windows 95, 98, ME or Windows 2000. Windows installed via BootCamp is not officially supported. 2.2.2 Macintosh ¾ Any Intel Processor based Mac or MacBook computer running OS X 10.6.
3 Nomenclature Used in this manual The following typographic conventions are used in this manual: ¾ ALL UPPER CASE TEXT refers to a specific parameter selection control (i.e. SYNC SOURCE) or a cable connection. ¾ Text in quotation marks indicates a parameter selection value or menu option (i.e. “EXT”). Phrases, such as: Start > Programs > Lynx Studio Technology use the greater than symbol (“>”) to indicate multiple menu options or mouse selections within a software control context.
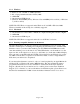
5 Insttallation Procedures P s Please in nsure that thee Aurora has firmware 24 2 or above before proceeeding. See Section 2.2.33 1. Remo ove the AC power p cord and a take the top cover offf of the Aurrora. There aare seven large screws pluss one small screw s near th he center of tthe front facceplate that hholds the topp coverr on. 2.
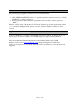
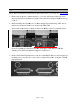
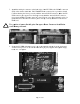
4. Remo ove the screw w from the Aurora A circu uit board thatt is adjacent to the JP1 connector andd the white w serial number/barco n ode label. Seet the screw aside for reuuse. 5. Installl the standoff post (inclu uded with th he LT-USB) in this samee hole. 6. Grou unding yourself to earth ground, g remo ove the LT-U USB from itts protective anti-static bag.
7. Attacch the multi-pin connecto or on the bacck edge of thhe LT-USB to the LSLO OT connectorr (JP1)) on the Auro ora mainboaard. The LT-U USB LSLOT T connector has a protecctive sheath to inssure that the pins line up correctly with w the Auroora LSLOT cconnector. W When the LT TUSB connector pins p appear to o be lined up p correctly w with the Auroora LSLOT connector, press gently untill the connecttor snaps into place.
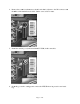
9. Reinstall the Aurora lid using the eight screws that had been removed in step 1. Do not over tighten the small screw near the center of the front faceplate as it is easily damaged. 10. Plug in and power up the Aurora using the front panel standby switch. You can see the LT-USB from the slits in the Aurora top cover. If the green LED on the LT-USB lights up, the installation was successful. If the LED does not light, unplug the Aurora and remount the LT-USB, making sure that it is securely attached.
When the application does not request a sample rate change, and one wishes to avoid sample rate conversion, the sample rate can be changed from within Audio MIDI setup in OS X to match the desired sample rate. After changing the sample rate, the play application often will need to be restarted. 5.1.2 Using External / AES A / AES B Clock The Aurora can slave to a master/house clock source via Word clock or via its AES inputs.
5.2.1 Windows W XP P, Vista (32--bit or 64-biit), or Wind dows 7 (32-b bit or 64-bitt) 1. Poweer on the Aurrora with thee USB cablee disconnecteed. From thee front panell, set the TO ANA ALOG OUT button b to “L LSLOT IN”. 2. The LT-USB L driv ver should be b installed prior p to connnecting the A Aurora to the computer. Insertt the Lynx In nstallation CD C into yourr computer’ss disk drive. 3. Locatte the Windo ows\LT-USB B folder on the t CD. Douuble-click thhe LTUSBSeetup.exe filee. 4.
6. The system s will search s for th he LT-USB and a should bbe unable to find it. Connnect the LTUSB and click “N Next>” 6. Accept the default destination n folder for the t driver filles and clickk “Install>” 7.
8. Click k “Finish >”. 9. You may m receive a warning that t the driveer has not beeen digitally signed by M Microsoft. It is saffe to disregarrd this warniing and selecct “Continuee Anyway.” 10. On so ome systemss the Window ws hardwaree wizard willl launch post driver instaallation. In this case, c run the wizard usin ng the “Autom matic Installlation” optioon, acceptingg the defaults, until it completess. Skipping this t step may y cause the ddriver to funcction incorreectly. 11.
6 Gettting Startted With the LT-USB drrivers and Au urora Remotte Control appplication innstalled, the A Aurora can now be used u with mo ost popular th hird-party au udio applicaations. Howeever, it is a ggood practicee to verify that the insttallation wass successful and a test the A Aurora withh the followinng procedurre. 6.
8. Laun nch the Aurorra Remote Control C appliication. Clickk the Analogg I/O tab. Chheck for meterr activity forr Analog Ou utputs 1&2. If I you have sspeakers or hheadphones connected too your destination device, d you should be heearing audioo as well.
Troubleshooting.
6.2 Ma acintosh Qu uick Audio Test T The instaallation of yo our LT-USB B can be testeed using the Aurora Rem mote Controll applicationn and the iT Tunes softw ware that is in ncluded with h OS X. Thiss is a quick w way of verifyying that thee interface is installed correctly and properly connected c to your externnal equipmennt. 1. Open n Audio MID DI Setup from m Applicatio ons > Utilitiees. 2.
7. For th his test we will w set the Aurora A to Inteernal as the cclock sourcee. This is thee default statte of thee Aurora. If this has been n altered, dissconnect thee USB cable and select IN NT from thee Aurora front paneel and then reconnect r thee USB cablee. 8. Laun nch iTunes frrom “Applications” or frrom the OS X dock. Draag the “SineeWaveMinuss16.aif” file from your desktop d into the iTunes ssonglist 9. Highlight this filee from the so onglist and click c the Playy button.
Troubleshooting.
7 Aurora Remote Control Application Reference The Aurora Remote Control (ARC) application allows control of Aurora parameters from a convenient software interface. It also provides accurate real-time metering for all inputs and outputs, and displays status information such as channel mode, sync source and sample rate. The ARC is automatically installed with the Windows driver setup program, and is a separate install under OS X (see Section 5.2, Installing the Driver and Aurora Remote Control Application).
When thee Aurora Remote Contro ol application n is run via tthe LT-USB B connectionn, the Auroraa will enterr a “lock-outt” mode wheere some fro ont panel conntrols will bee disabled, aand control iss restricted d to the ARC C software orr from settin ngs within thhe operating system. Thee following table detaails which frront panel fu unctions are impacted i byy “lock out” mode: q SAMPLE RATE This button will not n be activee.
o METER This button will function normally. See the Aurora manual for information. a TRIM/AES MODE When the METER select switch is set to “Analog”, this button normally allows the nominal trim level to be set for the analog inputs and outputs. In “Lock Out” mode, this button will not be active, and trims can be set for the Analog inputs and outputs from within the Aurora Remote Control application.
7.3.1 Analog A I/O Page P This pagee is viewablee by clicking g the “Analo og I/O” Tab in the top leeft corner of the Aurora Remote Control C appllication. q These T indicattors will illum minate when n three conseecutive full-sscale samplees are detected on th he Aurora Analog A Inputss and Outputts or when a summing overrun occurs on the Aurora Anaalog Outputss. The indicaator will rem main illuminaated for 250ms.
caauses the rem maining chan nnels to be set s sequentiaally (i.e. if yoou select LS SLOT In 1 ass th he monitor source for An nalog Out 1 while holdinng down the CTRL key, LSLOT In 1-16 will be assigned a to Analog A Out 1-16). Please P note th hat with an LT-USB L insttalled, LSLO OT sources coorrespond too audio sttreams coming from the host computter. y These T faders allow contro ol over the output o level oof each moniitor source w when in Remote R Routing mode.
Digital I/O & Settin ngs Page This pagee is viewablee by clicking g the “Digitaal I/O & Setttings” Tab inn the top left ft corner of the Aurora Remote Control C appliication. o These T indicattors will illum minate when n three conseecutive full-sscale samplees are detected on th he Aurora Digital Inputss and Outputts or when a summing ovverrun occurrs n the Auroraa Digital Outtputs. The in ndicator willl remain illum minated for 250ms.
to the Analog Outputs. By manually assigning LSLOT sources to the Digital Outputs, these signals can be mirrored to the Aurora AES/EBU outputs as well. For example, to send USB audio streams to the digital outputs, assign LSLOT 1-16 (for an Aurora 8, assign LSLOT 1-8) to the digital outputs as “SOURCE A” and set “TO DIGITAL OUT” to “REMOTE”. f These faders allow control over the output level of each monitor source when in Remote Routing mode.
; This T drop-dow wn menu alllows for seleection of the signal sourcce that will bbe routed to th he analog ou utputs. “ANA ALOG IN”, “AES IN” aand “LSLOT T IN” are gloobal seelections, aff ffecting all an nalog outputt channels. ““LSLOT” rouutes signals from the co omputer via the USB connection. Ch hoosing “RE EMOTE” alllows individu dual sources to o be assigned d from the Monitor M Sourrce section oon the ANAL LOG I/O Pagge of the Aurora A Remo ote Control application.
7.3.3 About A Aurorra Remote Control C Win ndow This dialog box detaiils the versio on number of the Auroraa Remote Coontrol application, and the hardw ware revision ns, serial num mbers and board revisio ns of the Auurora and LS SLOT devices. It also displaays the Auro ora’s operatin ng temperatuure and the cconnection m medium being em mployed.
8 Using the LT-USB With the LT-USB correctly installed in your computer, you can begin to use the Aurora with most popular third-party audio applications. In this section we will explore setting up the Aurora/LT-USB system for different contexts of use. 8.1 8/16 Channel Modes The LT-USB supports two channel modes: an 8-channel mode that supports sample rates up to192 kHz and a 16-channel mode that supports sample rates up to 96 kHz.
ut This Macc> More Infoo…> USB” ttab: In OS X 10.6.4+, go to the “Abou Both of the t following g screenshotts show the Lynx L LT-US SB as the onlly device onn a high-speeed USB hosst controller. This is the recommende r ed configuraation for systtems that behhave poorly when shaaring the US SB bus with multiple m dev vices.
8.4 Application Setup The LT-USB was designed to provide maximum compatibility with the most popular audio and multimedia applications that use the Windows MME, DirectSound, ASIO and OS X Core Audio driver standards. It is crucial that the applications are set up correctly for optimal operation. 8.4.1 Windows The Windows drivers for the LT-USB support two dominant driver models, WDM (which include both MME and DirectSound) and ASIO.
8.4.1.2 Multi-Channel Surround playback Surround-sound material can be played and distributed to multiple outputs on the Aurora. The playback software must have an option for decoding and playing back surround-encoded material. The playback software should be set up to use the appropriate Aurora playback device. In some cases, the software will use the Operating System default audio device set in the Windows Sound control panel.
latency performance p of an Aurorra/LT-USB system: s proccessor speed,, operating ssystem, sample raate, number of utilized record or play channels, system efficciency, etc. Latency can c be manipulated by changing c thee size of the bbuffers usedd to transfer ddata to and from the LT-USB. For Wind dows, the Ly ynx LT-USB B control pan nel provides access to buuffer settingss, which cann define individual bufffer and streaam buffer sizzes for WDM M and ASIO O.
When using WDM based applications, only the Streaming buffer size parameter contributes to the overall latency of the system. The ASIO buffer size is ignored. Most WDM applications also add a large amount of additional latency to ensure clean playback. For this reason, ASIO is the preferred driver model for pro-audio and low-latency situations. In order to modify the latency, the “Streaming” buffer size must first be set. Choose the desired size and click “Apply”.
s devicee, channels 11&2 are activve by When thee LT-USB iss selected as the output sound default. To T change th his, highlightt the LT-USB, choose “cconfigure sppeakers” from m the gear icon, and d then select the desired stereo outpu ut channels fr from the dropp-down mennus. C Latency L by Changing C thee Buffer Size 8.4.2.2 Controlling Latency in i an audio interface i can n be defined as the time rrequired to pprocess a sam mple from ann applicatio on to the inteerface’s aud dio output.
recording applications. With the LT-USB, buffer sizes typically range between 32 and 2048 samples. Smaller buffer sizes will give you lower latency. However, if a buffer size is too small for the system or context, audio anomalies such as clicks and pops may occur. It is recommended to become familiar with altering the LT-USB buffer size to best suit the context of use.
Although LT-USB streams cannot be globally routed to the Aurora’s Digital Outputs, they can be manually assigned to the digital outputs as “SOURCE A” or “SOURCE B” if TO DIGITAL OUT is set to “REMOTE”. In addition to Source A and Source B, Analog Outs 1-4 have 16 additional monitor sources available. These provide an excellent solution for cases where, for instance, all analog inputs need to be monitored through a stereo output.
9 Troubleshooting There is an error message during the driver installation: 1. Verify that the LT-USB has been installed correctly and there is an LED illuminated on the LT-USB board. See Section 5, Installation Procedures. 2. Verify that the USB cable is connected correctly and that the computer USB ports are active and the drivers are functional. 3. Verify that your Aurora has firmware revision 24 or above The LT-USB does not show up in the Operating System as a usable device: 1.
6. 7. 8. 9. the output row or above (i.e. 2&5, 2&6, etc.) in the Aurora Meter Display, then your unit is compatible with the LT-USB. If pressing Power and Trim does not cause any LEDs to flash, causes a sequence lower than 24 to flash, or causes a single number to flash, then your unit needs to be updated. Check that the LT-USB is connected via a High-Speed USB 2.0 cable (provided). Check that the OS is compatible with the LT-USB. One must be running OS X 10.6.
3. What is the connection medium described from the “About Aurora Remote Control” Dialog box? If connection via IRDA is indicated, disconnect or disable the Infrared transceiver on the host computer. 4. Close the ARC and any audio applications and reset the LT-USB either by removing then reinserting the USB cable, or by turning the Aurora off for 5 seconds, then turning it back on. 5. Please note that certain applications under OS X (ie Logic) do not allow other MIDI applications to run simultaneously.
10 Support We are devoted to making your experience with the LT-USB trouble-free and productive. If the troubleshooting and operational sections of this manual did not help resolve your questions, several support options are available to you: 10.1 Lynx Website Support Resources Logging on to http://www.lynxstudio.com/support.
10.4 Return Policy If you have a unit that you suspect is defective or is malfunctioning, contact Lynx technical support via one of the means described above for diagnosis. If the technician determines that the unit is faulty, they will issue an RMA number so you can send the unit in for repair. Units received without a valid RMA number will be refused. All RMA numbers are valid for 30 days from the date of issue. 10.
12 Warranty Information One year Free Labor / One year Parts Exchange This product must be returned to the factory for repair. Who Is Covered? You must have proof of purchase to receive warranty service. A sales receipt or other document showing when and where you purchased the product is considered proof of purchase. This warranty is enforceable only by the original retail purchaser.