
Installation Guide
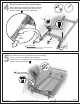

Move glide rails slightly forward as shown
and install glide-frame into cabinet using
wood screws found in parts bag.
Install front
screws first
5
41
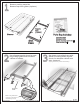
Remove packing materials
Remove tape from glides (4 places)
Turn screws
until just snug.
Remove drawer from glide-frame.
Glide
Frame
Remove
Tape
(4 places)
Set drawer onto glide-frame with
drawer mounting holes aligned.
Check for adequate cabinet and
door clearance.
Adjust glide frame position if necessary.
3
NO
Set drawer back onto glide-frame with mounting
holes in drawer and glide-frame aligned.
Install drawer onto glide frame by gently tightening
drawer mounting screws
Recommended.
Move
glide
forward
Drawer
Parts Bag Includes:
Instruction Sheet
Alignment Guide
Drawer mounting screws (4)
Wood screws (4)
“
2
min.
“
2
min.
Make sure glide-frame
is facing to the front as
indicated by arrows.
Alignment
Guide
2 ”
min.
2
Use alignment guide found in parts
bag to align glide-frame inside of
cabinet as shown.
“
2
min.
“
2
min.
2 ”
min.
© 2006 Lynk
®
, Inc. 8241 Melrose Drive, Lenexa, KS 66214
051106T
Roll-Out Drawer If you have questions, please call 800-733-5965
© 2006 Lynk
®
, Inc. 8241 Melrose Drive, Lenexa, KS 66214
051106T
Roll-Out Drawer If you have questions, please call 800-733-5965
Drill 4 starter holes using an 1/8” diameter drill bit.
The use of a power screwdriver.
Recommended: