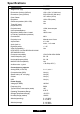
Specifications Specification AV-X2 Plus Weight in lbs. (kg) 7.2 (3.26) Dimensions (inches) (WxDxH) 12.8 x 9.8 x 3.6 (with lens) Dimensions (mm) (WxDxH) 325 x 250 x 92 (with lens) Color Palette 16.7 million (24 bit) Resolution 1024 x 768 (native) SXGA compression(1024 x 768) Yes Three 0.
User Guide English LCD Projector
This equipment has been tested and found to comply with the limits for a Class A digital device, pursuant to part 15 of the FCC rules. These limits are designed to provide reasonable protection against harmful interference when the equipment is operated in a commercial environment. This equipment generates, uses and can radiate radio frequency energy and, if not installed and used in accordance with the instruction manual, may cause harmful interference to radio communications.
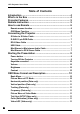
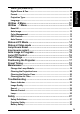
LCD Projector User Guide Table of Contents Introduction ........................................................................... 4 What’s in the Box .................................................................. 4 Projector Features ................................................................. 5 Remote Instruction ................................................................ 5 How to use Remote ............................................................... 6 Remote mouse function ...........
Utilities - 2 Menu ................................................................... 12 Utilities - 1 Menu ................................................................. 12 English Video Type (Video onl y) .................................................................... 11 Digital Zoom & Pan ............................................................................. 12 Format ................................................................................................. 12 Projection Type ...
LCD Projector User Guide Introduction The easy-to-use LCD Digital Projector offers superb image quality at an affordable price. Built into the LCD Digital Projector with Image Manager feature. With this feature, you can select the image display setting best suited for your specific presentation material and projection environment. In only minutes you can have your LCD Digital Projector ready to go. Just connect the projector to an image source such as a computer, DVD, VCR, or digital camera.
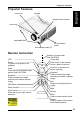
Projector Features zoom ring keypad remote control sensor focus ring English Projector Features adjustable feet I/O connection panel foot release button (2) Remote Instruction LED Power To power on projector or off projector Laser Press the key activate the laser pointer (See CAUTION) Keystone Press to adjust the image vertically and make a squarer image.
LCD Projector User Guide How to use Remote Install AAA battery x2 into the remote. Remote mouse function The flip cover must be closed in order for the mouse function to work. OSD Menu Funciton • The flip cover must be open. • Press “Menu” to enter OSD menu. • Up/down arrow of the cursor key will be same as OSD menu. / showed in the • Left / right arrow of the cursor key will be same as - / + function. • Exit is same as ↵ to exit OSD menu.
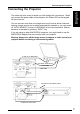
Connecting the Projector The cable are color coded to assist you with making the connections. When you connect the power cable to the projector, the Power LED on the keypad will be turned on. You can connect more than one image source at a time as above reference drawing. Image source can be either automatically selected or you can switch off “AUTO SOURCE” function of OSD MENU to be manual selection. Manual selection is operated by pressing “INPUT” key.
LCD Projector User Guide Starting the Presentation We recommend turning on the projector and image sources in the order listed here. 1. Connect the signal cable to the computer or video source. 2. Connect the power cord to the projector and to a power source. The Power light begins to blink. 3. Turn on the presentation components in the order listed. To turn on the projector, remove the lens cap and press the Power button on either the remote control or the keypad, when lamp ready LED is on.
4. Position the projector by using the adjustable feet on the bottom of the projector. Press the foot release buttons in the front of the projector to raise or lower the feet. English Starting the Presentation 5. Turn the focus ring to focus the image and turn the zoom ring to zoom in or out on the image. 6. Make any necessary image adjustments by using the on-screen menus. Turning Off the Projector Turn off the projector and image sources in the order listed here. To turn off the projector: 1.
LCD Projector User Guide OSD Menu Format and Description Basic Menu Description : Use the up and down keys to select function item. Use the - and + keys to adjust value. Hit ↵ to exit. Keystone correction Description: Use the - and + keys to adjust the keystone level of display. Volume Description: Use the - and + keys to adjust the volume level. Brightness Description: Use the - and + keys to adjust the display brightness. Contrast Description: Use the - and + keys to adjust the display contrast.
OSD Menu Format and Description Description: Use the - and + keys to adjust the display position in horizontal direction Vertical position (Data only) Description: Use the - and + keys to adjust the display position in vertical direction English Horizontal position (Data only) Tracking (Data only) Description: Use the - and + keys to adjust the sampling number Frequency (Data only) Description: Use the - and + keys to adjust the sampling clock Picture Menu at Video Mode Description : Use the up and
LCD Projector User Guide Utilities - 1 Menu Description : Use the up and down keys to select item. Use the - and + keys to adjust value. Hit ↵ to exit. Digital Zoom & Pan Description : Press + to enter zoom mode. Zoom: Use “+” key to zoom. Pan: 1. Press “Menu” to enter panning. 2. Press “+ “ to pan to right; “-” pan to right 3. Press to pan upward; to pan downward. Format Description : Use the -and + keys to adjust the video aspect ratio.
Utilities - 2 Menu Description:Showing the OSD position . Use the - and + keys to adjust OSD position. On top-left, top-right, center, bottom-left, bottom-right Auto Image Hit ↵ to exit. English OSD Position Description : Press + key to adjust “Auto Image” setting. ON: Enable image automatically fine tuning. OFF: Disable image automatically fine tuning. Auto Source Description: Automatically search the input source. Reset All Description : PC mode: Press + to reset all adjustable PC setting.
LCD Projector User Guide Status at PC Mode Description: Showing the input signal status and the detected PC mode with model number and firmware version information. Use + key to reset lamp hours to zero. Hit ↵ to exit. Status at Video mode Description: Showing the input signal status and the detected Video standard with aspect ration and firmware version information. Use + key to reset lamp hours to zero. Hit ↵ to exit.
Lamp Hours Reset English Lamp Hours Reset Description: Use the - to confirm lamp hours reset. Hit ↵ to exit. Input source select Description: Press up , down and INPUT keys to select different input source. Press + key to execute. PC: Select PC / MAC input port. S-Video: Select the S-Video input port. Video: Select the Composite video input port.
LCD Projector User Guide Auto Image In Progress Description: Message for auto image in progress Lamp Off Control Press the key again to turn lamp off, otherwise this screen will disappear automatically in 10 seconds. Out of Range Description: Message for input signal out of range.
Positioning the Projector The projector should be at least 2.5 feet (.9 m) from the screen but no more than 32 feet (10 m) away from the screen. Screen sizes are: Distance Width x Height Diagonal 5' (1.5 m) 23~ 30"x 17~ 23" (0.58~0.76 x0.43~0.58 m) 28.6~37.9" (0.7~1.0 m) 6.5' (2.0 m) 30~ 40"x 23~ 30" (0.76~1.02 x0.58~0.76 m) 38.1~50.5" (1.0~1.3 m) 8' (2.4 m) 37~ 48"x 27~ 36" (0.94~1.22 x0.69~0.91 m) 45.8~60.6" (1.2~1.5 m) 9' (2.8 m) 43~ 57"x 32~ 42" (1.09~1.45 x0.81~1.07 m) 53.4~70.7" (1.4~1.
LCD Projector User Guide Preset Timing Mode Name(s) Used Resolution H. Frequency (KHZ) V. Frequency (HZ) VESA Standard 640 x 350 + 37.86 - 85.08 VGA Compatibility 640 x 480 - 31.47 - 59.94 VESA Standard 640 x 480 - 37.86 - 72.81 VESA Standard 640 x 480 -37.50 -75.00 VESA Standard 640 x 480 - 43.27 - 85.01 MAC Compatibility 640 x 480 35.0 66.667 VESA Standard 720 x 400 - 31.47 + 70.08 VESA Standard 720 x 400 - 37.93 + 85.04 VESA Standard 800 x 600 + 37.88 + 60.
Maintenance Change the Lamp Module Important: The lamp contains trace amount of mercury. Some government required special disposal of lamps containing mercury. Dispose of lamps in accordance with the law and any applicable local regulations. The lamp module should be replaced with a certified replacement part. To order a new lamp, contact your local dealer. English Maintenance After change the lamp module, see “Lamp Hours Reset” on page 15 to reset lamp hours. Warning: 1.
LCD Projector User Guide 4. Loosen the two slotted screws on the lamp module bracket. 5. Gently lift and pull up on the metal wire to remove the lamp module. Caution: Do not touch any glass portion of lamp module or may damage it and shorten its operation life. Do not drop the lamp module or glass may shatter to cause injury. 6. Carefully place the new lamp module into the projector with the glass portion facing left.
Cleaning the Air Filter To ensure proper ventilation of your projector, the air filter should be periodically cleaned. More frequent cleaning may be required if you use your projector in a dusty or dirty environment. Caution: If the air filer is not cleaned properly, it can become clogged with dust and prevent proper ventilation. This may cause overheating and damage the projector.
LCD Projector User Guide Troubleshooting Power Indicator The power and lamp indicator on the keypad provides you with information about the condition of the projector. Indicator Light Status Blinking Lamp is off but live power cord is connected to the projector. Projector is in standby mode. OR Lamp is off and fan is running. Projector is cooling down. Steady Lamp is on and fan is running. Projector is ready. Two blinks Scaling chip is malfunctioning. Three blinks System is over temperature.
Troubleshooting Problem Solution Color or text is not being projected. Adjust the brightness up or down until the text is visible. Some text or fonts are not sharp with a computer as an image source. For optimal results, set the computer’s resolution to 1024 x 768. (Refer to your computer user manual.) But this projector can compress resolutions up to 1280 x 1024. Image isn’t centered on the screen. • Be sure that the projector is at a 90° angle to the screen. • Reposition the image.
LCD Projector User Guide Solution Problem Image is “noisy” or streaked. • From the Setup tab in the menus, adjust the frequency and tracking manually to find an optimal setting. • Try connecting to another computer. The problem could be with your computer’s video card. Image is wider at the top or bottom of the screen. This keystoning effect is caused by the projection angle not being perpendicular to the screen.
Troubleshooting Problem Projector responds poorly or not at all to the remote control. Cause and Solution • Make sure that the total distance from the remote to the projector is no more than 32 feet (10 m). • Point the remote control at the screen or at the front of the projector. • Make sure nothing is blocking the infrared sensor on the front of the projector. • Darken the room. The lighting might be effecting the remote control. • Replace the remote control batteries.
LCD Projector User Guide Image Source Problem Cause and Solution The S-Video image source Some inexpensive cables are not compatible with the projector. Be sure to use the cable that does not appear. came with your projector. Only the start-up screen • Verify that the cables are connected correctly. appears and not the image See “Connecting the Projector” on page 7. from the image source. • Verify that the proper image source is connected and that it is selected on the Setup tab of the menus.
Safety These safety precautions include information to prevent personal injury and damage to the projector. Safety Definitions Warning: Statements identify conditions or practices that could result in personal injury. English Safety Caution: Statements identify conditions or practices that could result in damage to your equipment. Warning: For information about use of a feature, please refer to this User Guide. Warning: Hot surface. Do not touch.
LCD Projector User Guide Caution: Never operate your projector without the lamp module or lamp module door. Doing so may damage the projector. Caution: Proper ventilation is important. Don’t block ventilation openings. Never operate this projector in an enclosed area. Do not place the projector on a tablecloth or other soft covering that may block the vents. With ceiling installations, use approved mounting hardware.
29 English