
Installation Guide


0123456
0 0 1 1+1 4 4+1 7 1+7
113568911
24679101213
36 8 1011131416
4 9 11 12 14 15 17 18
Four-gang gangable
wallbox
3/4" (19 mm)
space (use
chase nipple)
Single-gang
gangable wallbox
Offset Mounting Hole
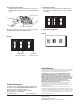
2. Assemble the controls.
Use the center or offset mounting holes as needed. Allow a
1/32" (0.8 mm) space between controls for ease in attaching
the wallplate.
Example: Four-Gang Controls
3. Snap on Multigang Wallplate
Example: Four-Gang Wallplate
3
Multigang Installation
Side Sections Removed, Derating Required
1. Determine the number of large and small controls
required.
When ganging any combination of small and large controls,
place all small controls on one end of the gang and all large
controls on the other. Use the chart below to determine the
size and maximum capacity of each control.
Multigang Installations:
No Side Sections Removed,
No Derating Required
1. Determine the number of large and small controls
required.
When ganging any combination of small and large controls,
place a small control on one extreme end of the gang, and a
large control at the other end of the gang. Use the chart
below to find your wallbox requirements.
Note: N-603P and N-1003P are listed as “small” controls. N-1503P and
N-2003P are listed as “large” controls.
Wallbox Requirement Chart
Ganging and Special Wallplates:
Dimmers can be ganged with other Nova controls. FOR NEW
CONSTRUCTION we suggest installing the dimmers without
breaking or removing the side sections. This will insure that the
control can be loaded to its full-rated capacity (no derating).
Follow the instructions below to install your controls with NO SIDE
SECTIONS REMOVED. For a retrofit installation, side sections
can be removed from controls to fit existing wallboxes; however,
this will require lamp derating.
Note: Masonry Multigang Wallboxes are recommended for neater
installations.
Note: When ganging an even number of small controls with no side
sections removed do not use plaster rings or gangbox covers. Space an
additional wallbox 3/4" (19 mm) apart from the other wallbox(es). A 3/4"
(19 mm) chase nipple is recommended as a spacer between the
wallboxes.
Number of Small Controls
No Side
Sections
Removed
Number of
Large
Controls
0123456
00123456
11345678
235678910
35789101112
47 9 1011121314
Wallbox Requirement Chart
Number of Small Controls
All Inside
Sections
Removed
Number of
Large
Controls
N-603P S 600W 600W 500W
N-1003P S 1000W 900W 700W
N-1503P L 1500W 1250W 1000W
N-2003P L 2000W 1800W 1500W
Model
Control
Size
No Sides
Removed
1 Side
Removed
2 Sides
Removed
Capacity Derating Chart
2. Derating is necessary when side sections are removed.
Center Mounting Hole