
Installation Guide


Operation:
1.
Turn ON power. Push preset button in center of the slider to
turn lights on to the level set by the slider.
2. Raise slider for brighter light, lower for dimmed light. Push
button again to turn lights OFF.
3. For 3-Way applications: When switching power from a
standard 3-way switch, light will come on at the level set by
slider on the dimmer.
Note: When it is necessary to replace lamps or service the controlled
fixtures, turn OFF circuit breaker or remove fuse.
Mounting Diagram:
Center Mounting Hole
6. Push wires back into the wallbox. Allow room for dimmer to be
installed.
7. Mount dimmer to wallbox using 2 screws provided and the
center mounting screw holes. Unit MUST be mounted
vertically.
8. Snap wallplate onto fins.
2
To Replace existing 3-Way Switch:
For wiring a N-603P, N-1003P, N-1503P or N-2003P in a 3-Way
application, the wall switch has three screws; two of one color and
a third of a different color. It also has a green ground screw.
Using the wire connectors provided:
• Connect the wire from the green ground screw to the green
ground wire of the dimmer.
• Connect the wire from the odd color screw to the black wire of
the dimmer.
• Connect the wire from one of the remaining switch screws to
one of the red wires of the dimmer.
• Connect the wire from the last switch screw to the last red wire
of the dimmer.
Note: Only one dimmer per 3-way circuit. Position of N-603P, N-1003P, N-
1503P, N-2003P and 3-Way switch may be reversed in wiring diagram. 4-
way switches must be wired between N-603P, N-1003P, N-1503P, N-
2003P and 3-way switch.
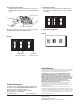
Live
Black
Red
Red
Neutral
N-3PS or Standard
3-way Switch
Ground
Ground
Light
Figure 2. 3-Way Wiring
N-4PS or Standard
4-way Switch
Red
Red
Black
Live
Neutral
Ground
Light
N-3PS or Standard
3-way Switch
Ground
Ground
Figure 3. 4-Way Wiring
Slider
Preset Button
Wallplate
120 V
60 Hz
120 V
60 Hz