
User's Manual


SPECIFICATION SUBMITTAL Page
Job Name:
Job Number:
Model Numbers:
Radio Powr SavrTM Wireless Occupancy and Vacancy Sensors
369432 Rev A 4 04.08.11
Installation Overview
Sensor Placement
•Thesensor’sabilitytodetectmotionrequireslineofsightofroomoccupants.Thesensormusthaveanunob-
structed view of the room. DO NOT mount behind or near tall cabinets, shelves, hanging fixtures, ceiling fans,
etc.Thesensorcannotseethroughglassobjectssuchaspatioorshowerdoors.
•Hotobjectsandmovingaircurrentscanaffectthesensor’sperformance.Toensureproperoperation,thesen-
sorshouldbemountedatleast4ft(1.2m)awayfromlightbulbsbelowtheceilinglineandHVACvents.
•Thesensor’sperformancedependsonatemperaturedifferentialbetweentheambientroomtemperatureand
thatofroomoccupants.Warmerroomsmayreducethesensor’sabilitytodetectoccupants.
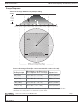
•Thesensorshouldbemountedwithin60ft(18m)lineofsightor30ft(9.1m)throughwalls,oftheassociated
dimming and switching receiving devices.
Mounting
•MountingofanyRFdevicesonorincloseproximitytoametalsurface(e.g.directlyonxturewithmetalhousing,
metal-backedceilingtile)willdrasticallyreducetheeffectiverangeofradiosignaltransmissionorreception.
•AllRFdevicesmustbemountedonnon-conductivematerialstoensureproperperformance.
Temporary mounting is recommended to test sensor coverage and wireless communication before permanently
installing the sensor.
Drop Ceiling (Compressed Fiber Ceiling Tile)
•Theceilingtilemountingwireisprovidedforbothtemporaryandpermanentmountingofthesensortoceiling
tiles. It is designed to allow temporary mounting, testing, and repositioning (if necessary) of the sensor without
damaging a ceiling tile. Once the sensor’s final position has been chosen, the mounting wire should be twisted
tolockthesensorinplacepermanently.
Solid Ceiling (Drywall, Plaster, Concrete, or Wood)
•Temporarymounting:Onedouble-sidedadhesivestripisprovidedfortemporarilymountingandtesting
the sensor.
•Permanentmounting:Screwsandanchors(fordrywallorplaster)providedtomountsensor.
Recess Mount
•Ceilingmountclampsinternallytoceilingtile.Sensortwist-locksintomount,sitsushwithceiling(asshownbelow)
•Openingis3"indiameter
•Purchasedasaseparatekit:LRF-CRMK-WH
Installing the Ceiling Mount Adapter
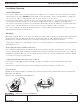
Cut mounting hole
Cut a 3 in to 3 in (76 mm to 76 mm) diameter hole to insert the ceiling
mount adapter.
Instalación del adaptador de montaje en cielo raso
Corte un orifi cio de montaje
Corte un orifi cio de 76 mm a 76 mm (3 pulg. a 3 pulg.) de diámetro para
insertar el adaptador de montaje en cielo raso.
Insert ceiling mount adapter
Insert the ceiling mount adapter into the hole and rotate brackets outwards by
turning screws.
Inserte el adaptador de montaje en cielo raso
Inserte el adaptador de montaje en cielo raso en el orifi cio y gire los soportes
hacia afuera apretando los tornillos.
1 1
2 2
3 in to 3 in
(76 mm to 76 mm)
76 mm to 76 mm
(3 in to 3 in)
Note: No need
to access top
of ceiling.
Nota: No se
requiere acceso
a la parte su-
perior del cielo
raso.
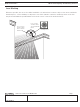
Clamp adapter to ceiling
Using a Philips screwdriver, hand-tighten the brackets, clamping the adapter to
the ceiling. Do not overtighten.
Fije el adaptador al cielo raso
Utilice un destornillador Phillips para ajustar a mano los soportes y fi jar el
adaptador al cielo raso. No ajuste demasiado.
3 3
®
Installation English
Instalación Español