
User's Manual

Lutron Electronics Co., Inc.
Made and printed in the U.S.A.
P/N 030-994 Rev. A 6 /08
Technical support: USA, Canada, Caribbean: 1.800.523.9466
Mexico: +1.888.235.2910
Central/South America: +1.610.282.6701
Warranty: 1-year limited warranty standard. 2-year parts and labor warranty, with
8-year pro-rated parts replacement on commissioned systems.
These products may be covered under one or more of the following U.S. patents: 5,248,919;
5,637,930; 5,838,226; 5,848,054; 5,905,442; 6,687,487; 6,803,728; and corresponding foreign
patents. U.S. and foreign patents pending. Lutron and the sunburst logo are registered
trademarks and FASS and Stanza are trademarks of Lutron Electronics Co., Inc.
© 2008 Lutron Electronics Co., Inc.
R
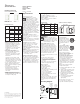
Dimming Slider
Slide up to brighten; slide down to dim
Load must be on for slider to affect intensity
Dimmer Operation (SZ-6D, SZ-6ND)
Switch Operation (SZ-6ANS)
Indicator light in slider track
Glows softly for easy locating of control
Track ends flash amber to indicate programming/
addressing mode
Tapswitch
Turns load on to slider level and off
FASSTM
Front-accessible service switch (facilitates safe bulb
replacement)
Pull down to remove all electrical power from load
and deactivate dimmer
Push up to restore power to load and dimmer
Indicator light in slider track
Glows softly for easy locating of control
Tapswitch
Turns load on and off
FASSTM
Front-accessible service switch (facilitates safe bulb
replacement)
Pull down to remove all electrical power from load
and deactivate switch
Push up to restore power to load and switch
Lamp Replacement
Caution! For any procedure other than routine lamp replacement, power
must be disconnected at the main electrical panel. Working with power
ON may result in personal injury or death.
For routine lamp replacement, remove power from the fixture(s) by pulling down
the FASS switch on the Dimmer / Switch.
Troubleshooting Guide
Symptom Cause and Action
Load is off and there
is no indicator on the
dimmer/switch
Power not present
• Circuit breaker OFF or tripped. Perform short circuit check.
• FASS is in the OFF position. Move FASS to the ON position by
fully pushing it up.
Wiring error
• Check wiring to be sure it agrees with installation instructions
and wiring diagrams.
Lamps burned out or not installed
• Replace or install lamps.
Dioded lamps
• Replace with non-dioded lamps.
Damaged dimmer/switch
• Device may have been damaged by previous overload or
miswire. Replace device.
Dimmer / switch indica-
tor is on but load can-
not be turned on and/or
cannot be turned off
Wiring error
• Check wiring to be sure it agrees with installation instructions
and wiring diagrams.
Damaged dimmer/switch
• Device may have been damaged by previous overload or
miswire. Replace device.
Light turns ON and OFF
continuously
Load is less than minimum load requirement
• Make sure the connected load meets the minimum load
requirement for that control. See Load Specifications table.
Improper load type
• Check that the load being dimmed is not non-dimmable. See
Load Specifications table.
Lights don’t switch ON/
OFF from keypad
Improper programming
• Check programming in the Stanza software.
Out of RF range
• Ensure device is within 20 feet (6 m) of another device
configured as a repeater.
Wiring
• Wiring error. Check wiring to be sure it agrees with installa-
tion instructions and wiring diagrams.
Faceplate is warm Solid-state control dissipation
• Solid-state dimmers and switches internally dissipate about
2% of the total connected load. It is normal for dimmers and
switches to feel warm to the touch during operation.
Control is buzzing or
humming
It is normal for dimmers and switches to emit a slight buzzing or
humming sound.
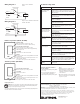
Single Location Installation
SZ-6D
Wiring Diagram 1
Dimmer/Switch
Brass
Black
Lighting
load
Hot/Live
Neutral
Green
Ground
120 V
50 / 60 Hz
Single Location Installation with Neutral
SZ-6ND, SZ-6ANS
Wiring Diagram 2
Dimmer/Switch
Brass
Black
Load
Hot/Live
Neutral
Green
Ground
120 V
50 / 60 Hz
Silver
Returning the Dimmer/Switch to
Factory Settings
1. Triple-tap the tapswitch quickly (within
1 second).
2. Press and hold the tapswitch for 5
seconds (until the load ashes) .
3. Triple-tap the tapswitch quickly again.
Notes
• Returning to factory settings will clear
all programming from the dimmer/
switch, and will prevent it from being
controlled over RF from a keypad or
control interface.
• After being returned to factory defaults,
the device will need to be re-addressed
as part of a system.