® W ireless Home Lighting Control RAMC-MFE, RBMC-MFE Setup and Installation Guide For a RadioRA® Multi-Function Entry Master Control A Comprehensive Step-by-Step Guide for Installing, Programming, and Operating the Lutron RadioRA® Multi-Function Entry Master Control Note: Please leave this manual with homeowner.
Notes on this Manual The procedures to setup a RadioRA® Multi-Function Entry Master Control are contained in this manual. For more information on programming the remainder of your RadioRA® System, or for advanced features, refer to the original RadioRA® Setup Guide (P/N 044-001). Important Application Note The Multi-Function Entry Master Control is a type of Master Control. The RadioRA® System can have a maximum of 12 Master Controls. Important Installation Notes 1. 2. 3. 4. 5.
Table of Contents Section 1 - Overview Overview Multi-Function Entry Master Control ............................................................................................. 4 Application Examples Activating a “Home” Lighting Scene ............................................................................................ 6 Controlling a Garage Door ............................................................................................................. 6 Interfacing to a Timeclock ...............
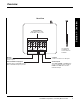
Overview Multi-Function Entry Master Control Section 1 - Overview Front View CCI Buttons Provide a means for programming the general inputs. Also toggles the ROOM or SCENE when pressed. CCI 1 CCO Buttons Provide a contact closure output for as long as the button is pressed. CCI 2 CCO 1 SECURITY FULL CCO 2 FLASH LEARN Button Used to enter LEARN mode. LEARN mode is used when the MultiFunction Entry Master Control is learning Visor Control Transmitter buttons.
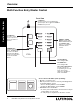
Overview Section 1 - Overview Rear View Terminal Block Each terminal accepts 14-22 AWG, Class 2 wire. CCO 2 OUTPUTS INPUTS COM 2 CCI 2 CCO 1 1 CCI 1 2 FLASH FULL 1 Use included screwdriver to secure wires into terminals. Outputs Provide a momentary contact closure output. Common Common connection for all inputs. FULL FLASH Security Input Activates FULL and FLASH scenes while a maintained input is present.
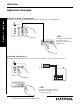
Overview Application Examples Activating a “Home” Lighting Scene Section 1 - Overview Pressing the “Home” button on the Entry Master Control activates the “Home” lighting scene. SUNSET HOME SUNRISE NIGHT CCO 1 1 GARAGE SECURITY AWAY FULL WELCOME FLASH MORNING CCO 2 2 GARAGE LEARN ALL ON ALL OFF – OR – HOME AWAY Pressing the “Home” button on the Visor Control activates the same “Home” lighting scene.
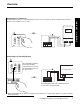
Overview Interfacing to a Timeclock Section 1 - Overview The lighting scene “Sunset” on the Entry Master Control can be activated by either pressing the button labeled “Sunset” or by an input closure on CCI 1.
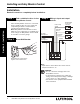
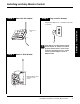
Installing an Entry Master Control Installation Read all instructions completely before installation. Section 2 - Installation Step 1 Find a suitable location for the Entry Master Control Place the Entry Master Control in a convenient and accessible location. Access to input and output wiring should be considered when selecting the mounting location. Note: Entry Master Control must be located within 30 feet of a Repeater.
Installing an Entry Master Control Step 4 Attach the AC Adapter Step 6 Plug in the AC Adapter Plug the AC Adapter into a 120VAC, 60Hz wall receptacle. ? Step 5 Section 2 - Installation Plug in power cord. If the LEDs do not flash when powered, ensure that the AC adapter is installed properly and that there is power at the receptacle. If problem persists, call the Lutron Technical Support Center at (800) 523-9466. Attach to Wall Bracket UP Align Entry Master Control and snap onto wall bracket.
Activating an Entry Master Control Activating Control The Entry Master Control is a type of Master Control. The RadioRA® System can have a maximum of 12 Master Controls. Section 3 - Start-Up Step 1 Begin Control activation REPEATER ACTIVATE VERIFY MAIN REPEATER BEEP AUXILIARY CONTROLS FLASH Step 2 Press and hold button for 3 seconds. Activate Entry Master Control Press button.
Button Programming Assigning a Column of Buttons as ROOMS or SCENES Step 1 Begin ROOM/SCENE assignment Press and hold buttons for 3 seconds. CCI 1 CCI 2 CCO 1 SECURITY FULL CCO 2 FLASH Step 2 Section 3 - Start-Up LEARN Change ROOM/SCENE Assignment SCENES ROOMS CCI 1 CCI 2 CCO 1 SECURITY Press corresponding button to assign column as ROOM or SCENES. Only these buttons are configurable. FULL CCO 2 FLASH LEARN Step 3 Complete ROOM/SCENE assignment CCI 1 Press and hold buttons for 3 seconds.
Button Programming Assigning Dimmers, Switches, or GRAFIK Eye® Control Units to Buttons Step 1 Begin assigning Step 4 Select next button Press and hold buttons for 3 seconds. Press button. CCI 1 CCI 1 CCI 2 CCI 2 CCO 1 CCO 1 SECURITY SECURITY FULL FULL CCO 2 CCO 2 FLASH FLASH Section 3 - Start-Up LEARN Step 2 LEARN Select a button Step 5 Complete assigning Press and hold buttons for 3 seconds. Press button.
Button Programming Setting Light Levels/GRAFIK Eye® Scene Selection for Buttons Begin setting light levels Step 5 Select the next button Press and hold buttons for 3 seconds. Press button. CCI 1 CCI 1 CCI 2 CCI 2 CCO 1 CCO 1 SECURITY SECURITY FULL FULL CCO 2 CCO 2 FLASH FLASH LEARN LEARN Step 2 Select a button Step 6 Complete setting light levels Press button. Press and hold buttons for 3 seconds.
Button Programming Configuring General Inputs as Maintained or Momentary Note: The Security Input is always a maintained CCI. Step 1 Begin CCI closure type assignment Simultaneously press and hold the FULL and ALL ON buttons (approximately 3 seconds). Step 2 Changing the CCI closure type assignments Both General CCIs can be independently selected as a Momentary or Maintained closure. Press and hold a CCI button to change it’s type. Shown: Setting CCI 2 as Maintained.
Button Programming Maintained Input Example Step 3 Complete CCI closure type assignment Simultaneously press and hold the FULL and ALL ON buttons (approximately 3 seconds). Switch Open Activate Switch Release Switch A Maintained switch closure will turn an input ROOM or SCENE ON. Input ROOM or SCENE remains ON until the switch closure is released. When released, the input ROOM or SCENE turns OFF.
Button Programming Entry Master Control Learning a Visor Control Step 1 Plan which Entry Master Control buttons you want to learn Visor Control buttons SUNSET HOME SUNRISE NIGHT HOME CCO 1 1 GARAGE SECURITY AWAY Step 3 Select an Entry Master Control Button Press and release Entry Master Control button that you want to learn a Visor Control button; its LED will turn ON.
Button Programming Select Visor Control Button to be learned by the Entry Master Control Press and hold the Visor Control Button until the orange LED next to the selected Entry Master Control button flashes (approximately 3 seconds). The LEARN LED will also flash while the Visor Control button is pressed. HOME AWAY Step 5 Repeat Steps 3 and 4 to learn additional Visor Control buttons Step 6 Exit LEARN Mode Press the LEARN button.
Advanced Programming Programming the ALL ON Button To program the ALL ON button, refer to the RadioRA® Setup Guide, Lutron P/N 044-001, section on “Programming the ALL ON Button.” Programming the ALL OFF Button To program the ALL OFF button, refer to the RadioRA® Setup Guide, Lutron P/N 044-001, section on “Programming the ALL OFF Button.
Advanced Programming Programming the FULL and FLASH Buttons The Security FULL and FLASH buttons are used for programming and diagnostic purposes only. Step 1 Begin FULL and FLASH button programming Simultaneously press and hold the 2nd and 4th buttons in the right most column until the upper right LED begins to flash (approximately 3 seconds). Step 3 Assign Dimmers, Switches or GRAFIK Eye® Control Units to the FULL button • Dimmers and Switches assigned will turn on to full while in SECURITY Mode.
Advanced Programming Step 4 Select FLASH button Step 5 Assign Dimmers, Switches or GRAFIK Eye® Control Units to the FLASH button Press the FLASH button. CCI 1 CCI 2 CCO 1 SECURITY • Dimmers and Switches assigned will flash ON and OFF while in SECURITY Mode. • GRAFIK Eye® Control Units assigned will alternate between scene 1 and OFF while in SECURITY Mode. FULL CCO 2 FLASH LEARN Assign a Dimmer or Switch to the FLASH button by turning the Dimmer or Switch ON.
Advanced Programming Step 6 Complete FULL and FLASH button programming CCI 1 CCI 2 CCO 1 SECURITY FULL CCO 2 FLASH LEARN Section 4 - Advanced Features Simultaneously press and hold the 2nd and 4th buttons in the right most column until all the LEDs begin to flutter (approximately 3 seconds).
Advanced Programming Deleting ALL Visor Control Transmitters from an Entry Master Control Deleting all Visor Controls from an Entry Master Control will permanently delete all Visor Control Transmitter Buttons previously learned. Step 1 Begin deleting ALL Visor Controls Press and hold the LEARN button until its LED turns ON (approximately 3 seconds). Step 2 Press and hold the CCI 1, FULL, and ALL ON buttons in the middle column until the CCI 1 and FULL LEDs begin to flash (approximately 3 seconds).
Advanced Programming While the CCI 1 and FULL LEDs are flashing, press and hold the CCI 2 and FLASH buttons in the middle column until all the LEDs flash. Step 3 Complete deleting ALL Visor Controls Press the LEARN button. CCI 1 CCI 2 CCO 1 CCI 1 SECURITY CCI 2 FULL CCO 1 CCO 2 SECURITY FLASH FULL LEARN CCO 2 FLASH Section 4 - Advanced Features LEARN CCI 1 CCI 2 CCO 1 SECURITY FULL CCO 2 FLASH LEARN All LEDs (except the LEARN) flutter.
Troubleshooting Guide Proper operation of the RadioRA® Wireless Central Home Lighting Control System is based upon a complex series of radio frequency (RF) communications between system components. As such, it is highly dependent upon proper system installation and programming of controls. If you experience difficulties programming or operating your RadioRA® system, please refer to this guide. Many symptoms of common system activation or programming errors are contained in this Troubleshooting Guide.
Returning to Default Factory Settings Entry Master Control Returning an Entry Master Control to Default Factory Settings will permanently delete all current programming information. Do not do this unless you are sure that it is necessary. For more information call the Lutron Technical Support Center at 1-800-523-9466. Step 1 Begin returning to Default Factory Settings Ensure that the ACTIVATE REPEATER LED and ACTIVATE CONTROLS LED on any Repeater is NOT ON before proceeding.
Section 5 - Troubleshooting Notes 26 RadioRA® Setup Guide for the Entry Master Control
Section 5 - Troubleshooting Notes RadioRA® Setup Guide for the Entry Master Control 27
Limited Warranty Lutron will, at its option, repair or replace any unit that is defective in materials or manufacture within one year after purchase. For warranty service, return unit to place of purchase or mail to Lutron Electronics Co., Inc. at 7200 Suter Rd., Coopersburg, PA 18036-1299, postage pre-paid. THIS WARRANTY IS IN LIEU OF ALL OTHER EXPRESS WARRANTIES, AND THE IMPLIED WARRANTY OF MERCHANTABILITY IS LIMITED TO ONE YEAR FROM PURCHASE.