
User Manual

Installing a Replacement Dimmer
2 3
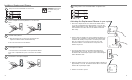
Install replacement dimmer
A. Note which wire(s) are connected to each terminal. The
replacement dimmer will be installed identically.
B. Disconnect the wires from the dimmer.
4
Uninstall existing dimmer
WARNING: Power must
be turned off for your
safety.
1
2
3
Turn power off at circuit breaker or remove fuse
Turn power on at circuit breaker or replace fuse
Connect the wires to the terminals on the replacement dimmer
in the same configuration they were connected to the old dim-
mer.
6
Mount dimmer and replace wallplate
5
1. Enter Device Replacement: Press and hold the Advanced but-
ton (on the Central Antenna) for approximately 3 seconds. The
Advanced LED will be on solid during the press until the hold is
detected. When the hold is detected, the Advanced LED will
flash slowly.
2. Dimmers that are already in the System will flash the lights con-
nected to each. The Master Control will have the following LED
feedback: LED flashing corresponds to a Dimmer present and
LED off corresponds to a Dimmer not present. Press and
Release the Master Control button that corresponds to the
Dimmer not present.
3. Press and hold the button on the Replacement Dimmer for
approximately three seconds. Upon successful replacement,
the Dimmer will start flashing its lights and the selected Keypad
button will flash its LED.
4. Exit Device Replacement: Press and hold the Advanced button for
approximately 3 seconds. The Advanced LED will turn off and the
Dimmer will stop flashing its lights.
5. Dimmer now works in System.
Remove wallplate and existing dimmer. Do not disconnect
wires.
Activating the Replacement Dimmer in your system