Model 2216 Talking Digital Ear Thermometer Instruction Manual 2216-INS-LAB-RevA09
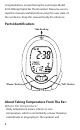
Congratulations on purchasing the Lumiscope Model 2216 Talking Digital Ear Thermometer! Please be sure to read this manual carefully before using this new state-ofthe-art device. Keep this manual handy for reference. Parts Identification: Take Reading “Memo.” Button “Talk” Button About Taking Temperature From The Ear: What is Ear Temperature? Body temperature means interior or core temperature, which is controlled by a lower thalamus subordinate to a hypophysis.
lower thalamus have a common blood vessel. Because of this shared vessel, ear temperature can accurately tell fluctuation of body temperature. How to Use The Ear Thermometer Properly: For children younger than one year, gently pull the ear in an inclined backward direction to straighten the auditory canal before inserting the temperature probe for measurement. What is a Normal Ear Temperature? Users’ body temperatures vary by age, time, and ambient temperature.
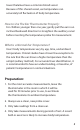
Taking Measurements: 1. Thoroughly clean ear, and apply a clean, new probe cover to thermometer. 2. Insert the temperature probe along the ear canal as deep as is comfortable into the ear, press the “ “ button once to start the measurement and you will hear a single beep. In about a second, the temperature reading Figure 1 will be complete and you will hear a short melody. The 2216 will then speak the temperature reading aloud, and display it on the large digital display. (Fig.
reading will be overwritten, as will each existing memory with the new reading, as they are taken. 4. For the most accurate temperature readings, wait 10 minutes between consecutive uses. 5. If a measurement falls within measuring range (89.6°F ~ 109.3°F or 32.0°C ~ 42.9°C), the temperature will be displayed. If a measurement is above measuring range, “Hi” will be displayed. If below measuring range, “Lo” will be displayed. 6.
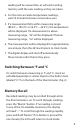
Clock Mode 1. The 2216 will enter clock mode when the thermometer is on and no key is pressed for more than one minute. 2. The time will be displayed in Year, Month, Date, Day, Hour and Minute, with a flashing “:” for seconds. 3. Press “Talk” to speak current time aloud. 4. Press and hold “Memo” for 2 seconds to enter setup mode and change the Date and Time.
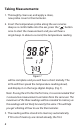
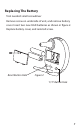
Replacing The Battery Tool needed: small screwdriver Remove screw on underside of unit, and remove battery cover. Insert two new ‘AAA’ batteries as shown in figure 2. Replace battery cover, and reinstall screw.
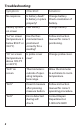
Troubleshooting: 8 Symptom: Checklist: Solution: No response Is battery dead? Is battery in place properly? Change battery. Check orientation of battery. Battery symbol on screen Low battery Change battery. “Lo” on screen (temperature is below 89.6°F or 32.0°C) Has the thermometer been positioned correctly for a reading? Follow instruction manual for correct positioning. “Hi” on screen (temperature is above 109.3°F or 42.9°C) Is probe cover new? Change probe cover.
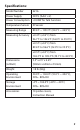
Specifications: Model Number 2216 Power Supply DC3V (‘AAA’ x 2) Power Consumption <0.05W for Talk Function Temperature Sensor IR Sensor Measuring Range 89.6°F ~ 109.3°F (32.0°C ~ 42.9°C) Measuring Accuracy ±0.4°F (±0.2°C) from 96.7°F to 102.2°F (36.0°C to 39.0°C) ±0.5°F (±0.3°C) from 89.6°F to 96.6°F (32.0°C to 35.9°C) ±0.5°F (±0.3°C) from 102.3°F to 109.3°F (39.1°C to 42.9°C) Dimensions (LxWxH) 3.5” x 2.5” x 2.25” (90mm x 65mm x 55mm) Weight .18 lb (82g) Operating Environment 50.0°F ~ 104.
Notes: 10
Warranty GF Health Products, Inc. guarantees this product free from defects in material and workmanship for a period of two years from the date of purchase, except as noted below: This product warranty does not cover damage caused by misuse or abuse, the attachment of any unauthorized accessory, alteration to the product, or any other conditions whatsoever that are beyond the control of GF Health Products, Inc. GF Health Products, Inc.