
Manual

• Data Interpretation
• Batch Settings
• Plate Layout
• Batch Audit
• Patient Report
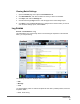
If you choose Data Interpretation, a Select Analysis section appears on the right and
displays a list of the analytes in the batch. Select the analytes you want to include in the
report. Select All to select all the analytes in the list. Select Clear to clear all the analytes
in the list.
A series of new buttons appears when you click Generate Report.
• Analyte arrows - This feature is directly below the Report list. Use the left and right
arrows to display information for individual analytes of those selected for the report.
• Page arrows - Use the arrows to scroll through the pages being displayed.
• Save All - Click to open the Browse For Folder dialog box. Select a location to save the
file, and click OK. This file includes all selected analytes.
• Print All - Click to print the analyte information for all the analytes in the report.
• Save - Click to open the Save As dialog box. Select a location and click Save. This saves
only the analyte information currently displayed.
• Print - Click to print the analyte information currently being viewed.
• New Report - Click to return to the main Reports window.
NOTE: If running a data interpreation of an allele call batch, be aware that
when choosing analytes from the Select Analytes list, selecting one
analyte will select all analytes in that group.
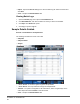
• Protocol Reports - A list of protocols displays. Choose from the following reports:
• Protocol Settings
• Plate Layout
• Protocol Audit
Select a protocol and then click Generate to generate the report.
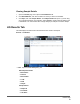
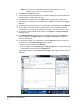
• Calibration and Verification Reports - Displays a list of calibrations and verifications.
Choose from the following selections:
• All
• F3DCAL1
• F3DeCAL1
• F3DCAL2
• F3DCAL3
• F3DVER1
• F3DeVER1
• F3DVER2
Select a calibration componenet, a date from the Date list, and click Generate to generate
the report.
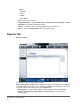
Results Page
71