
Hardware User (IVD) Instruction Manual

Luminex IVD MAGPIX Hardware Installation and User Manual
56
To replace the sample probe tube:
1. T
urn off MAGPIX and unplug the power cord.
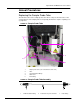
2. Op
en the side access door on MAGPIX and locate the probe assembly.
3. Unscrew the pr
obe fitting completely. The sample probe tube is connected to it.
4. Unscrew the 1/4
-28 flat-bottom fitting at the valve end of the sample probe tube. The
sample probe tube is connected to it. Use pliers to disconnect the 1/4-28 flat-bottom
fitting if necessary.
5. Pull the
loose tube through the strain relief to remove it.
6. Th
read the new piece of tube through the strain relief.
7. Scr
ew the 1/4-28 flat-bottom fitting on the end of the new sample probe assembly into
the valve where you removed the fitting during step 4.
8. Scre
w the probe fitting on the end of the new sample probe assembly into the top of the
probe assembly where you removed the probe fitting during step 3.
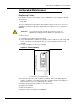
Replacing the Drive Fluid Filter
To replace the Drive Fluid filter on MAGPIX:
1. T
urn off MAGPIX and unplug the power cord.
2. Op
en the side access door on MAGPIX and locate the Drive Fluid filter at the left of the
syringe pump.
3. Ge
ntly pull the filter from the mounting bracket.
4. Unscrew the tub
ing from the top and bottom of the filter.
5. Re
attach the tubing to the ends of the new filter.
6. Pre
ss the new filter into the mounting bracket. Be sure the filter is oriented the way it is
in the following picture.
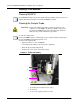
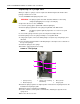
FIGURE 59.
1
2
3
4
Drive Fluid Filter
7. Close the side access door.
8. Plug
in the power cord and turn on MAGPIX.
9. Use
the software to run the prime command twice.
1 & 3 Tube attachments (Unscrew in step 3)
2Filter
4 Mounting bracket