
Hardware User (IVD) Instruction Manual

Luminex IVD MAGPIX Hardware Installation and User Manual
54
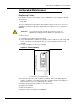
Replacing the Syringe Seal
When you replace a syringe seal, also replace the black O-ring that fits inside it. One
package contains four of each.
1. T
urn off MAGPIX and unplug the power cord.
WARNING: The plunger guide does NOT deactivate while the seal is being
changed; unplugging is necessary to avoid injury.
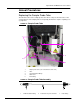
2. Open the side access door of MAGPIX.
3. Lo
cate the syringe (glass cylinder with a metal rod plunger).
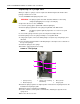
4. Push the
plunger guide down. The syringe may fill with clean Drive Fluid.
NOTE: T
he plunger guide is tight. Be prepared to use some force to push
it down.
5. Unscrew the syr
inge from the top of its housing and carefully remove it.
6. Pull
the plunger out of the syringe and dispose of any Drive Fluid.
7. Usi
ng a pair of pliers, remove the white plunger seal (at the top of the plunger) and
discard it.
8. Place the
black O-ring inside the new white plunger seal and press the seal down on
the top of the plunger.
9. Retur
n the plunger to the syringe.
10.Scr
ew the syringe back into its housing.
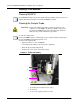
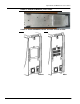
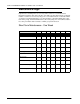
FIGURE 56.
1
2
3
4
5
The Syringe
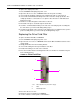
11.Return the plunger guide to its original position. The bottom of the plunger fits into the
indentation in the plunger guide.
12.Pl
ug in the power cord and turn on MAGPIX.
13.Use the
software to run the prime command twice, watching for any leaks in the
syringe area.
14.Clo
se the side access door.
1 Syringe housing 3 Syringe seal, containing
black O-ring
4 Glass cylinder
2 Metal rod plunger 5 Plunger guide