Luminex® IS Version 2.3 Upgrade Instructions to xPONENT® 3.
© LUMINEX CORPORATION, 2001-2011. All rights reserved. No part of this publication may be reproduced, transmitted, transcribed, or translated into any language or computer language, in any form or by any means without prior express, written consent of: LUMINEX CORPORATION 12212 Technology Boulevard Austin, Texas 78727-6115 U.S.A. Voice: (512) 219-8020 Fax: (512) 219-5195 Luminex® IS Version 2.3 Upgrade Instructions to xPONENT® 3.1 Rev 2 PN 89-00002-00-214 Rev.
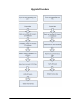
Contents Upgrade Procedure .............................................................................1 Important Upgrade Information..........................................................2 Recommendations...............................................................................2 Training...............................................................................................3 System Requirements .........................................................................3 Kit Components ......
ii
Upgrade Procedure 1
Luminex IS Version 2.3 Upgrade Instructions to xPONENT 3.1 Rev 2 - For In Vitro Diagnostic Use Important Upgrade Information Before performing the Luminex xPONENT 3.1 upgrade, verify that the following cables are in place on your system: • USB cable from P1 on the Luminex 100 or Luminex 200™ analyzer to a USB port on the PC. • CANBUS cable from P1 on the Luminex SD™ to P2 on the analyzer. • Serial cable from the Luminex XYP™ to the PC.
Luminex IS Version 2.3 Upgrade Instructions to xPONENT 3.1 Rev 2 - For In Vitro Diagnostic Use Training System Requirements To register or find out more about Luminex xPONENT 3.1 training, contact Luminex’s Services Sales Team at serviceandtraining@luminexcorp.com or 512-219-8020, ext. 4386. Visit www.xmapuniversity.com for more details.
Luminex IS Version 2.3 Upgrade Instructions to xPONENT 3.1 Rev 2 - For In Vitro Diagnostic Use • Luminex xPONENT 3.
Luminex IS Version 2.3 Upgrade Instructions to xPONENT 3.1 Rev 2 - For In Vitro Diagnostic Use 6. In the Save As dialog box that opens, select the folder where you want to export the lot as the Save-in location. 7. Enter a name for the exported lot into the File Name box. 8. Click Save. To export a batch file: 1. On the File menu, click Export Batch Data. The Open Batch dialog box opens. 2. Select the batch you want to export. 3. Click Select.
Luminex IS Version 2.3 Upgrade Instructions to xPONENT 3.1 Rev 2 - For In Vitro Diagnostic Use 5. Connect the serial end of the Luminex 100/200 serial-to-USB cable to P1 of the Luminex 100/200 and the USB end to an available USB port on the computer. 6. Connect the monitor cable to the computer. Touchscreen monitors will have two cables. 7. Connect power cables for the monitor, computer, Luminex analyzer, and Luminex XYP. 8.
Luminex IS Version 2.3 Upgrade Instructions to xPONENT 3.1 Rev 2 - For In Vitro Diagnostic Use 10. Select Luminex 100 IS. Click Change/Remove. In the Luminex 100 IS setup window, click Remove, then click Next and follow the prompts to remove it. If prompted, do NOT restart your computer. 11. Select LXMaint, click Remove and follow the prompts to remove it. If prompted, do NOT restart your computer. 12. Select LXR, click Remove and follow the prompts to remove it. If prompted, do NOT restart your computer.
Luminex IS Version 2.3 Upgrade Instructions to xPONENT 3.1 Rev 2 - For In Vitro Diagnostic Use Note: Please see “Licensing” in the “Using” chapter of Luminex xPONENT 3.1 Rev 2 Software Manual if you need information on how to change licensing information. Release Notes – Click to view contact information, installation notes, and features and enhancement information. If Release Notes is selected prior to the xPONENT 3.
Luminex IS Version 2.3 Upgrade Instructions to xPONENT 3.1 Rev 2 - For In Vitro Diagnostic Use 9. A dialog box opens with two installation options, Complete and Custom. Select Complete and click Next to continue. 10. Click Install at the next dialog box to continue installation, which may take several minutes. 11. Click Finish at the final InstallShield Wizard to complete the installation. 12. Restart the PC. Ensure the user is logged in as admin or as a user with installation privileges. 13.
Luminex IS Version 2.3 Upgrade Instructions to xPONENT 3.1 Rev 2 - For In Vitro Diagnostic Use 11. Select an installation folder for the software. Click Next to continue. 12. The Confirm Installation dialog box opens. Click Next to continue. 13. An Installation Complete dialog box opens. Click Close to complete the installation. Import and Convert Files Import and convert earlier versions of data with xCONVERT. You can convert the following kinds of IS 2.3 files: • IS 2.
Luminex IS Version 2.3 Upgrade Instructions to xPONENT 3.1 Rev 2 - For In Vitro Diagnostic Use Verify Firmware Version Verify that the correct firmware version for the Luminex analyzer and the Luminex XYP display in the xPONENT software. Click Maintenance > System Info. The Detector Firmware Version (Luminex 100 or Luminex 200) and the XY Firmware Version fields should display the latest firmware version numbers. • If you have a Luminex 100, the firmware version should be 2.3.9.
Luminex IS Version 2.3 Upgrade Instructions to xPONENT 3.1 Rev 2 - For In Vitro Diagnostic Use Luminex Contact Information Contact Luminex Technical Support by telephone in the U.S. and Canada at 1-877-785-BEAD (2323), by telephone outside the US and Canada at +1 512-381-4397, or by email at support@luminexcorp.com. Additional information is available on the Luminex website. Search on the desired topic, navigate through menus, or review the website FAQ section. Enter http://www.luminexcorp.