
Product Manual


GF6570B-1-INS-LAB-RevD10
3
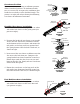
2. Position the foot end crossbrace so it
extends across the bed. Ensure the stabi-
lizers remain at the bottom of the cross-
brace and rotate the rail guides so the
long ends face upward and the spring
buttons face the bed's foot end, as shown
at right.
3. Insert one of the crossbrace stabilizers
into the slot across the bed from you.
Compress the spring-loaded crossbrace
until the second stabilizer aligns with the
slot closest to you and lower it into the
slot. Slowly release crossbrace until it
locks into place.
4. Rotate the crossbrace so the long ends
of the rail guides face downward and the
spring buttons face the bed's head end, as
shown at right.
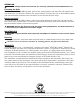
Rail Installation
1. Align the two legs of each rail over the crossbrace rail guides. Ensure the outer telescoping rail
tubes are facing the bed's head end and the rail rivet stops are facing outward, as shown below.
2. Gently pull out the spring buttons and lower the rail until both buttons click into position in the
rst holes on both rail legs, locking down the rail.
WARNING: Ensure the
outer telescoping rail
tubes face the head end of
the bed as shown at right;
if positioned otherwise,
a pinch point could occur
when bed is raised or low-
ered.
spring button
long end
anti-slide tab
rail guide
stabilizer
detail: install
foot end
crossbrace
head end
foot end slot
spring button
rail guide
foot end
crossbrace
detail: foot end
crossbrace
installed
head end
foot end
head end
right
side
left
side
head end
crossbrace
foot end crossbrace
right rail outer
telescoping tube
left rail outer telescoping tube
rail rivet stops
face outward
head end
rail guide
foot end
rail guide
spring buttons
face each other
full-length bed rails installed