PS600 Digital Visualizer User Manual-English English - 0
TABLE OF CONTENTS COPYRIGHT INFORMATION ................................................................................3 CHAPTER 1 PRECAUTIONS ................................................................................4 SAFETY PRECAUTIONS ....................................................................................5 FCC WARNING ................................................................................................5 EN55022 (CE RADIATION) WARNING ........................................
5.5 STORAGE AFTER USE ....................................................................................23 CHAPTER 6 Q & A ................................................................................................
Copyright Information Copyright © Lumens Digital Optics Inc. All rights reserved. Lumens Digital Optics Inc. is in process the trademark registration of Lumens. No part of this document may be copied, reproduced, or transmitted by any means, without prior written permission from Lumens Digital Optics Inc. Except documentation kept by the purchaser for backup purposes. In the interest of continuing product improvement, Lumens Digital Optics Inc.
Chapter 1 Precautions Always follow these safety instructions when setting up and using the Digital Presenter: 1. Do not place the Digital Presenter on an unstable trolley, stand or table. 2. Do not use the Digital Presenter near water or source of heat. 3. Use attachments only as recommended. 4. Use the type of power source indicated on the Digital Presenter. If you are not sure of the type of power available, consult your dealer or local electricity company for advice. 5.
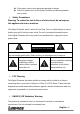
If the power cable or plug becomes damaged or frayed. If liquid is spilled into it or the Digital Presenter has been exposed to rain or water. ¾ Safety Precautions Warning: To reduce the risk of fire or electric shock, do not expose this appliance to rain or moisture. This Digital Presenter has a 3 wires AC line Plug. This is a safety feature to ensure that the plug will fit into the power outlet. Do not try to defeat this safety feature.
This is a Class A product. In a domestic environment it may cause radio interference, in which case the user may be required to take adequate measures. The typical use is in a conference room, meeting room or auditorium.
Chapter 2 Package Content Please make sure the package comes with the following items when you unpack: PS600 Quick start guide User Manual CD Power Cable USB Cable C-Video Cable VGA Cable Remote Control English - 7
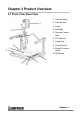
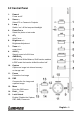
Chapter 3 Product Overview 3.1 Front View/ Rear View 1. Camera Head 2. Camera Arm 3. Lamp 4. Backlight 5. Remote Control Slot 6. CF card slot 7. Lamp lock 8. Control Panel 9. Button Function Guide 10.
3.2 Control Panel 1. Power: 2. Power on/off Source: 3. Select PC or Camera to Projector Lamp: 4. Switch / on / off the lamp and backlight Photo/Text: 5. Select the photo or text mode AF: 6. Brightness +/– 7. Zoom + /– 8. zoom in/out A4/A5: 9. Speedy zoom to A4/ A5 size AWB/Shift: Auto Focus Brightness Adjustment AWB is Auto White Balance; Shift function enables in PBP mode that can be shifted the other half 10. Capture Capture an image into internal memory or storage card 11.
3.3 I/O Connector 1. VGA IN Connect to VGA-out of other device for example PC 2. VGA OUT Connect to VGA-in of another visual device 3. DVI OUT Digital & Analog Receptacle Connector 4. LCD Monitor External small size LCD monitor 5. C-VIDEO C-Video for video output 6. Ethernet Ethernet connection For remote central control 7. USB ( support USB 1.1 ) Ethernet connection For remote central control 8. PS2 Connect with PS/2 mouse 9. RS232 Connect external device with RS232 10.
3.4 Remote Control 1. Power: 2. Power on/off Capture: 3. Capture image to internal memory Source: 4. Select PC or Camera to Output AF: 5. Auto Focus PBP: 6. Compare the live image and captured image Menu: 7. Display full control menu (OSD Menu) BRT+/-: 8. Brightness adjustment Photo/ Text : 9. Change between Photo or Text mode Play: 10. Recall the saved images in the Digital Visualizer A4/A5: 11. Speedy zoom to A4/ A5 size Del: Delete the saved images in the Digital Visualizer 12.
Chapter 4 Installation 4.1 Setup the Digital Visualizer 1. 2. Pull up the arm. Adjust the position and height (the height should be 48.5 cm for operation) of the arm by moving the 3-section joint Turning the camera head toward the platform ※ Note:The angle of the camera head is limited. Don’t turn it forcefully when it reaches the maximal angle 4.
4.3 Positioning and Turning on the Lamps You can use the lamps on the both sides of the Digital Presenter for auxiliary lighting by following some simple steps: 1. Press and slide the latches to release the lamp lock. 2. Pull up the lamp arms. 3. Rotate the folded lamp to face the platform as the arrow shows. (Refer to figure 4-1) 4. Press the lamp button of control panel and remote control to switch the side lamp or backlight. ※ Note: The angle of the lamp arm/lamp head is limited.
4.6 Using Ethernet The Digital Visualizer can be controlled via the internet. 1. Please connect the RJ-45 to Ethernet port (refer to the 3.3 I/O connection) 2. Select the setting of DHCP, IP, Net Mask and Gate Way. Please refer to the 5.4 Network setting steps. 3. Open the Internet Browser and key in the IP in the address field. The remote control will be shown as following then you can control the main unit remotely via internet.
Chapter 5 Using the Digital Visualizer This chapter shows you the basic and advanced functions of the Digital Presenter as and how to use the menu, the mouse, and the Presenter USB/RS232 interface 5.1 Getting Started 5.1.1 Select Input Source Switch the video input from PC or Camera ¾ Option1:press button on the control panel ¾ Option2:press on the remote control ※Note:Input source can be shown on the indicator of control panel 5.1.
option2:press on the remote control ※Note:The digital visualizer will execute the Auto Focus after zoom in/ out ¾ Manual Focus option1:press +/- on the control panel option2:press ※Note:The optical zoom will be automatically switched to the digital zoom at the last step of the optical zoom 5.1.
¾ Rotate the camera head ¾ While observing the image on the monitor, adjust the zoom or arm to obtain the optimal size ¾ To rotate the image by 180º Optoin1:press
Option 2:press on the remote control 5.1.9 To show the captured image (StorageÆPlay) Option 1:OSD/Storage /Play In the Index screen, the captured images were displayed in thumbnails. Whenever the box is on a thumbnail, you may see the full and large image by Enter click. Option 2:Press on the remote control and select image by keys then press the using key to see the large image 5.1.
5.2 Using the OSD Menu 5.2.1 Showing the Main Menu: Option 1:Press
5.3 OSD Menu Layer 1 Layer 2 Image Display Storage Layer 3 Normal/Gray/Film/ Slide/Microscope Content Normal:default Gray:Black & while picture Film:in the backlight mode Slide: in the backlight mode (Your presenter will automatically adjust the image size, brightness, color, lamps, and AF, based on your selection of Slide or Film modes.) Enable is default Flip Enable/Disable AE On (default)/Off Flip by 180° (Up→Down & Left→Right ) exposing effect of the image automatically Color Temp.
Layer 1 Layer 2 Layer 3 Point Color Red / Green / Blue Drawing Type Frame / Line Video Format Auto / NTSC / PAL Setting Language English / Deutsch / Francais / Italiano/ Eapanol / Русский / Content Select the cursor’s color Select your native language / Factory Reset Enter / Exit Reset all default setting Preset Save/load Save/load setting parameters DHCP Enable / Disable Set DHCP (Dynamic Host Configuration Protocol) Advance IP Set IP address Net Mask Set Net Mask value Gate Way
5.4 Network Setting Step1:Confirm the Ethernet has been connected Step2:Press
5.5 Storage after Use 1. Fold the arm and camera head until they touch the stage 2. Turn the camera head until it’s parallel with the stage 3. Turn the upper lamps toward the supporting arms 4. Insert the remote control into the slot on the right of the Digital Visualize 5.
Chapter 6 Q & A This chapter describes the problems you might have encountered when you use this Digital Presenter. If you have a problem, refer to the appropriate section and follow all the suggestions that apply to your problem. If none of the suggested solutions solves the problem, call your dealer or your service center. z Q1:The ( ) system indicator does not come on. Ans1: No power is coming on.