DC260 Visual Presenter User Manual [Important] To download the latest version of Quick Start Guide, multilingual user manual, software, or driver, etc., please visit Lumens http://www.lumens.com.tw/goto.
Contents Copyright Information....................................................................................... 3 Chapter 1 Precautions.................................................................................... 4 Safety Precautions ....................................................................................... 5 FCC Warning................................................................................................ 5 EN55022 (CE Radiation) Warning .......................
7.4 7.5 7.6 7.7 7.8 7.9 7.10 7.11 7.12 7.13 7.14 7.15 7.16 7.17 7.18 7.19 7.20 I would like to use the auto focus ...................................................... 29 I would like to adjust the brightness .................................................. 29 I would like to turn on/ off the lamp.................................................... 29 I would like to automatically adjust the image to have best brightness and focusing performance...........................................................
Copyright Information Copyrights © Lumens Digital Optics Inc. All rights reserved. Lumens is a trademark that is currently being registered by Lumens Digital Optics Inc. Copying, reproducing or transmitting this file is not allowed if a license is not provided by Lumens Digital Optics Inc. unless copying this file is for the purpose of backup after purchasing this product. In order to keep improving the product, Lumens Digital Optics Inc.
Chapter 1 Precautions Always follow these safety instructions when setting up and using the visual presenter: 1. Do not place visual presenter in tilted position. 2. 3. 4. 5. Do not place the visual presenter on an unstable trolley, stand or table. Do not use the visual presenter near water or source of heat. Use attachments only as recommended. Use the type of power source indicated on the visual presenter.
15. Unplug the visual presenter from the wall outlet and refer serving to licensed service personnel when the following situations happen: If the power cable or plug becomes damaged or frayed. If liquid is spilled into it or the visual presenter has been exposed to rain or water. Using an incorrect battery type in the remote control may result in breakdown. Follow your country’s instructions on how to dispose of used batteries.
OPERATE THE EQUIPMENT. Note: This equipment has been tested and found to comply with the limits for a Class A or B digital device, pursuant to Part 15 of FCC Rules. These limits are designed to provide reasonable protection against harmful interference in a residential installation. This equipment generates uses and can radiate radio frequency energy and, if not installed and used in accordance with the instruction, may cause harmful interference to radio communications.
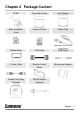
Chapter 2 Package Content DC260 Quick Start Guide User Manual Base Installation Guide Remote Control Power Cord Appearance may vary with country/region.
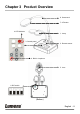
Chapter 3 Product Overview 8. Gooseneck 7. AF button 4. LED indicator 1. Lamp 3. Control panel 2. Remote sensor 9. Built-in icrophone 5. Lens 6.
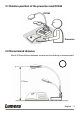
3.1 Relative position of the presenter and DC260 DC260 Document Presenter 3.2 Recommend distance About 470mm distance between camera and the desktop is recommended.
3.
Chapter 4 Installation and Connections 4.
4.2 Mounting the DC260 at desktop 1. Please set up the DIP Switch settings first. Refer to Chapter 5 “DIP Switch Settings” in the DC260 user manual. 2. Please refer to the Base Installation Guide for installation instructions for all parts. 4.3 Connecting devices 4.3.1 Step 1: Plugging in the power outlet AC Outlet Appearance of power cord may vary with countries/regions. 4.3.
2. Adjust DIP Switch Setting NTSC: America, Taiwan, Panama, Philippine, Canada, Chile, Japan, Korea and Mexico PAL: Country/region not listed above: You are unable to use the [Menu] / [Rotate] / [Half Page] / [Source] / [Record] / [Capture] / [Delete] / [PBP] / [Slide Show] functions in C-Video mode. VGA output is not supported once C-Video output enabled. 3. Restart the DC260 DIP Switch setting will not be available until restarting the DC260.
¾ Connecting to a LCD TV/ PDP z Using the HDMI cable to connect a LCD TV/ PDP ¾ Connecting to a computer z Use VGA cable to connect VGA IN connector on DC260 to the VGA OUT connector on the computer z Connecting to a computer through USB Connect to USB port. Then install the supplied Ladibug™ program. Please refer to DC260 User Manual 4.6 Installing application software.
¾ Connecting to speaker Speaker : Or connect to an additional amplifier before connecting to the speaker ¾ Connecting to microphone Microphone English - 15
4.4 Start using the DC260 Control Panel Remote Control z When using the remote control, aim at the receptor on the DC260, and press the power button. z Once DC260 is turned on, the LED on the control panel will flash a few times and stay lit. Please contact your distributor if the LED is not on. Once the password page is shown , please key in the password. If you forget it, please contact your distributor or the service center. 4.
4.6 Installing application software After installing the USB driver and application software, you can use the following functions: ¾ Control the DC260. ¾ Capture and record images. ¾ Annotate the image, highlight important details and save it. ¾ Support the full screen function. : Please refer to Ladibug™ software user manual for installation steps and software operation.
Chapter 5 DIP Switch Settings You have to reset the unit for setting to take affect. 5.1 Connecting to a projector or monitor 5.1.1 XGA 60Hz output (default values): 5.1.2 SXGA 60 Hz output 5.1.3 HDTV 720P 50Hz output 5.1.
5.2 Connecting to a TV 5.2.1 NTSC: America, Taiwan, Panama, Philippines, Canada, Chile, Japan, Korea and Mexico 5.2.2 PAL: Countries/regions not listed above. VGA output is not supported once C-Video output has been enabled.
Chapter 6 Control Panel/Remote Control and Setting Menu 6.1 Functions of control panel and remote control You are unable to use the [Menu] / [Rotate] / [Half Page] / [Source] / [Record] / [Capture] / [Delete] / [PBP] / [Slide Show] functions in C-Video mode. The below functions are listed alphabetically. Name Function Turn on and off the visual presenter. Operation Remote control / Control panel ghij AF Move up, down, left or right to select the needed function.
Lamp Turn on / off the lamp. Remote control / Control panel M Scope Menu Enter the microscope mode. Press again to return to the previous mode. Activate the setting menu function/exit menu. Remote control Remote control / Control panel Mode PBP Photo/ Text Record Rotate Select general/slide/negative/microscope mode. PBP (Picture by picture): Compare live images with captured image files. Select photo, text or grayscale image mode.
6.2 Setting Menu Press [Menu] on the remote control or control panel to enter the setting menu; The bold underlined values in the following table are the defaults. 1st Level 3rd Level 2nd Level Descriptions Major Adjustment Minor Items Items values Brightness 0~Max Use the left and right arrow keys to adjust the brightness. Mode Normal/Slide/ Film/Microscope Use the left and right arrow keys to select the image mode. Use the left and right arrow keys to select the image mode.
Storage Slide Show Enter Press [Enter] to play the photos or videos stored in the SD card (priority) or internal memory. Refer to DC260 User Manual Chapter 7 Descriptions of major functions 7.14 I would like to play the slides 1. Off 2. Shutter Slide Show Effect 3. Right 4. Down Use the left and right arrow keys to select the image switch mode. 5. Side 6. Open 1. 1 Sec 2. 3 Sec Delay 3. 5 Sec 4. 10 Sec Use the left and right arrow keys to select the delay time.
1. High Image Quality 2. Medium 3. Low 1. Single Setting Capture 2. Continuous 3. Disable 1. 1 hr 2. 2 hr Capture Time 3. 4 hr 4. 8 hr 5. 24 hr Use the left and right arrow keys to select the image quality for the captured images and recorded videos. Use the left and right arrow keys to select the video capture mode. (Single/Continuous/Disable) Use the left and right arrow keys to set the capture time. It only works when the capture mode is set to [continuous]. 1. 5 sec 2.
AE On/Off Regardless of outside environment, the machine will adjust the brightness to the optimal condition. Use the left and right arrow keys to select. AWB Enter Regardless of outside light or color, the machine will adjust the color to the optimal condition. Press [Enter] to activate. Digital Zoom On/Off Use the left and right arrow keys to turn digital zoom on/off. Noise Reduction On/Off Use the left and right arrow keys to turn on/off the noise reduction function.
Advance Language 1. English English 2. 繁体中文 Traditional Chinese 3. Deutsch German 4. Français French 5. Italiano Italian 6. Español Spanish 7. Русский Russian 8. Nederlands Dutch 9. Suomi Finnish 10. Polski Polish Use the left and right arrow keys in the language option to select the preferred language. 1. XGA 2. SXGA 3. UXGA 4. 720P Output Mode 5.
Auto Erase On/Off Use the left and right arrow keys to turn the auto erase function on and off. When [On] is selected, the saved images will automatically be deleted when the system is turned off. Refer to DC260 User Manual Chapter 7 Descriptions of major functions 7.11 I would like to automatically delete the captured images whenever it is turned off Read the value of the current image mode. Preset Load Yes/No Use the left and right arrow keys to select, and then press [Enter] to confirm.
Chapter 7 Descriptions of major functions 7.1 I would like to switch image sources Live image is the default of image source. Press [Source] on the remote control or control panel to change: 1. Live images (default) 2. SD card (priority) or internal memory 3. Computer. 7.2 I would like to make text clearer and photos more colorful Photo is the default. You can change setting via the remote control or control panel. Remote control: 1.
7.4 I would like to use the auto focus 1. Press [AF] on the remote control. 2. Press the AF button on the camera head of main unit. 7.5 I would like to adjust the brightness Remote control: 1. Press [BRT +] to make it brighter. 2. Press [BRT -] to make it darker. Control panel: 1. Press [MENU] to enter the setting menu. 2. Press [f] or [e] to select [Display]. 3. Press [d] to select [Brightness]. 4. Press [f] or [e] to adjust the value. 7.6 I would like to turn on/ off the lamp 1.
7.8.2 Setting continuous capture 1. Press [Menu] on the remote control or control panel to enter the setting menu. 2. Press [f] or [e] to the [Setting] menu. 3. Press [d] to find [Capture]. 4. Press [f] or [e] to select [continuous]. 5. Press [d] to find [Capture Time]; Press [f] or [e] to select time settings. 6. Press [d] to find [Capture Interval]; Press [f] or [e] to select time settings. 7. Press [Menu] to exit. 7.8.3 Capturing and saving images 1.
7.11 I would like to automatically delete the captured images whenever it is turned off (Auto Erase) 1. Press [Menu] on the remote control or control panel to enter the setting menu. 2. Press [f] or [e] to access the [Advance] menu. 3. Press [c] or [d] to [Auto Erase]. 4. Press [f] to select [On]. 5. Press [f] or [e] to select [OK]. 6. Press [Menu] to exit. 7. It will automatically delete all captured photos when it is turned off. 7.12 I would like to record and play videos 7.12.
4. Press [f] or [e] to turn to the previous/next video. 5. Press [Source] to exit. [Note] Only the MOV files recorded can be played and live sound output is not available; additional amplifier can be connected to the PHONE port. 7.13 I would like to switch the view between the upper and lower half of the image (Half Page) 1. Press [Half Page] on the remote control or control panel and the upper half of the live image will be displayed. 2.
7.14.3 Activating/Stopping the slide show Images over 8 MB, cannot be played. Whilst playing, the [Rotate] function can be activated to rotate the images. Remote control: 1. Press [Slide Show] to start playing. 2. Press [Slide Show] again to stop playing. Control panel: 1. Press [Menu] to enter the setting menu. 2. Press [f] or [e] to access the [Storage] menu. 3. Press [d] to find [Slide Show] 4. Press [Enter] to play. 5. To stop playing, repeat steps 1 to 4. 7.
Control panel: 1. Press [Menu] to enter the setting menu. 2. Press [f] or [e] to access the [Display] menu. 3. Press [d]to find[PBP] 4. Press [Enter] to enter the PBP (Picture by Picture) photo selection screen. 5. Press [c] or [d] or [f] or [e] to select the files to be compared. 6. Press [Enter] to activate the image comparison. 7. Press [f] or [e] to move the images (captured images only) leftward/rightward. 8. Press [Menu] again to return to image thumbnails. 9. Press [Source] to exit. 7.
1. Press [Menu] on the remote control or control panel to enter the setting menu. 2. Press [f] or [e] to the [Setting]. 3. Press [d] to find [Noise Reduction]. 4. Press [f] or [e] to select [On]. 7.18 I would like to set / change the password (Lock Down) 7.18.1 Setting the password 1. Press [Menu] on the control panel to enter the setting menu. 2. Press [f] or [e] to the [Advance] menu. 3. Press [d] to [Lock Down]. 4. Press [f] or [e] to select [On]. 5. The screen will be displayed, as shown below.
7.18.2 Changing the password 1. 2. 3. 4. Press [Menu] on the control panel to enter the setting menu. Press [f] or [e] to the [Advance] menu. Press [d] to [Lock Down] Press [f] or [e] to select [Off] and deactivate the password setting function. 5. Press [f] or [e] to select [On] and reactivate the password setting function. Refer to Steps 5-8 in DC260 User Manual Chapter 7 Descriptions of major functions 7.18.1 Setting the password for operational steps. 7.19 Using a SD card 7.19.
The data previously saved on the SD card will be erased when it is formatting. 7.19.3 Ejecting a SD card Turn the power off before ejecting the SD card to avoid damaging the SD card. 7.20 Computer-related functions Ensure that the USB cable is connected and the drivers are installed before using the computer-related functions. Refer to DC260 User Manual Chapter 4 Installation and Connections 4.3 Connecting Devices and 4.6 Installing application software. 7.20.
7.20.2 I would like to insert a photo in MS-Word 1. Click Insert > Image > From Scanner or Camera in MS-Word. 2. Select [Visual Presenter V2] and click [Custom Insert]. 3. Click [Get Picture]. It will capture the photo of live image.
7.20.3 I would like to change the setting of DC260 then capture a photo in MS-Word 1. Click Insert > Image > From Scanner or Camera in MS-Word. 2. Select [Visual Presenter V2 TWAIN] and click [Custom Insert]. 3. A window showing a live image (see below) will be displayed.
4. Press [Setting] to control the DC260 via the Camera Settings interface. The operating procedure is the same with the remote control and control panel of the DC260. Refer to DC260 User Manual Chapter 6 Control Panel / Remote Control and Setting Menu. 5. Press [Setting] to capture images in MS-Word. 6. Press [Cancel] to exit. 7.20.4 I would like to set the DC260 as a webcam for Skype The DC260 can be used as a webcam for teleconferencing software such as Skype and MSN.
3. Start calling your contact. When both sides are connected, Skype will display the video screen. 7.20.5 I would like to set the DC260 as a PC Camera 1. Press [Menu] on the control panel to enter the setting menu. 2. Press [f] or [e] to the [Setting] menu. 3. Press [d] to find [USB Transfer]. 4. Press [f] or [e] to select [Camera]. 5. A window will be displayed, showing the [Visual Presenter V2], as shown below 6. Click the [Visual Presenter V2].
7.20.6 I would like to set the DC260 as a Removable Disc 1. Press [Menu] on the control panel to enter the setting menu. 2. Press [f] or [e] to the [Setting] menu. 3. Press [d] to find [USB Transfer]. 4. Press [f] or [e] to select [Storage device]. 5. Press [Menu] to exit. 6. A Removable Disc will be displayed. The Removable Disc will select SD card if a SD card has been inserted, but if a SD card has not been inserted, the Removable Disc is internal memory.
7.20.7 I would like to connect Interactive Whiteboard 1. System diagram USB Cable PC USB Cable Interactive Whiteboard Visual Presenter 2. Using StarBoard 2.1 Install LuLulizer and execute “LuLulizer.exe” Please download LuLulizer from the website (www.lumens.com.tw/goto.htm) 2.
2.3 Display the live image. 2.4 Press [StarBoard] / [Mode] / [TWAIN] Please refer to the operations of 7.20.2 I would like to insert a photo in MS-Word and 7.20.3 I would like to change the setting of DC260 then capture a photo in MS-Word 3. Using SmartBoard 3.1 Press [Insert] / [Picture From Scanner] 3.2 Please refer to the operations of 7.20.2 I would like to insert a photo in MS-Word and 7.20.
Chapter 8 Connecting to Microscope 1. Mount the microscope adaptor onto the microscope. 2. The lens of DC260 connects with the microscope adaptor. 3. Select the[Microscope]Mode 3.1. Press [M Scope]on the remote control (suggestion). 3.2. Control panel 3.2.1. Press [MENU] to enter the setting menu. 3.2.2. Press [f] or [e] to select [Display]. 3.2.3. Press [d] to select [Mode]. 3.2.4. Press [f] or [e] to select [Microscope]. 4. If the image is not clear. 4.1. Please adjust the focus of microscope. 4.2.
2. Press [f] or [e] to select [Display]. 3. Press [d] to select [Mode]. 4. Press [f] or [e] to select [Normal].
Chapter 9 Troubleshooting This chapter describes problems you may encounter while using DC260. If you have questions, please refer to related chapters and follow all the suggested solutions. If the problem still occurred, please contact our distributors or service center. No. 1 2 Issues Boot without power No image output from the DC260 3 Unable to focus 4 The image is incomplete 5 Forget the password for turning on Visual Presenter V2, Ladibug™ or other application cannot be executed simultaneously.