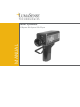
MANUAL IMPAC Pyrometer IS 8 pro IGA 8 pro IS 8-GS pro
Confidential Information The material contained herein consists of information that is the property of LumaSense Technologies and intended solely for use by the purchaser of the equipment described in this manual. All specifications are subject to change without notice. Changes are made periodically to the information in this publication, and these changes will be incorporated in new editions.
Contents 1 General Information ......................................................................................................... 5 1.1 1.2 1.3 1.4 1.5 1.6 1.7 2 Introduction ....................................................................................................................... 9 2.1 2.2 2.3 2.4 2.5 3 Information about the user manual ....................................................................... 5 1.1.1 Legend ............................................................
5.2 5.3 5.4 5.5 5.6 5.7 5.8 5.9 Maximum value display MAX ............................................................................... 20 Average value display AVG ................................................................................... 20 INT (time interval for measured value storage).................................................. 20 EMI Direct ................................................................................................................ 20 C / F (display in °C or °F) ..
1 General Information 1.1 Information about the user manual Congratulations on choosing the high quality and highly efficient Series 8 pro pyrometer. This manual provides important information about the instrument and can be used as a work of reference for installing, operating, and maintaining your Series 8 pro pyrometer. It is important that you carefully read the information contained in this manual and follow all safety procedures before you install or operate the instrument.
1.3 Limit of liability and warranty All general information and notes for handling, maintenance, and cleaning of this instrument are offered according to the best of our knowledge and experience. LumaSense Technologies is not liable for any damages that arise from the use of any examples or processes mentioned in this manual or in case the content of this document should be incomplete or incorrect.
Technical Support can be contacted by telephone or email: Santa Clara, California Telephone: +1 408 727 1600 or +1 800 631 0176 Email: support@lumasenseinc.com Frankfurt, Germany Telephone: +49 (0) 69 97373 0 Email: support@lumasenseinc.com Erstein, France Telephone +33 (0)3 88 98 98 01 Email support@lumasenseinc.com 1.6 Shipments to LumaSense for Repair All RMA shipments of LumaSense Technologies instruments are to be prepaid and insured by way of United Parcel Service (UPS) or preferred choice.
To ensure consistent document formatting, this page was intentionally left blank.
2 Introduction 2.1 Appropriate use The IS 8 pro and IGA 8 pro pyrometers are high-quality, battery powered portables for noncontact temperature measurement between 250 and 2500 °C, dependent on the type. The instruments have full digital signal processing, which results in long measurement ranges as well as very high accuracy. The instruments are mainly used in the steel, glass, forging industries as well as in foundries.
Parameters: Objective: Sighting (ocular): Instrument settings: Data storage: Storage interval: Displays: Serial interface: Ambient temperature: Storage temperature: Power supply: Battery operation time: Tripod socket: Housing: Weight: Protection class: Dimensions: CE-label: Emissivity, direct emissivity setting; storage interval, temperature indication in °C or °F, reading temperature values Achromatic, optics adjustable from a = 500 mm to , with close-up lens (optional) a = 250 mm to 500 mm Effective l
2.4 Physical user interface Choosing the measuring functions: Normal temp. measurement, maximum temp. measurement or average temp.
To ensure consistent document formatting, this page was intentionally left blank.
3 Controls and Installation 3.1 Battery insertion The pyrometer requires six (alkaline-manganese or rechargeable) batteries to operate. The batteries must be inserted into the battery holder with correct polarity connections. In addition, ensure that the battery case correctly touches the contacts in the handle. Battery case cover Handle with battery case Locking screws 3.2 Switching on The pyrometer can be switched on and off with the 2-stage push button on the handle. 3.2.
Single value storage (Setting INT = OFF, see Section 5.4): HOLD °C With single value storage, the current measured value is saved at the second trigger point. This value appears on the rear display and in the CELL view finder when the push button is held in the second trigger point. The assigned storage slot appears briefly in the LC display as "CELL#" together with the storage slot number. When memory is full, a beep sounds and the display shows "MEM 100%".
3.3.1 Turning right: +3 dpt Adjustment of the diopter adaptor Since most people have a light ametropia, the view finder is equipped with an adjustable diopter adaptor. The diopter adjuster has no visual zero position and has to be adjusted individually so that focusing the objective shows the correct distance values at the line mark.
Close-up lens / protection window If using the close-up lens, the emissivity setting of the instrument (EMI) has to be corrected with the following factor (emissivity see 5.1) due to reduced measuring signal: IS 8 pro or IGA 8 pro with close-up lens: IS 8 pro or IS 8-GS pro with protection window: = 0.92 x object protection window = 0.93 x close-up lens object IGA 8 pro with protection window: protection window = 0.94 x object 3.3.
4 Display functions / adjustment buttons PAR ENT The pyrometers are equipped with extensive adjustment options for optimal adaptation to the relevant measurement condition. They are controlled by the adjustment buttons on the left side of the instrument. 4.1 Displays and adjusting special displays / parameters Pressing the PARameter push button repeatedly brings up the following functions one after the other. They appear in the bottom left of the LC display in short form.
4.2 Switching between numeric and graphic display NUM GRAPH Two different temperature displays are available: numeric and graphic. Pressing the NUM/GRAPH button switches between the displays (switching between these displays is possible either in measurement mode or subsequently while viewing the measured values. The subsequent display also contains some additional information, see 5.
5 Parameter descriptions / Settings The pyrometer is equipped with a wide range of settings for optimal adaptation to the required measuring condition and to measure the temperature correctly. 5.1 Emissivity For a correct measurement, it is necessary to adjust the emissivity. The emissivity is the relationship between the emission of a real object and the emission of a blackbody radiation source (this is an object which absorbs all incoming rays and has an emissivity of 100%) at the same temperature.
5.2 Maximum value display MAX If the MAX function is activated (MAX = ON), the highest value reached °C during a measurement process appears. This will be the value that is saved (second trigger point on the push button). This storage function can be used, for example, with greatly fluctuating temperatures or to record MAX measuring objects that are only in the measuring spot briefly. Maximum value storage is automatically deleted with every new measurement, i.e. every time the push button is pressed.
Saved measured value Parameter mode PAR Set emissivity Current block + numb. of blocks Date when measured values were recorded Storage cell parameters Arrow keys: EMI: MODE: Block: No.: Date / time: MEM CELL (Nr.): Add. measurement mode if any Measured value no. + number of values in the °C MODE Block MEM Time when measured values were recorded Storage slot of the measured value CELL The arrow keys can be used to display all the temperature values in a block one after the other.
5.8 Deleting measured value memory CLR Pressing the CLR push button (clear) activates delete mode for data storage (not possible during a storage process). Individual values, blocks or all stored values can be deleted: Delete individual value: Select NUM mode and press CLR to delete individual values. CLEAR CELL with a storage slot number appears in the display (at the bottom). The arrow keys can be used to select an individual value. "CONFIRM WITH ENTER" flashes in the display.
6 Software PortaWin Pyrometers are equipped with a digital USB interface that can be used to connect the pyrometer with a PC. Optional PortaWin software can be used to store measured values. Then the data can be accessed later and evaluated in graphical or table format (for connection cable and software see Chapter 9, Reference numbers). If the push button is activated up to the second trigger point, the current measured value is sent to the interface.
To ensure consistent document formatting, this page was intentionally left blank.
7 Maintenance 7.1 Cleaning the front window Since the device does not contain parts that require regular maintenance, the only regular maintenance required is periodic inspection of the front window for build-up of foreign particiles. If allowed to build up, the particles can influence the energy received by the instrument. The window is not water soluable and can be cleaned with standard lens tissue dampened with a commercially available glasses or camera lens cleaning solution.
To ensure consistent document formatting, this page was intentionally left blank.
8 Troubleshooting Before sending the pyrometer for repair, try to find the error and to solve the problem with the help of the following list. Temperature indication too low Incorrect alignment of the pyrometer to the object New correct alignment to achieve the max. temperature signal Measuring object is smaller than spot size Choose correct measuring distance Measuring object is not always in the measuring spot of the pyrometer (e.g. swinging wire or pouring stream) Use max.
9 Reference Numbers 9.1 Reference numbers instrument Pyrometer IS 8 pro IS 8-GS pro IGA 8 pro 9.2 Temperature Range Reference Number 600 ... 1800 °C (MB 18) 3 807 300 750 ... 2500 °C (MB 25) 3 807 310 1000 ... 2000 °C (MB 20) 3 807 380 250 ... 1600 °C (MB 16) 3 807 350 280 ...
Index A Adjustment buttons 17 Appropriate use 9 Average value display 20 AVG 20 B H HOLD function 13 I INT 20 Battery 13 L C Legend 5 Liability 6 Calibration 25 Cleaning the front window 25 Close-up lens 16 Close-up lens / protection window 16 Continuous measurement 14 Controls and Installation 13 D Deleting measured value memory 22 Diopter adaption 15 Display 17, 18 graphic 18 numeric 18 Display functions 17 Display in °C or °F 20 Disposal 7 E EMI Direct 20 Emissivity 19 Eye protection filter 5,
Service Request 6 Settings / parameter descriptions 19 Sighting 14 Single value storage 14 Software PortaWin 23 Special displays 17, 18 Spot size 15 Storage 11 Support 6 Switching on 13 T Technical Data 9 Temperature 20 Time and date 22 Time interval 20 Transport 11 Troubleshooting 27 U Unpacking the Instrument 6 USB interface 14 W Warranty 6 Series 8 pro Manual Index 32