
Instruction Manual

Section 4 – Basic Commands
Radiance 2020 rev 102214
11
Section 4 – Basic Commands
Power
Turn power on by pressing the ON button. Place the Radiance in standby-mode by pressing STBY.
Input Selection
The four video inputs are numbered 1 to 4. To select an input press the “Input” button and then press the
corresponding number button on the remote.
Shortcut:
If the menu is not displayed on the screen, inputs can be selected
by just pressing the corresponding number button on the remote.
If desired, the “Input” button can be programmed to display a screen with the inputs listed as a menu-table. Then
the desired input can be selected either with the number keys, or by using the arrow keys to highlight the desired
input and then pressing the OK button. The command to enable the input menu is:
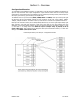
MENU →
→→
→ Other →
→→
→ Menu control→
→→
→ Menu Options →
→→
→ Input Menu →
→→
→ (Off, On)
Configuration Memory Selection
Each input has four configuration memories. These are referred to as memory “A,” “B,” “C,” and “D.” To select one
of these memories press MEMA, MEMB, MEMC, or MEMD, respectively. Note, RS232 codes are provided to
directly access these memories. Each input memory has eight input “sub-memories” that are automatically
selected based on the input resolution and 2D/3D input video format.
Each configuration memory, and sub-memory, is independent of the other memories. To allow the memories to be
used for mode selection (e.g. day/night), by default, the memory type remains unchanged when a new input is
selected. (i.e. If input 2 memory B is active, pressing “Input, 3” selects input 3 memory B).
Input Aspect Ratio Selection
The input source aspect ratio can be selected by pressing one of the 4:3, LBOX, 16:9, 1.85, or 2.35 buttons. To
use the NLS feature, press “4:3, NLS”, “16:9, NLS”, or “1.85, NLS”.
• Use 4:3 for standard definition full-screen material.
• Use LBOX for “letterbox” standard definition material, such as analog-television movies shown with black
bars above and below the image.
• Use 16:9 for material labeled as “Enhanced for 16:9 televisions”.
• Use 1.85 for material labeled as “Aspect ratio 1.85”.
• Use ‘Alt’ 1.85 for material labeled as “Aspect ratio 1.85 letterboxed in a 16:9 (1.78) window”.
• Use 2.35 for material labeled as “Aspect ratio 2.35”.
• Use ‘Alt’ 2.35 for material labeled as “Aspect ratio 2.40”
• Use NLS to apply a horizontal non-linear stretch, to stretch 4:3 to 16:9, or 16:9 or 1.85 to 2.35.
NOTE:
Make sure the “display aspect ratio” setting is 16:9 in the setup menu of all video
sources (e.g. DVD players or set top boxes), even if your display is not 16:9.
Image Zoom
After the input aspect ratio has been selected, the image can be zoomed in to better fit the screen. The zoom
function uses the
and
arrow buttons. When the menu is off, by default, the
arrow button zooms in and the
arrow button zooms out.