
User's Manual


4
Operating Your Humidifier
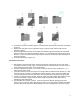
a. Plug the humidifier into the power supply. The unit will now be in standby mode. All other keys
will be invalid except for the power button.
b. Press the power button. The humidifier will detect the water level in the tank. After 2 seconds, if
there is sufficient water in the tank, it will begin to operate and the indicator light will turn on.
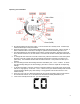
c. The default settings for the humidifier are as follows: medium mist setting, the timer function will
be off, the DC fan will be on, the unit will be in cool mist mode and the humidity level will be set to
70%.
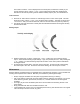
d. To change the mist mode from cool mist to warm mist, press the C/W button on the control panel.
Once the unit is set to warm mist, the C/W indicator light will turn from blue (cool mist) to red
(warm mist). The humidifier will then heat the water in the tank. This process can take up to 5
minutes.
e. The mist settings and the timer settings are both controlled by the “+” and “-“ buttons. To switch
from the humidity settings to the timer settings, press the “S” button to adjust the corresponding
settings.
f. To set the hygrometer, press the “S” button so that the numbers in the center of the control panel
with the “%” sign light up. Press the “+” and “-“ buttons to set your desired humidity level and wait
5 seconds before adjusting any other settings. The hygrometer can be set from 30% to 70%
relative humidity.
g. Once your room is at your desired humidity level, the unit will stop adding mist to the air and the
fan and atomizer will turn off. It will restart once the relative humidity decreases by 5%.
h. If the room’s humidity level is at 70%, you will see this image: